
Instructions / Assembly


4
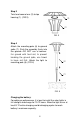
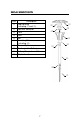
Step 3
Twist and secure lens (3) to top
housing (1). (FIG.3)
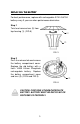
Step 4
Attach the mounting pole (6) to ground
spike (7). Push the assembly firmly into
the ground—DO NOT use a hammer.
For ground with hard soil, to prevent
breaking the ground spike, use trowel
to loose soil first. Attach the light to
mounting pole (6). (FIG.4)
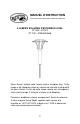
Charging the battery:
For optimum performance, it is best to install the solar lights in
full sunlight and charge for 10-12 hours. Allow the light to run at
least 8-12 entire charging and discharging cycles to reach
battery’s maximum capacity.
FIG.3
⑶
⑴
FIG.4
⑹
⑺