
Instructions / Assembly


6 208463-01
TEST 1 5 10 MIN
ON-TIME
LO - M - HI
SENSITIVITY
Junction
Box
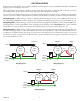
MOUNTING THE LIGHT FIXTURE
1. Make sure wire connectors and wires are inside the
junction box.
2. Slide the xture assembly onto the mounting screws.
Tighten decorative nuts removed in step 1 of
Light
Fixture Installation
section securely against xture base.
Mounting Screw
Decorative Nut
3. Install one medium base light bulb (60 Watt maximum,
tungsten incandescent).
TESTING AND ADJUSTMENTS
Initial Setup
e TEST mode overrides the photocell (daylight shuto
feature) and allows the light xture to be tested day or night
when the ON-TIME switch is in the TEST position. e
light will stay on for 5 seconds after all motion has stopped.
30 ft. (9.1 m)
6 ft. (1.8 m)
150°
5.
Move the sensor head left or right to change the coverage
area. Note: Grasp the sensor only as shown and turn
the entire sensor. Any other method may damage
the sensor. Do not force it past the stops.
1. Set the ON-TIME control to TEST.
2. Turn on the circuit breaker or fuse and the light switch.
3. Allow the sensor to completely warm up (90 seconds)
before beginning the setup process.
4. Perform a walk test. Walk in an arc across the front of
the sensor.
Sensor Controls
Maximum Range Maximum
Coverage Angle
(Top View)
Rotating Sensor Head to Change Coverage Area
1
5
0
°
1
5
0
°