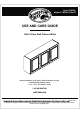
Item # 722990 Model # THD90070.6a.ST USE AND CARE GUIDE Elite 3-Door Wall Cabinet-White Questions, problems, missing parts? Before returning to the store, call Hampton Bay Customer Service 8 a.m. - 6 p.m., EST, Monday - Friday 1-855-HD-HAMPTON HAMPTONBAY.COM THANK YOU ually create quality products designed to enhance your home. Visit us online to see our full line of products available for your home improvement needs.
Table of Contents Table of Contents . . . . . . . . . . . . . . . . . . . . . . . . . . . . . . . . . . . 2 Safety Information . . . . . . . . . . . . . . . . . . . . . . . . . . . . . . . . . . 2 Warranty . . . . . . . . . . . . . . . . . . . . . . . . . . . . . . . . . . . . . . . . . . 2 Pre-Assembly . . . . . . . . . . . . . . . . . . . . . . . . . . . . . . . . . . . . . . 3 Planning Assembly . . . . . . . . . . . . . . . . . . . . . . . . . . . . . . . . . . . . . . 3 Tools Required . . . . . . . . .
Pre-Assembly PLANNING ASSEMBLY Compare all parts with the Hardware Included and Package Contents lists in this manual. If any part appears missing or damaged, do not assemble this product. Contact the Customer Service Team at 1-855-HD-HAMPTON or visit www.HamptonBay.com. TOOLS REQUIRED Flathead screwdriver Phillips screwdriver HARDWARE INCLUDED NOTE: Hardware not shown to actual size.
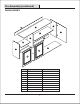
Pre-Assembly (continued) PACKAGE CONTENTS C A G I F G D E J B H H Part Description Quantity A Top 1 B Left Side Panel 1 C Right Side Panel Partition 1 1 F Short Adjustable Shelf Adjustable Shelf 1 G H I J Back panel Left Door Right Door Bottom 2 2 1 1 D E 1 4
Assembly 1 Preparing the top , bottom , partition and two cross bars □ Insert eight wood dowels (a) into the top (A) and bottom (J). □ Insert four wood dowels (a) into the partition (D). □ Insert eight wood dowels (a) into the two cross bars (G). a A J D G G 5 HAMPTONBAY.COM Please contact 1-855-HD-HAMPTON for further assistance.
Assembly (continued) 2 Assembly the top , bottom and partition □ Connect top (A) , bottom (J) and partition (D) , ensure that the wood dowels (c) are fully inserted into the appropriate holes. □ Using screwdriver to tighten four screws (b) , make sure the finished sides of the panel faces in towards the mantle. □ Cover the four screws (b) with cover caps (j).
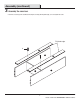
Assembly (continued) 3 Assembly the cross bars □ Fasten the cross bars (G) to the assembled unit using two screws (d) with the partition (D) , do not over tighten the screws. Finished edge d G J G A D 7 HAMPTONBAY.COM Please contact 1-855-HD-HAMPTON for further assistance.
Assembly (continued) 4 Fliping the framework □ Connect left side panel (B) and top (A) , bottom (J) and two cross bars (G) , ensure that the wood dowels (a) are fully inserted into the appropriate holes. □ Using screwdriver to tighten six screws (b) , make sure the finished side of the panel faces in towards the mantle. □ The same step to assembly the right side panel (C). □ Cover the twelve screws (b) with cover caps (j).
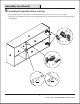
Assembly (continued) 5 Assembling the adjustable shelves and hinge □ Insert eight shelf supports (c) into the desired holes of the cabinets inside and places the shelves (E and F) on top of the supports. □ Through sixteen screws (g) with four hinges (h) to lock on the side panel (B and C) , the same assembling steps for the two bending hinges (i) lock to the partition (D). C A F g h D E J B i g c c 9 HAMPTONBAY.COM Please contact 1-855-HD-HAMPTON for further assistance.
Assembly (continued) 6 Assembling the door □ Through four screws (g) with the hinge (h) to lock on the right door (I) , the same assembling steps for the left doors (H). □ Through two bolts (e) connection knob (f) with the right door (I) , the same assembling steps for the other knobs (f).
Assembly (continued) To adjust the vertical height. Loosen the four screws "A" on both hinges. Two of them are usually in slotted holes which mean and you can adjust up or down by a few mm. Then tighten back up To adjust depth. Loosen screw "B" and adjust door, if the door can not be adjusted, please loosen screw "C", then try again. Tighten screw "B" and "C". To adjust side ways. Turning the screw "C" on BOTH hinges on each door. 11 HAMPTONBAY.
Assembly (continued) 7 Installing 3-door wall cabinets to the wood wall □ Drill 2/16" diameter holes (2.5mm) in the wood wall , height corresponding with the cross bars (G) holes ,through cross bars hole using four 3" screws (k) tightening the 3-door wall cabinet into the wood wall hole.
Assembly (continued) WEIGHT LIMITS □ This unit has been designed to support the maximum loads shown. Exceeding these load limits could cause sagging, instability, product collapse, and/or serious injury. WARNING: Please ensure that all the objects are removed before moving the assembled unit. The unit must be lifted by more than one person, not dragged or pushed. Failure to do so will cause product damage, instability, product collapse, and/or serious injury.
Questions, problems, missing parts? Before returning to the store, call Hampton Bay Customer Service 8 a.m.-6 p.m., EST, Monday-Friday 1-855-HD-HAMPTON HAMPTONBAY.COM Retain this manual for future use.