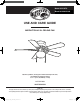
Model #121-079 Model #1000021980 Use and Care Guide Middleton 42 in. Ceiling Fan Questions, problems, missing parts? Before returning to the store, call Hampton Bay Customer Service 8 a.m. - 6 p.m., EST, Monday - Friday 1-877-527-0313 Hamptonbay.com THANK YOU We appreciate the trust and confidence you have placed in Hampton Bay through the purchase of this ceiling fan. We strive to continually create quality products designed to enhance your home.
Table of Contents Table of Contents. . . . . . . . . . . . . . . . . . . . . . . . . . . . . . . . . . . . . 2 Safety Information. . . . . . . . . . . . . . . . . . . . . . . . . . . . . . . . . . . . 2 Warranty . . . . . . . . . . . . . . . . . . . . . . . . . . . . . . . . . . . . . . . . . . . 3 Pre-Installation . . . . . . . . . . . . . . . . . . . . . . . . . . . . . . . . . . . . . . 4 Operation. . . . . . . . . . . . . . . . . . . . . . . . . . . . . . . . . . . . . . . . . . 10 Care and Cleaning. .
Warranty Limited WARRANTY WHAT IS COVERED The Hampton Bay warrants the fan motor to be free from defects in workmanship and material present at time of shipment from the factory for a period of lifetime after the date of purchase by the original purchaser.
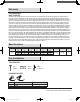
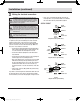
Pre-Installation (continued) Package Contents NOTE: Unpack your fan and check the contents. You should have the following items listed below A B D C E F G Part 121-079 THD_HamptonBay_UE42V-SHB_HD195.
Installation 1 2 Determining mounting method WARNING: To reduce the risk of fire, electric shock, or personal injury, mount to outlet box marked acceptable for fan support of 15.9 Kg (35 lbs) or less and use mounting screws provided with the outlet box. Installing the support bar NOTE: You may need a longer downrod to maintain proper blade clearance when installing on a steep, sloped ceiling. The maximum angle allowable is 18° away from horizontal.
Installation (continued) Making the electrical connections □□ If you choose to install another light kit, it must be a UL Listed light kit accessory marked suitable for use with this fan. Follow the instruction packed with the light kit. WARNING: To avoid possible electrical shock, be sure electricity is turned off at the main fuse box before wiring. If you are not sure the electrical box and fan are grounded, contact a licensed electrician for advice. They must be grounded for safe operation.
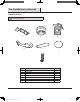
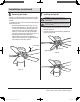
Installation (continued) 4 Finishing the installation 1 □□ Match the three holes at two ends of the supporting bar (A) with three screws of the hanger. Secure the fan assembly onto the supporting bar (A) using the preassembled screws (1) and washers (2) (Figure 9 and 10). A 2 □□ Fix the motor housing (B) onto the supporting bar (A) by tightening the four screws (3) preassembled to the motor housing (B) (Figure 11).
Installation (continued) 5 Attaching the fan blades NOTE: Your fan blades are reversible. Select the blade side finish which best accentuates your decor. Failure to follow above procedure could result in fan wobble. □□ Mount the blade holders (D) to the fan blades (E) using the screws (1) provided – 3 per blade (Figure 12). Please note the rubber washers are pre-attached to the blade holder (D).
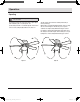
Installation (continued) 6 7 Balancing the blades All blades are grouped by weight. Because natural woods vary in density, the fan may wobble even though the blades are weight matched. Installing the light kit Warning: To reduce the risk of electric shock, disconnect the electrical supply circuit to the fan before installing light kit. The following procedure should correct most fan wobble. Check for wobble after each step. Caution: Do not use pliers or screwdrivers to tighten the thumb screws.
Operation Operating NOTE: Wait for the fan to stop before changing the setting of the slide switch. The pull chain controls the fan speed as follows: 1 pull – High, 2 pulls – Medium, 3 pulls – Low, and 4 pulls – Off. The slide switch controls direction: forward (switch down) or reverse (switch up).* Speed settings for warm or cool weather depend on factors such as the room size, ceiling height, number of fans, and so on.
Care and Cleaning Warning: Make sure the power is off at the electrical panel box before you attempt any repairs. Refer to the section Making Electrical Connections Section. Here are some suggestions to help you maintain your fan. □□ Because of the fan’s natural movement, some connections may become loose. Check the support connections, brackets, and blade attachments twice a year. Make sure they are secure. (It is not necessary to remove the fan from the ceiling.
Questions, problems, missing parts? Before returning to the store, call Hampton Bay Customer Service 8 a.m.-6 p.m., EST, Monday-Friday 1-877-527-0313 Hamptonbay.com Retain this manual for future use. THD_HamptonBay_UE42V-SHB_HD195.