
Instructions / Assembly


11
Installation
5
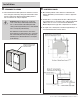
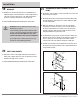
FRAME-TO-FRAME ATTACHMENT
HAMPTONBAY.COM
Please contact 1-855-HD-HAMPTON for further assistance.
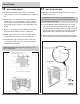
o On a 1/8" drill bit, set tape or drill depth gauge at 2-1/2".
o Before drilling face frames, recheck for level and that alignment
between face frames is exact.
o Drill a 1/8" pilot hole, 2-1/2" deep through the first face frame and
into the second face frame. Drill bit must be 2-1/2" or less to avoid
drilling completely through the second face frame.
o Drill a 7/32" clearance hole, 1-1/2" deep through the pilot hole in the
first face frame. To make screw driving easier, rub paraffin or bee’s
wax on the screws.
6
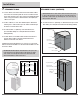
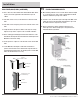
ATTACHMENT MINIMUM REQUIREMENTS
o All cabinet frames must be fastened to adjacent cabinet frame,
fillers, side wall, or ceiling.
Wall Double Faced Cabinet
Peninsula Wall Cabinet
Ceiling Joist
Use
#10 X 3-1/2"
Screws
to attach
cabinet
to ceiling.
Face Frame
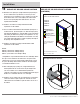
INSTALLER NOTE: If a cabinet is not bordered by cabinets on both
sides, the face frame must be supported by the countertop or screwed
into the soffit structure or ceiling joists using #10 x 3-1/2" Truss Head
Screws. Use these screws as follows.
• For cabinets 24" or less, use (4) screws, or (2) screws per frame.
• For cabinets 27" or more, use (6) screws or (3) screws per frame.
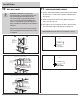
o Wall Cabinets up to 18" wide: Screw a top and bottom wall
attachment screw into one wall stud and the face frame to at least
one adjacent cabinet.
o Wall Cabinets 21" to 36" wide: Screw top and bottom wall
attachment screws into two wall studs and the face frame to at least
one adjacent cabinet.
o Wall Cabinets 42" wide: Screw top and bottom wall attachment
screws into three wall studs and the face frame to at least one
adjacent cabinet. If any three wall studs are not present, use wall
anchors or toggle bolts for the third position. You must attach to at
least two wall studs.
o End wall cabinets, where a wall stud falls more than 6" from the
exposed end of the cabinet, will require additional supports, such as
wall anchors or toggle bolts within 6" of the end of the cabinet.
WARNING: Failure to follow these guidelines could
result in a cabinet falling off the wall, possibly resulting in
serious injury, and will void the product warranty.
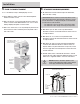
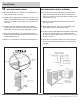
Shim cabinets so they align exactly with the Base Cabinet Top Level Line
(base cabinets) or Wall Cabinet Bottom Level Line (wall cabinets). Place
clamps just above drawer slide and just above bottom hinge. Clamp
cabinets together loosely.
Adjust so face frames align perfectly at the top and front edges.
• If you need to tap cabinets for alignment, use a block or rubber
mallet to avoid marring finish.
Tighten clamps.
WARNING! Tightening hang rails against a crooked wall without
shims may cause the joint between the hang rail and the rest of the
cabinet to break. This may result in the cabinet falling off the wall when loaded,
which may cause personal injury and/or damage to the cabinet that will not be
covered by the product warranty.
15Installation Guide
– Installation Requirements –
Shimming cabinets for level & plumb;
clamping
On a 1/8" drill bit, set tape or drill depth gauge at 2-1/2".
Before drilling face frames, recheck for level and that alignment
between face frames is exact.
Drill a 1/8" pilot hole, 2-1/2" deep through the first face frame and into
the second face frame. Drill bit must be 2-1.2" or less to avoid drilling
completely through the second face frame.
Drill a 7/32" clearance hole, 1-1/2" deep through the pilot hole in the
first face frame. To make screw driving easier, rub paraffin or bee’s
wax on the screws.
Frame-to-frame attachment