
Instructions / Assembly


12
Installation
7
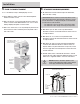
ATTACHMENT TO WALL
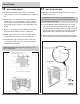
o On base cabinets, don’t attach cabinets to the wall until all cabinet
Face Frames are fastened together. Re-check each cabinet for level
front to back and side to side. Check each front for plumb. Add shims
if there is any space between cabinet and wall to avoid pulling the
cabinet out of square.
o For base cabinets, use a 1/8" bit to drill through the cabinet back
and hang rail, 1" down from the top of the cabinet. Predrill through
the shims to each wall stud location.
o To avoid ‘breakout’ or ‘splintering’ of the cabinet back, don’t
press hard while drilling. Use a sharp bit and let the bit do the
drilling gradually.
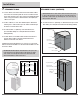
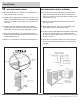
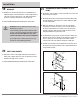
o For wall cabinets, use the Wall Outline and measure the distance
from the cabinet outline to the walls stud and transfer that
dimension to the back of the cabinet.
TIP: When transferring this dimension, use a spacer to account for the
difference between the width across the frame and the width across the
back of the cabinet.
INSTALLER NOTE: Verify this offset dimension for the spacer, since
it may vary based on the cabinet model. For wall cabinets, pre-drill a
7/32" clearance hole through the backrail of the cabinet at the wall
stud locations while the cabinet is on the floor.
Ledger Board
Transfer Measurement to
Back of Cabinet
Cabinet Wall Outline
Center on Stud
ATTACHMENT TO WALL (CONTINUED)
o To avoid “breakout” or “splintering” of cabinet back, don’t press hard
while drilling. Use a sharp bit and let the bit do the drilling gradually.
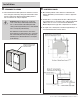
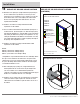
INSTALLER NOTE: For wall cabinets, drill 2" down from the top and
2" up from the bottom at the stud locations. For tall cabinets under 36"
wide, drill 2" down from the top and through the center of the hang rail
that is just above fixed shelf.
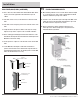
Top Hang Rail
1’’ Up
Measurement
Taken From Wall
Wall Stud
Location
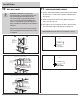
2” Up From Bottom
Bottom Hang Rail
Spacer
1”Up From Bottom
Measurement
Taken From Wall
Wall Stud
Location
Hang Rail
Spacer