
Instructions / Assembly


7
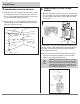
WARNING: DO NOT use nails or drywall screws to install base or wall cabinets. Use the recommended screws as shown in this guide.
Using nails or drywall screws may result in cabinets falling from the wall. Cabinets installed with nails or drywall screws will void the
product warranty.
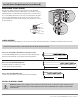
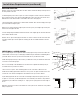
NOTICE: Install cabinets using the screws shown below. Screws must be purchased separately.
Installation Requirements (continued)
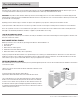
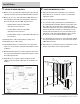
DOOR, DRAWER, & SHELF REMOVAL
Remove doors, drawers, and roll-out trays so they aren’t in the way during
installation. Removal also makes the cabinets lighter to move. Label each piece
with masking tape so you know where to reinstall each piece. Store them face to
face to avoid damage. Remove the screws on the door hinges where they attach
to the face frame. Pull drawers and roll-out trays out to the stop, lift the front,
then pull straight out. For shelves, push in the top of the shelf clip so you can lift
the shelf up and out.
Remove Screw
Door Hinge
Cabinet Face
Frame Plate
Remove Screw
Door Hinge
Cabinet Face
Frame Plate
SmallClip
Push
Shelf
2"
2-1/2"
3-1/2"
#10 x 2-1/2" Round Washer Head with No. 2 Square Recess Drive
(or Truss Head with Phillips Drive) screw for frame-to-frame attachment and
hang-rail-to-wall attachment. (Screws must be purchased separately.)
#10 x 3-1/2" Truss Head with Phillips Drive
for attaching cabinets to ceiling joists or a soffit.
(Screws must be purchased separately.)
#10 x 2" Truss Head with Phillips Drive
For Base Lazy Susan cabinets. (Screws must be purchased separately.)
NO NAILS OR DRYWALL SCREWS
HAMPTONBAY.COM
Please contact 1-855-HD-HAMPTON for further assistance.
SCREWS REQUIRED
The instructions in this booklet apply only to 16" on center wood stud construction. All other types of installation should be done by a professional.
2"
2-1/2"
3-1/2"
2"
2-1/2"
3-1/2"