
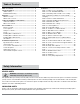
Instructions / Assembly


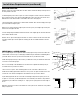

Pivot Holes
Shim as
Needed
T Brace
Inside Cabinet
Pilot Holes
10
Installation
3
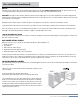
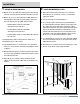
MOUNTING UNDER A SOFFIT OR LOW CEILING
o If wall cabinets are to be mounted directly under a soffit or ceiling,
you should find the low spot of the soffit or ceiling using the same
process as done for finding the high spot on the floor. Snap a level
line. This will be the Wall Cabinet Top Level Line.
o Measure down 30", 36" or 42" (the height of your wall cabinets) to
confirm the distance between the Wall Cabinet Bottom Level Line
and the Base Cabinet Top Level Line.
Soffit
TopofWallCabinet
LevelLine
LowestPointon
SoffitorCeiling
BaseCabinet
LevelLine
17-1/4”Min.
HighPointLevelMark
Bottomof
WallCabinets
LevelLine
84”Min.FromHigh
PointLevelMark
If wall cabinets are to be mounted directly under a soffit or
ceiling, you should find the low spot of the soffit or ceiling
using the same process as done for finding the high spot on
the floor. Snap a level line. This will be the Wall Cabinet Top
Level Line.
Measure down 30", 36" or 42" (the height of your wall
cabinets) to confirm the distance between the Wall Cabinet
Bottom Level Line and the Base Cabinet Top Level Line.
14Installation Guide
– Installation Requirements –
Mounting under a soffit or low ceiling
Adjust and shim cabinets so they are level side-to-side, and front-to-back.
Check plumb of the face frame and that it aligns perfectly with the
adjacent cabinet.
Shimming cabinets for level & plumb;
clamping
4
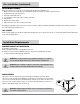
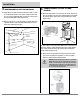
SHIMMING CABINETS FOR LEVEL & PLUMB;
CLAMPING
o Adjust and shim cabinets so they are level side-to-side, and front-to-
back. Check plumb of the face frame and that it aligns perfectly with
the adjacent cabinet. Shims may be required between the cabinet
and the ceiling.
o Shim cabinets so they align exactly with the Base Cabinet Top Level
Line (base cabinets) or Wall Cabinet Bottom Level Line (wall cabinets).
Place clamps just above drawer slide and just above bottom hinge.
Clamp cabinets together loosely.
o Adjust so Face Frames align perfectly at the top and front edges.
If you need to tap cabinets for alignment, use a block or rubber
mallet to avoid marring finish. Tighten clamps.
WARNING: Tightening hang rails against a crooked wall
without shims may cause the joint between the hang rail
and the rest of the cabinet to break. This may result in the
cabinet falling off the wall when loaded, which may cause
personal injury and/or damage to the cabinet that will not
be covered by the product warranty.
Shim cabinets so they align exactly with the Base Cabinet Top Level Line
(base cabinets) or Wall Cabinet Bottom Level Line (wall cabinets). Place
clamps just above drawer slide and just above bottom hinge. Clamp
cabinets together loosely.
Adjust so face frames align perfectly at the top and front edges.
• If you need to tap cabinets for alignment, use a block or rubber
mallet to avoid marring finish.
Tighten clamps.
WARNING! Tightening hang rails against a crooked wall without
shims may cause the joint between the hang rail and the rest of the
cabinet to break. This may result in the cabinet falling off the wall when loaded,
which may cause personal injury and/or damage to the cabinet that will not be
covered by the product warranty.
15Installation Guide
– Installation Requirements –
Shimming cabinets for level & plumb;
clamping
On a 1/8" drill bit, set tape or drill depth gauge at 2-1/2".
Before drilling face frames, recheck for level and that alignment
between face frames is exact.
Drill a 1/8" pilot hole, 2-1/2" deep through the first face frame and into
the second face frame. Drill bit must be 2-1.2" or less to avoid drilling
completely through the second face frame.
Drill a 7/32" clearance hole, 1-1/2" deep through the pilot hole in the
first face frame. To make screw driving easier, rub paraffin or bee’s
wax on the screws.
Frame-to-frame attachment