
Instructions / Assembly


13
Installation
8
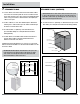
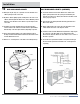
ATTACHMENT TO CEILING
HAMPTONBAY.COM
Please contact 1-855-HD-HAMPTON for further assistance.
o Follow the Attachment to Wall requirement to attach the face frame
to the ceiling joists; transferring ceiling joist and wall stud locations
to the face frame(s) and cabinet back and predrilling clearance
holes. Tack shims to the ceiling for alignment.
9
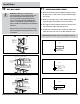
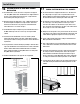
COUNTERTOP BRACES
o When installing cabinets or fillers that leave a void between the
wall and cabinet/filler, you must install a 1 x 3 Brace to support the
countertop.
o Install the Brace so it exactly matches the Base Cabinet Top Level
Line. Predrill the Brace as described for base cabinets in Attachment
to Wall section. Use 2-1/2" screws and follow the Attachment
Minimum Requirements, toggle bolts or drywall anchors elsewhere.
o The length of the Countertop Brace should leave approximately 1" on
each end between the Brace and the cabinet.
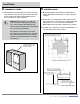
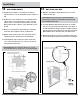
Transfer Framing or Joist
Locations and Drill 7/32”
Clearance Holes
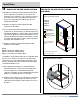
WARNING: Make sure that the 3-1/2" screws enter
1-1/2" of solid ceiling or soffit framing material. Failure
to do so could result in the cabinet falling off the wall,
causing possible injury and damage to the cabinet that will
not be covered by the product warranty.
Holes drilled in Face Frames must be no more than 2"
from vertical sides of cabinet. Failure to do so could result
in the cabinet falling off the wall, causing possible injury
and damage to the cabinet that will not be covered by the
product warranty.