
Instructions / Assembly


17
Installation
WALL FILLER; BASE, WALL (CONTINUED)
HAMPTONBAY.COM
Please contact 1-855-HD-HAMPTON for further assistance.
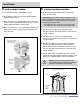
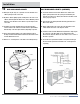
o Place, shim, level, and install the final cabinet. With the final cabinet
in place, measure the gap between the wall and the top of the
cabinet.
o If the wall contour is even, use this dimension to mark and cut the
Filler.
o If the wall contour is irregular, you’ll need to scribe the surface of the
Filler.
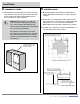
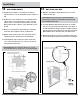
o Clamp the Filler to the adjacent cabinet so the edges are exactly
aligned. Set a protractor compass to the exact width of the filler.
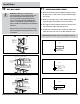
o Before scribing, put masking tape down the Filler where the scribe
mark will be. This tape will show the mark better and will protect the
Wall Filler surface when cutting.
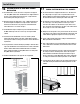
o Use the protractor compass to scribe the wall contour onto the Wall
Filler.
o Cut the Wall Filler, following the scribe mark. Put the Filler in
position. Fasten the Filler to the cabinet frame using the Frame-to-
Frame Attachment requirements. Use finishing nails to tack the Wall
Filler to the Backer Board, if necessary.
15
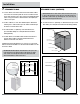
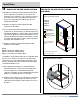
FILLERS FOR VARIOUS DEPTH
o When installing cabinets next to each other that are different depths
(i.e. 12” deep next to 24” deep), a Filler or Full Height Panel will be
required to maintain the spacing of the cabinets.
o If a Filler is used, cut the Filler equal to the height of the Wall or Base
cabinet Face Frame. The Filler width should match the space from
the cabinet side to the edge of the Face Frame.
o Before positioning the cabinets, attach the Filler to the Face
Frame edge of the cabinet already in place using the Frame-to-
Frame Attachment requirements.
Transfer
Width to Filler
Masking Tape
Filler Width
Transfer Wall Contour
to Filler Wall Strip
Compass
Backer Board