
Instructions / Assembly


21
Installation
HAMPTONBAY.COM
Please contact 1-855-HD-HAMPTON for further assistance.
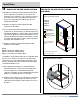
o Transfer measurements for the location of the electrical outlet onto
the back of the Wall Microwave Shelf. Cut the hole in the cabinet
back to accommodate the outlet box. If no outlet exists, check your
microwave oven manufacturer’s recommendation.
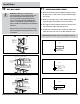
o Install the cabinet following the Installation Requirements. Once
the cabinet is mounted, slide the cabinet shelf (shipped not installed)
into the cabinet with the pilot holes facing down. Attach the shelf to
the cabinet using the (6) #8 x 1-1/4" screws with washers provided
with cabinet.
22
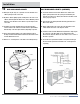
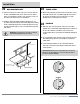
WALL MICROWAVE SHELF
Six (6) pilot holes
on bottom of shelf
Six (6) No. 6x 1-1/4”
Screws and Washers
(View from below)
WARNING: Use the washers to ensure the screw heads
will not pull through the bottom of the cabinet.
RIGHT
WRONG
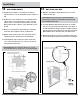
o Measure the length of the toekick area and cut the Toekick Cover to
that length. Clean the area of any debris. Apply glue to the back of
the Toekick Cover and place onto the toekick area. Use small
finishing nails to tack the Toekick Cover in place.
23
TOEKICK COVERS
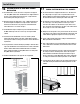
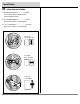
o Drill 11/64" holes from the front side of the door for decorative
hardware. It is recommended to apply masking tape on both sides of
the door stile and drawer assemblies in order to reduce tear
out when drilling. This is also beneficial for marking the drilling hole
location.
o It is recommended on Full Overlay door styles to keep the door ajar
when drilling through the stile so the drill bit does not strike the
cabinet frame.
o Countersinking the hardware screws to the proper depth will
prevent the screw heads from striking the cabinet frames during
normal operation.
24
HARDWARE
INSTALLER NOTE: Some door styles may have holes on the back
that were used in the finishing process. These should not be used as
pilot holes to mount the hardware.