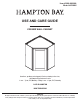
Item #1000 000 000 Model #XXXXX USE AND CARE GUIDE CORNER WALL CABINET Questions, problems, missing parts? Before returning to the store, call Hampton Bay Customer Service 8 a.m. - 7 p.m., EST, Monday – Friday, 9 a.m. – 6 p.m., EST, Saturday 1-855-HD-HAMPTON HAMPTONBAY.COM THANK YOU We appreciate the trust and confidence you have placed in Hampton Bay through the purchase of this wall cabinet. We strive to continually create quality products designed to enhance your home.
Table of Contents Safety Information. . . . . . . . . . . . . . . . . . . . . . . . . . . . . . . . . . . 2 Warranty. . . . . . . . . . . . . . . . . . . . . . . . . . . . . . . . . . . . . . . . . . . 2 Pre-Assembly. . . . . . . . . . . . . . . . . . . . . . . . . . . . . . . . . . . . . . . 3 Before You Begin. . . . . . . . . . . . . . . . . . . . . . . . . . . . . . . . . . . 3 Tools Required. . . . . . . . . . . . . . . . . . . . . . . . . . . . . . . . . . . . . 3 Hardware Included. . . . . . . . . . .
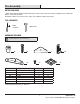
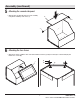
Pre-Assembly BEFORE YOU BEGIN Compare all parts with the Hardware Included and Package Contents sections. If any part is missing or damaged, do not assemble this product. Contact Customer Service. Assemble the cabinet on a soft surface such as carpet or the cardboard container of this product. TOOLS REQUIRED Phillips screwdriver Rubber mallet HARDWARE INCLUDED NOTE: Hardware not shown to actual size. AA BB CC EE FF DD GG Part Description Total Quantity Extras* AA Posts 13 1 BB #8 x 1 in.
Pre-Assembly (continued) PACKAGE CONTENTS A C B D E Part Description Quantity A Back Panels with Attached Shims 2 B Side Panels 2 C Face Frame 1 D Top and Bottom Panels 2 E Shelf 2* * 42 in. Tall pantries have 3 shelves.
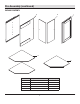
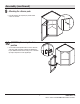
Assembly 1 Attaching the posts to the back panels AA BB □ Locate the two back panels with attached shims (A). □ Align four posts (AA) with corner-most predrilled holes on each panel (A) and secure with screws (BB). A AA BB 2 Attaching the posts to the side panels AA BB □ Locate the two side panels (B). □ Align two posts (AA) with predrilled holes closest to the grooved edge on each side panel (B) and secure with screws (BB). AA B BB 5 HAMPTONBAY.
Assembly (continued) 3 Connecting the back and side panels □ Lay a back panel (A) down with shims facing the floor. Align the other back panel (A) to create a 90-degree corner. □ Secure together using two corner locks (CC). Make sure the flat face of the corner locks (CC) faces out. □ Repeat these steps on the other side of the assembly with a side panel (B). A CC CC 4 B A A Attaching the top and bottom panels D □ Slide the top and bottom panels (D) into the grooves of the assembly.
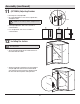
Assembly (continued) 5 Attaching the second side panel □ Align the other side panel (B) and secure to the assembly using the two remaining corner locks (CC). B CC CC 6 Attaching the face frame □ Align the face frame (C) with the sides of the cabinet. Attach face frame (C) using four 135-degree corner brackets (EE) and twelve 1/2 in. screws (FF). FF C EE FF 7 HAMPTONBAY.COM Please contact 1-855-HD-HAMPTON for further assistance.
Assembly (continued) 7 Securing the corner locks □ Insert a screw (BB) through the hole in each of the six corner locks (CC), and screw into the top/bottom panels. BB CC 8 Securing the panels in place □ Insert seven screws (BB) into the countersunk holes in the back (A) and side panels (B).
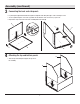
Assembly (continued) 9 Attaching the silicone pads □ Peel and stick two silicone pads (GG) onto the inside corners of each door. 10 GG (OPTIONAL) Reversing the door position □ You can remove and reposition the door to the other side of the face frame at any time using the pre-drilled holes. For pre-drilled holes that are not used, you can cover them up using a wax pencil or touch-up paint pen. 9 HAMPTONBAY.COM Please contact 1-855-HD-HAMPTON for further assistance.
Assembly (continued) 11 2 (OPTIONAL) Adjusting the door 1 □ Door hinges are 6-way adjustable. □ Up or down adjustment – Loosen screw 1, align the door, and tighten screw 1. 3 NOTE: It is critical that you do NOT overtighten screw 1. □ Left or right adjustment – Turn screw 2 clockwise or counterclockwise. 1 □ In or out adjustment – Turn screw 3 clockwise or counterclockwise. 2 3 12 Installing the shelves NOTE: Do not install shelves until the cabinet assembly has been fully installed.
Assembly (continued) 12 Installing the shelves (continued) □ Raise the shelf resting on the bottom and place shelf pins (DD) at the desired locations underneath it. Lower the shelf to snap over the shelf pins. E DD □ To remove the shelves, push the tabs (1) on the shelf pins (DD) and lift the shelf. DD 1 Care and Cleaning □ For normal spills, a damp cloth is sufficient. Dry the surface immediately. □ Doors can be cleaned with most general purpose household cleaners.
Questions, problems, missing parts? Before returning to the store, call Hampton Bay Customer Service 8 a.m. – 7 p.m., EST, Monday – Friday, 9 a.m. – 6 p.m., EST, Saturday 1-855-HD-HAMPTON HAMPTONBAY.COM Retain this manual for future use.