
Instructions / Assembly

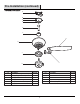

10
Assembly — Close-to-Ceiling Mounting
12
3
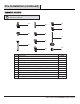
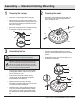
Assembling the fan
Preparing the motorPreparing the canopy
□ Remove three of the six collar mounting screws with
lock washers (FF) (every other one) from the collar on
top of the fan motor assembly (G).
WARNING: Failure to completely tighten the three collar
mounting screws (FF) could result in the fan becoming loose
and possibly falling.
C
B
G
FF
FF
G
D
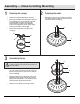
□ Make sure the slot openings of the canopy ring (B)
are on top, and then proceed to place the canopy ring
(B) and canopy (C) over the collar at the top of the fan
motor assembly (G).
□ Align the mounting holes in the bottom of the canopy
(C) with the holes in the top of the fan motor assem-
bly (G). Fasten using the three collar mounting screws
with lock washers (FF) previously removed.
□ Tighten the collar mounting screws (FF) securely.
A
BB
BB
C
B
□ Remove the canopy ring (B) from the canopy (C).
□ Remove the mounting bracket (A) from the canopy (C)
by loosening the four canopy mounting screw with
lock washer (BB) on the top of the canopy (C).
Remove the two non-slotted canopy mounting
bracket screws (BB) and loosen the slotted canopy
mounting screw with lock washer (BB).
□ Remove the canopy bottom cover (D) from the
canopy (C).