
Installation Instructions

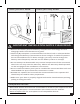


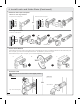

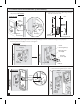

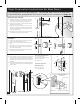
Table Of Contents

5½"
140mm
If installing the Array By Hampton
™
connected door lock on a new door,
follow the door preparation instructions and use the template on Page 10.
Door Preparation Instructions for New Doors
Mark Door with Template
a.
Mark the centerline for the deadbolt about 44"
(1120 mm) from the floor, or about 5-1/2" (140 mm)
abovethe center of an existing knob or lever.
b.
Apply the template to the door with the dotted
fold line on the door edge.
c.
Select the 2-3/8" (60 mm) or 2-3/4" (70 mm)
backset and mark the center for the hole for the
deadbolt on the door face. (Most residential doors
have a 2-3/8" backset.)
d.
Mark the center for the latch hole on the door edge
according to the thickness of your door.
a
c
d
44"
1120 mm
Drill Holes
a.
Drill a 2-1/8" (54 mm) hole on the door face from
both sides to avoid splitting wood.
b.
Drill a 1" (25.4 mm) hole in the door edge for the
latch.
c.
Insert latch into hole, mark outline of faceplate, and
chisel 1/8" (3 mm) deep or until the faceplate is
flush with the dooredge.
d.
Mark latch screw holes and drill two 1/8" (3 mm)
pilot holes for the Latch Screws.
a,b
1"
25.4 mm
c
2
1
8 "
54 mm
Prepare Door Jamb for Strike Plate
a.
Mark centerline on the door jamb exactly opposite
the latch hole in the door edge. Make sure that the
mark is correct so that the latch bolt will enter the
strike plate without intereference when the deadbolt
is locked.
b.
Usingthe strike plate asa pattern, drillthe latch and
screw holes, and chisel out a mortise until the strike
plate fits flush.
a.
b.
Door Jamb Hole Dimension
F
A.
1-3/16"(30 mm)
C
B.
1-9/16" (40 mm)
C.
1" (25 mm)
Strike Plate Dimension
B
E
D.
5/32" (4 mm)
E.
2-3/4" (70 mm)
F.
1-1/8"(28 mm)
A
D
3" Reinforcement
Screws (FF)
Strike plate
44"
1120 mm
Dust box
Reinforcement plate
DOOR JAMB
9
Door Jamb 3/4" Strike Screws (EE)
b