
Installation Instructions

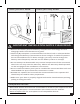


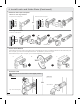

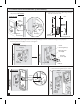

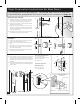
Table Of Contents

1. Charge Battery
Pre-Installation Instructions
a. Remove the Battery Cover (L), Rechargeable b. Carefully remove the Antenna
Battery (J), Battery Charging Cradle, USB Cable Cover (K) by gently pulling the
and Wall Adapter. Remove the plastic tab on the edges outward slightly and lifting.
Battery (J). Slide the Battery (J) into the Charging
Cradle from the side. Charge the Battery (J) until
the LED Light turns from red to green.
b.
Rechargeable
Pull edge slightly
Battery (J)
outward
a.
Slide
Antenna Cover (K)
LED Light
Battery
Charging
USB Cable
Cradle
Wall Adapter
The Array By Hampton
™
connected door lock is compatible with either iOS® or
Android
™
devices. Search for “Array By Hampton
™
Connected Door Lock” at the App
Store or Play Store to download the free app. Once the app is downloaded, register
your connected door lock and watch the installation video. Install your Array By
Hampton
™
connected door lock (Steps 3 – 5) and then follow the instructions to add
a lock or visit www.Array.care for additional support.
3. Prep the Door
• FITS DOORS 1-3/8" (35 mm) TO 1-3/4" (45 mm) THICK •
a.
If replacing an existing deadbolt. Remove the old hardware and begin at
STEP 4
.
b.
If installing the Array By Hampton
™
connected door lock on a new door, follow the door
preparation instructions on
PAGE 9
and use the template provided on
PAGE 10
.
4. Install Latch and Strike Plate
Install Strike Plate (N) in the Door Frame
Door Jamb
3" Reinforcement Screws (FF)
Strike plate (N)
Dust box (P)
Reinforcement plate (O)
3/4" Strike Screws (EE)
4
2. Watch the Installation Video