HandiTreads Wood Installation What you will need: ● ● ● ● Your Handi-Tread(s) Tread screws A power drill or a screwdriver A tape measure Types of Screws Handi-Treads recommends using screws at least ¾” long and 3/16” in diameter to fasten your treads to your stairs. Pan (a), button (b), round (c), and truss (d) screws work well. Avoid using flat (e) and oval (f) screws because their tapered heads will not sit flat on your tread.
*The face of the tread is the little bit that hangs over the edge of the stair Installation 1. Align your Handi-Tread in the desired stair position. If you are installing a tread, set it back roughly ½” from the edge. If you are installing a nosing, make sure it fits snugly at the edge of your stair. 2. Starting with the middle screw holes, drill your screws into the stair working your way out from the center.
Handi-Tread Concrete Installation What you will need: ● ● ● ● ● Your Handi-Tread Clear liquid silicone (OPTIONAL) 3/16” fastening screws 3/16” masonry drill bit A power or hammer drill - We recommend using a hammer drill but a power drill will do the job. Types of Screws Handi-Treads recommends using a concrete screw such as the industry standard TapCon. Ensure that each screw is at least ¾” long. Check the table below for the required number of screws for each tread.
Handi-Tread Concrete Stair Installation 1. Once you have acquired all of the necessary materials, align the tread in the desired position. If you are installing a nosing, make sure that it fits snugly at the edge of the stair. If you are installing a tread, set it back roughly ½” from the edge. Using a marker and the tread as a template, place a dot in each of the screw holes to mark the placement of the screws on the concrete surface.
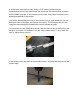
2. Remove the tread from the stair. Using a 3/16” masonry drill bit and your hammer/power drill at each marked spot, drill a hole into the concrete deep enough to accommodate the length of the concrete screw you are using. Make sure that you are drilling perpendicular to the surface. Use caution when drilling the holes. If the concrete is not in good condition or you are drilling too close to the edge, the concrete can fracture.
3. Make sure that the holes you have drilled are free of any concrete debris. OPTIONAL: Deposit a small amount of clear silicone into each drilled hole. As the screws are placed in their positions, the excess silicone will flow out of the hole leaving you with a watertight seal. This measure is taken to prevent any water from collecting within the screw hole, which might cause the concrete to fracture if it freezes and expands. 4.
Handi-Tread Concrete Installation What you will need: ● ● ● ● ● ● Your Handi-Tread Clear liquid silicone (OPTIONAL) 3/16” drive pin anchors 3/16” masonry drill bit A hammer A power or hammer drill - We recommend using a hammer drill but a power drill will do the job. Types of Fasteners Handi-Treads recommends using drive pins to fasten your treads to your stairs. Ensure that each drive pin is at least ¾” long. Check the table below for the required number of drive pins for each tread.
Handi-Tread Concrete Stair Installation 1. Once you have acquired all of the necessary materials, align the tread in the desired position. If you are installing a nosing, make sure that it fits snugly at the edge of the stair. If you are installing a tread, set it back roughly ½” from the edge. Using a marker and the tread as a template, place a dot in each of the pin holes to mark the placement of the drive pins on the concrete surface.
2. Remove the tread from the stair. Using a 3/16” masonry drill bit and your hammer/power drill at each marked spot, drill a hole into the concrete deep enough to accommodate the length of the concrete drive pin you are using. Make sure that you are drilling perpendicular to the surface. Use caution when drilling the holes. If the concrete is not in good condition or you are drilling too close to the edge, the concrete can fracture.
3. Make sure that the holes you have drilled are free of any concrete debris. OPTIONAL: Deposit a small amount of clear silicone into each drilled hole. As the pins are placed in their positions, the excess silicone will flow out of the hole leaving you with a watertight seal. This measure is taken to prevent any water from collecting within the pin hole, which might cause the concrete to fracture if it freezes and expands. 4.