
Use and Care Manual
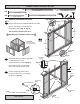

33
GABLE UNIT INSTALLATION
PARTS REQUIRED:
FINISH
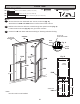
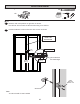
Your gable units are now installed
Repeat STEPS 1 - 4 for the opposite side.
x4
3" (7,6 cm)
AL
NAIL FIRST
2" (5,1 cm)
NAIL FIRST
2" (5,1 cm)
TOP PLATE
1-1/2"
(3,8 cm )
Measure and
Mark
1-1/2"
(3,8 cm )
Measure and
Mark
6"
(15,2 cm)
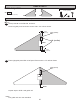
Fig. A
3" (7,6 cm)
Screws
1-1/2" (3,8 cm)
x76
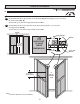
x2 Gable Units
BEGIN
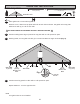
Place gable unit on front wall top plate.
2
4
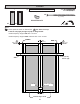
Continue nailing lower edge of panels into top plate with 2" nails spaced 6" apart.
Continue securing panels to rafter with 2" nails spaced 6" apart.
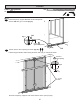
Working inside, secure gable unit with (2) 3" screws into AL at an angle as shown (Fig. A).
3
Measure 1-1/2" down from top plate and mark at each side as shown. Set gable unit on top plate.
Hold secure with (1) 2" nail on each side.
1
BE SURE GABLE IS CENTERED ON WALL BEFORE NAILING.