
Installation Guide


2
Safety! Always use approved safety glasses during assembly.
Optional5HTXLUHG
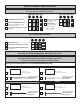
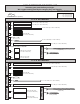
HELPFUL REMINDER SYMBOLS
Look for these symbols for helpful reminders throughout this manual.
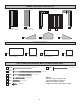
ORIENT LUMBER AND TRIM FOR BEST APPEARANCE
$VVLVWDQFH5HTXLUHGWZRRUPRUHSHRSOH
(QVXUHVTXDUHQHVV
,PSRUWDQWUHTXLUHGVWHSRURSHUDWLRQ
= Helpful assembly hint.
= Mark part with pencil.
= Beginning of steps for assembly or installation.
<RXKDYH¿QLVKHGWKHDVVHPEO\RULQVWDOODWLRQ
= Level
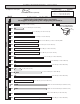
❑ Gloves
Framing lumber is graded for structural strength and not appearance. Exterior trim is graded for one good side.
Always install the material leaving the best edge and best surface visible. Please remember that these blemishes in no way
negatively affect the strength or integrity of our product. (See Fig. A, B, C.)
A
❑ Safety Glasses
❑ Tape Measure
❑ Paint Tools
❑ Ladder
❑ Caulk Gun
❑ Hammer
❑ Level
FINISH
BEGIN
❑ Pencil
❑ Phillips
Screwdriver
❑'ULOO'ULYHU
❑'ULOO%LW
❑ #2 Philips Drive Bit
❑7RRO%HOW
Nail Pouch
❑ Chalk Line
❑ Nail Gun
JXQQDLOV
❑ Tin Snips
(for drip edge)
❑6TXDUH
or
❑ Utility Knife
❑ Shingle Blades
B C
❑ Sawsall
TOOLS