
Installation Guide


17
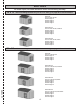
x40
2" (5,1 cm)
PARTS REQUIRED:
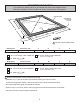
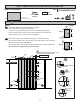
Place a 48" X 84" panel on the wall frame, as shown.
Locate the panel 1-1/2" above the top plate.
Use a 2 x 3 as a gauge block for the 1-1/2" top overhang measurement.
Use the gauge block to mark the 3/4" side measurement on the wall stud.
Secure panel with (2) 2" nails in the corners (Fig. A).
2
Secure panel with 2" nails spaced 6" apart on edges and 12" apart inside panel.
Note the panel lip-edge/square edge orientation.
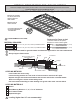
EXAMPLE WALL
Ensure your wall is square by installing one panel and squaring frame.
Move to the opposite end. Using the long edge of the panel as a lever,
move the panel side-to-side until you have a 3/4" measurement on the wall stud.
Secure corner with (2) 2" nails (Fig. B).
3/4" Gauge
Block
x1
3/8 x 48 x 84"
(1 x 121,9 x 213,4 cm )
For squareness maintain 3/4" and 1-1/2"
measurement along panel edge.
BEGIN HERE
3/4"
(1,9 cm)
6" (15,2 cm)
12" (30,5 cm)
2x3"
TEMP. SPACER
3/4" GAUGE
BLOCK
GAA
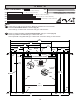
WALL PANEL INSTALLATION HINTS & EXAMPLES
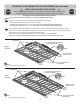
BEGIN
1
Angle nail to draw panels
tight at seams.
Install all wall panels with the primed side facing up.
2x3
1-1/2"
(3,8 cm)
3/4"
(1,9 cm)
LIP EDGE
SQUARE
EDGE
Do not nail
in groove.
3/4"
(1,9 cm)
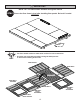
Fig. A
3/4"
(1,9 cm)
2 Nails
1-1/2" (3,8 cm)
Overlap
Fig. B
3/4"
(1,9 cm)
1-1/2" (3,8 cm)
Overlap
2 Nails
Install 2nd panel
ush to
installed panel.
HINTS