
Installation Guide


25
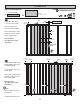
BEGIN HERE
3/4"
(1,9 cm)
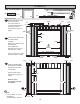
PARTS REQUIRED:
10' WALL 04
2" (5,1 cm)
x106
6" (15,2 cm)
12"
(30,5 cm)
3-1/2"
(8,9 cm)
3/4"
Gauge Block
1-1/2"
(3,8 cm)
SQUARE
EDGE
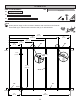
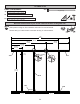
Your 10' WALL 04 is now assembled.
Carefully ip the wall over.
FINISH
Install 48" x 84" panel
1-1/2" from the top plate.
Use a 2x3 spacer for
consistent measurement.
Secure panel with 2" nails
spaced 6" apart on edges
and 12" inside panel.
Note the panel
lip-edge/square edge
orientation.
2
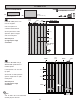
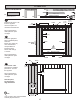
Install next 48" x 84" and
(1) 23-7/8" panel ush to
installed panels.
Locate panels 1-1/2" from
the top plate.
Secure with 2" nails spaced
6" apart on edges and 12"
apart inside panel.
Note the panel
lip-edge/square edge
orientation.
3
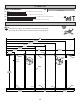
48 x 84"
(121,9 x 213,4 cm )
x2
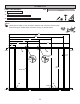
2x3
2x3
3-1/2"
(8,9 cm)
6" (15,2 cm)
12"
(30,5 cm)
1-1/2"
(3,8 cm)
Flush Flush
Flush
Flush
SQUARE
EDGE
SQUARE
EDGE
23-7/8" x 84"
(60,6 x 213,4 cm )
x1
23-7/8"
(60,6 cm)