
Installation Guide


26
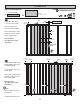
20-1/2"
34-1/4"
44-1/2"
68-1/2"
92-7/16"
102-3/4"
113"
78-1/2"
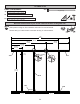
(199,4 cm)
44-1/2" 68-1/2"
(113 cm) (1747 cm)
44-1/2"
(52,1 cm)
(87,0 cm)
(113 cm)
(174 cm)
(234,8 cm)
(261 cm)
(287 cm)
(113 cm)
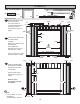
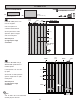
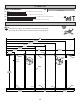
PARTS REQUIRED:
10' WALL 05
3" (7,6 cm)
x60
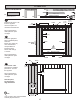
Fig. B
3" (7,6 cm)
Screws
Pre-Assembled Header
Install Header in
this position
Fig. A
2
1
BEGIN
3" (7,6 cm)
x6
x1
Pre Assembled Header
x5
2 x 4 x 7" (5,1 x 10,2 x 17,8 cm)
AL
x2
2 x 4 x 68" (5,1 x 10,2 x 172,7 cm)
UM
x2
2 x 4 x 68-1/2" (5,1 x 10,2 x 174 cm)
YFA
x3
2 x 4 x 78-1/2" (5,1 x 10,2 x 199,4 cm)
AI
STL
UM UM
STLYFA
TJ
AI x3
AL x5
Seam
3" (7,6 cm)
Screws
x2
2 x 4 x 44-1/2" (5,1 x 10,2 x 113 cm)
STL
Orient parts on edge on oor as shown. Measure and mark from end of boards.
Orient Pre Assembled Header as shown (Fig. A).
Secure with (2) 3" nails at each connection and (4) 3" nails at seams.
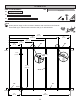
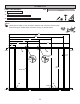
Fasten (3) middle parts AL to Pre Assembled Header with (2) 3" screws (Fig. B).
Fasten (2) end AL to studs AI with (4) 3" nails at each side.
Secure parts AL to top plates with (2) 3" nails at each connection and (4) 3" nails at seam.
Flush
Flush
Flush
Seam