
Installation Guide

35
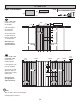
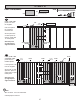
PARTS REQUIRED:
14' WALL 09
2" (5,1 cm)
x150
x1 x1
3" (7,6 cm)
x2
x1
69" (75,3 cm) Door Stiffener
OO Temporary Brace
1-1/2"
(3,8 cm)
3-1/2"
(8,9 cm)
3-1/2"
(8,9 cm)
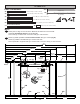
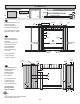
Install the left panel
1-1/2" from the top plate.
Use a 2x3 spacer
for consistent
measurement.
Secure panel with 2"
nails spaced 6" apart
on edges.
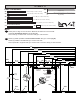
Install the right panel
ush to installed panel,
as shown.
Ensure 64" (162,8 cm)
door measurement.
Use part OO as a
temporary brace.
Secure with with (2)
3" screws.
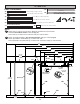
Secure panel with 2" nails
spaced 6" apart on edges.
2x3
6" (15,2 cm)
Flush Flush
OO Temporary Brace
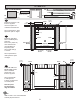
4
3
64"
(162,6 cm)
3" (7,6 cm)
Screw
3" (7,6 cm)
Screw
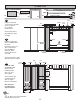
Install 48" x 84"
and 23-7/8" x 84"
panels ush to
installed panels
and 1-1/2" from
the top plate.
Secure panels with
2" nails spaced 6"
apart on edges
and 12" inside panel.
Note the panel
lip-edge/square
edge orientation.
Flush Flush
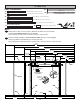
5
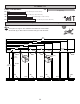
Your 14' WALL 09 is now assembled.
Carefully ip the wall over.
FINISH
BEGIN HERE
3/4"
(1,9 cm)
1-1/2"
(3,8 cm)
6" (15,2 cm)
3/4" Gauge
Block
SQUARE
EDGE
SQUARE
EDGE
Flush Flush
12"
(30,5 cm)
2x3
Flush
48 x 84" (121,9 x 213,4 cm )
x1
23-7/8" x 84"
(60,6 x 213,4 cm )
x1
23-7/8"
(60,6 cm)