
Installation Guide


46
10' EAVE WALL INSTALLATION
3" (7,6 cm)
x1
3" (7,6 cm)
x10
2
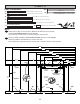
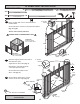
BEGIN
Place 10' eave wall centered on oor.
1-1/2" (3,8 cm) overlap is to the top.
Secure wall with (1) 2" screw into 10' wall
bottom plate (Fig. A) and top plate (Fig. B).
Secure wall to bottom plate rst.
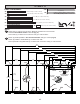
1
Nail lower edge of panels to oor with 2" nails
spaced 6" apart.
Angle nails into oor frame (Fig. C).
Nail panel to 10' wall stud with 1-1/2" nails
spaced 6" apart.
ENSURE PANEL CORNERS ARE FLUSH.
Your 1st 10' eave wall is now installed.
FINISH
2" (5,1 cm)
x23
1-1/2" (3,8 cm)
x13
2" (5,1 cm)
x2
PARTS REQUIRED
2" (5,1 cm)
Nails
1-1/2" (3,8 cm)
Nails
Flush
6" (15,2 cm)
6"
(15,2 cm)
2" (5,1 cm)
Screw
Fig. B
2" (5,1 cm)
Screw
Fig. A
Nail 2" nails rst.
2" (5,1 cm)
Nails
3" (7,6 cm)
Nails
Fig. C
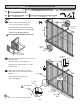
Secure wall top plate with (1) 3" screw
angled at the corner at an angle as shown
(Fig. D).
3
3" (7,6 cm)
Screw
Fig. D
3" (7,6 cm)
Nails
OPTIONAL:
DOOR LOCATED
ON 10' EAVE WALL
Secure wall bottom plates to oor
with 3" nails (Fig. C).