
Installation Guide

49
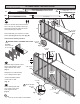
20-3/8" 92-5/8"
24"
96"
20 3/8"92-5/8"
24"
96"
(51,8 cm) (235,3 cm)
(61 cm)
(243,8 cm)
(51,8 cm)(235,3 cm)
(61 cm)
(243,8 cm)
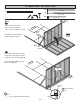
GO TO PAGE 61 TO CONTINUE
BUILDING YOUR SHED.
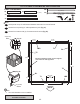
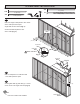
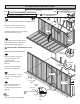
10' x 10' WALL DOUBLERS INSTALLATION
3" (7,6 cm)
x56
3" (7,6 cm)
x8
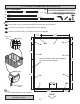
PARTS REQUIRED:
1
BEGIN
2
3
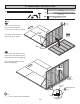
Orient parts on top of wall frames. Measure and mark from end of boards.
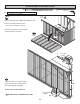
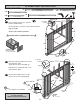
Secure from bottom with (2) 3" screws at each corner (Fig. B).
Your wall doublers are now installed.
FINISH
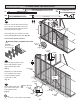
Fig. A
Secure from top with (2) 3" nails spaced every 24" (Fig. A).
x2
2 x 4 x 92-5/8" (5,1 x 10,2 x 235 cm)
TJ
x2
2 x 4 x 96" (5,1 x 10,2 x 243,8 cm)
TP
DOOR
Ensure all doubler seams are non-aligned
over seams of wall top plates.
JBD
TJ
TJ
TP
TP
RL
RL
Fig. B
3" (7,6 cm)
Nails
3" (7,6 cm)
Screws
JBD
2 x 4 x 24" (5,1 x 10,2 x 61 cm)
x2 RL
2 x 4 x 20-3/8" (5,1 x 10,2 x 51,8 cm)
x2 JBD
Nail TYP.
24"
(61 cm)