
Installation Guide

58
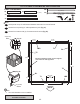
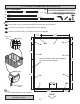
PARTS REQUIRED:
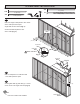
18' EAVE WALL INSTALLATION
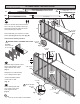
Secure wall with (1) 2" screw through
gable wall panel into 10' wall bottom
and top plates (Fig. A, Fig. B).
Secure wall to bottom plate rst.
ENSURE PANEL CORNERS ARE FLUSH.
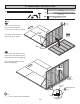
BEGIN
1
2
2" (5,1 cm)
x2
Flush
2" (5,1 cm)
Screw
Fig. B
2" (5,1 cm)
Screw
Fig. A
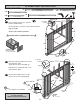
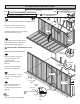
Remove temporary brace OO from installed 10' wall.
Place 2nd 18' wall centered on oor.
1-1/2" (3,8 cm) overlap is to the top.
Use TJ as a temporary brace as shown.
Secure TJ with (2) 3" screws.
TJ
3" (7,6 cm)
Screws
3" (7,6 cm)
x3
x1
2 x 4 x 92-5/8" (5,1 x 10,2 x 235 cm)
TJ
Temporary Brace
1-1/2"
(3,8 cm)
3" (7,6 cm)
x18
2" (5,1 cm)
x41
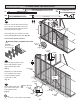
Nail 2" nails rst.
2" (5,1 cm)
Nails
Fig. C
3" (7,6 cm)
Nails
4
Nail 18' wall panel to 10' wall
stud with 1-1/2" nails spaced
6" apart.
Your 2nd 18' wall is now installed.
FINISH
3" (7,6 cm)
Nails
1-1/2" (3,8 cm)
x13
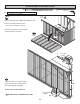
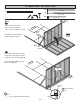
Secure gable wall top plate
with (1) 3" screw at the
corner at an angle as shown
(Fig. D).
5
3
Nail lower edge of wall panels
to oor frame with 2" nails
spaced 6" apart.
Angle nails into oor frame
(Fig. C).
Secure wall bottom plates to
oor with 3" nails (Fig. C).
2" (5,1 cm)
Nails
6"
(15,2 cm)
3" (7,6 cm)
Screw
Fig. D
6"
(15,2 cm)
1-1/2" (3,8 cm)
Nails