
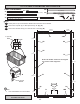
Installation Guide


59
10' GABLE WALL INSTALLATION
3" (7,6 cm)
x2
3" (7,6 cm)
x8
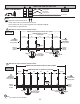
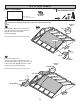
2
Place 10' gable wall on oor centered
between installed walls.
Secure wall with 2" screws into top and bottom plates
(Fig. A, Fig. B).
Secure wall to bottom plate rst.
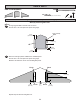
BEGIN
1
Nail lower edge of panels to oor with 2"
nails spaced 6" apart.
Angle nails into oor frame (Fig. C).
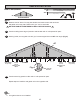
Nail panels to 10' wall studs with 1-1/2"
nails spaced 6" apart.
ENSURE PANEL CORNERS ARE FLUSH.
Your walls are now installed.
FINISH
CUT OUT AND REMOVE BOTTOM PLATE
AT DOOR OPENING.
REMOVE TEMPORARY BRACING.
2" (5,1 cm)
x10
1-1/2" (3,8 cm)
x26
2" (5,1 cm)
x4
PARTS REQUIRED
6"
(15,2 cm)
Secure wall top plates with 3" screws
at each corner at an angle (Fig. D).
3
STANDARD:
DOOR LOCATED
ON 10' GABLE WALL
2" (5,1 cm)
Screw
Flush
Flush
Fig. A
Fig. B
2" (5,1 cm)
Nails
1-1/2"
(3,8 cm)
Nails
6"
(15,2 cm)
3" (7,6 cm)
Screw
Fig. D
3" (7,6 cm)
Nails
Nail 2" nails rst.
2" (5,1 cm)
Nails
Fig. C
3" (7,6 cm)
Nails
2" (5,1 cm)
Screw