
Installation Guide

75
7/16 x 23-7/8 x 47-7/8"
(1,1 x 60,6 x 121,6 cm)
x1
3/4"
(1,9 cm)
Gauge Block
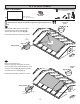
Fig. A
23-7/8"
x 48"
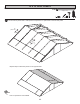
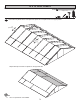
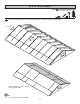
PARTS REQUIRED:
10' x 18' ROOF PANELS
x12
2" (5,1 cm)
7/16 x 48-7/8 x 48"
(1,1 x 121,6 x 121,9 cm)
x2
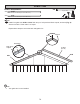
Move Gable
Move Gable
47-7/8"
x 48"
47-7/8"
x 48"
1/2"
(1,2 cm)
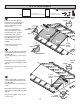
Gable
End Rafter
Fig. C
1/2"
(1,2 cm)
Gable
End Rafter
Fig. C
Flush
Flush
Flush
Flush at
peak
Fig. B
Flush at
peak
Fig. B
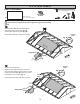
Install rst 47-7/8" x 48" roof
panel ush to the installed panel
and ush at the peak (Fig. B).
Secure panel with (1) 2" nail
in each corner.
Move to the opposite end.
Using the unattached end of
the panel as a lever, move the
panel side-to-side until the
top corner is ush to the peak
(Fig. B) and there is a 3/4"
measurement on the rafter
(Fig A).
Finish securing panel with (1)
2" nail in each corner.
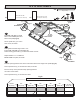
Install next 48" x 48" roof panel ush
to the installed panel and ush at the
peak (Fig. B).
Secure panel with (1) 2" nail in each
corner.
Move gable end rafter edge until it is
1/2" from the 2nd 48" x 48" roof panel
(Fig. C).
Finish securing panel with (1) 2" nail
in each corner.
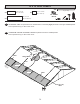
Install 27-7/8" x 48" roof panel ush
to the installed panel and ush at the
peak (Fig. B).
Secure panel with (1) 2" nail in each
corner.
Move gable end rafter edge until it is
1/2" from the 2nd 48" x 48" roof panel
(Fig. C).
Finish securing panel with (1) 2" nail
in each corner.
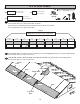
3
5
4
2" nail
in each
corner
2" nail
in each
corner