
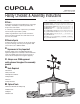
Installation & Assembly

3
1" Screws
BP
J
E
G
Panel siding
down
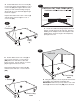
KEY HOLE
SAW
BB
BB
D
E
1-1/2"
Finish
nails
2" Finish
Nails
AC
AC
BB
BB
AC
AC
A
A
D
C
G
F
E. Mark Template and cut out with a Key Hole Saw
or a Sabre Saw as shown in step E. Be sure Corner
Trim (BB) is flush to bottom of Panel where it is to be
cut. Cut out other 11-3/4” x 20” Panel with Corner
Trim (BB) attached in the same manner.
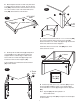
F. Stand up the two Side Panels (A) and position
cut Panel (D) on top of Side Panels and Corner
Supports flush to outside edges of Side Panels.
Secure with six 2” finish nails (C) through Front
Panel into Interior Corner Supports (AC).
Turn assembly over and install second cut Panel
(D) in same fashion.
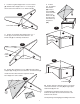
G. Position un-cut Corner Trim 3/4” x 1-1/2” x 10-1/2” (BB)
over corner of Panels flush to front of Corner Trim (E).
Secure with three 1-1/2” Finish nails (C) through Corner Trim
into Panels and Interior Corner Supports.
Install other three un-cut Corner Trim (BB) pieces in the
same fashion at corners.
H
H. Position Top Trim 3/4” x 1-1/2” x 20-3/4” (BP) on top of
Corner Trim (E) and (G) as shown. From inside Cupola,
secure with three 1” screws (J) through Panel into Top Trim
(BP).
Note: Top Trim (BP) will stick up about 1/4”
above Side Panels.
Install other three Top Trim (BP) in sequence around Cupola
in same fashion.
Top view of
Trim (BP)