
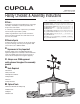
Installation & Assembly

4
1-1/2" Finish nails
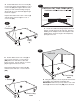
Flush
at bottom
L
K
C
I. Position Long Roof Support 3/4” x 5-1/4” x 23-3/4”
(K) and Short Roof Support 3/4” x 5” x 11-5/8” (L) as
shown and connect with two 1-1/2” Finish nails (C).
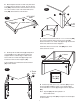
1-1/2"
Finish
nails
Flush at bottom
L
K
C
I
J
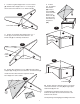
1-1/2"
Finish
nails
L
K
M
C
J. Position second Short Roof Support 3/4” x 5” x
11-5/8” (L) as shown and connect with two 1-1/2”
Finish nails (C) toe-nailed top and bottom.
K. Position Roof Panel12” x 21-1/2” (M) centered on Roof
Supports (K) and (L) and secure with six 1-1/2” Finish nails (C).
Install other three Roof Panels in sequence around
Roof Supports in same fashion.
K
L. Position
four assembled
Roof Panels
(M) on top of
Top Trim (BP)
and secure with
twelve 1-1/2”
Finish nails (C)
through Panels
into all four Top
Trim pieces
(BP).
1-1/2"
Finish nails
M
BP
C
L
M. Position Cupola in desired location on roof peak
and secure with four 3” screws (N) through Cupola
Side Panels (A) into roof.
Caulk between all Cupola Panels and roof- and
between all Cupola Corner Trim and Panels- and
between trim and roof.
Finish painting and shingling per building instructions.
3" Screws
A
N
M