
User Manual


10
Parts Needed
• Assembled wing
• Servos (JRPS537 or equivalent) (2)
• Servo extensions (6" recommended) (2)
• Y-harness (if using a non-computer radio)
• String and a weight to run servo extensions through the wing
Tools and Adhesives Needed
• Hobby knife
• Phillips screwdriver
• Drill
• Drill Bit: 1/16"
• Masking tape
• Electrical tape
• Felt-tipped pen or pencil
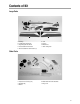
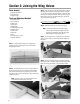
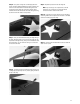
Step 1. Locate the servo opening in one of the wing halves.
Install the recommended servo hardware supplied with your
radio system onto your servos (grommets and eyelets). Install
a 6" servo extension lead to the servo as well. Secure the
connectors by tying a knot in the leads and wrapping with
electrical tape. This will prevent the connectors from becoming
accidentally disconnected inside the wing.
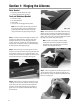
Step 2. Trial fit the servo into the servo opening. Some trim-
ming may be required, depending on the type of servo installed.
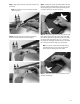
Step 3. With the servo in place, mark the location of the servo
screws used to mount the servo to the plywood servo rail inside
the wing servo opening.
Step 4. Using a 1/16"drill bit, drill the servo screw locations
marked in the previous step.
Step 5. Before mounting the servo, it would be wise to run the
servo lead and extension through the wing and out the opening
provided near the wing center. The servo lead exits are located
on the top of the wing. Turn the wing over and look for two
round openings near the center of the wing close to the wing
center. You will have to trim away the covering to expose the
opening. Use a sharp hobby knife to cut away the covering over
the opening. Do the same for the other wing half.
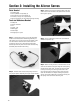
Section 3: Installing the Aileron Servos