
Ultra Stick 10cc Sport Airplane Manual


15 EN
Ultra Stick
™
10cc
35.
36.
37.
38.
39.
30.
5/8 inch
(16mm)
31.
32.
33.
34.
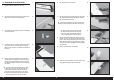
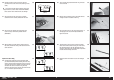
30. Enlarge the hole in the servo arm that is 5/8-inch
(16mm) from the center of the servo. (Drawing is not to
scale).
The servo arm length listed is suited for sport flying.
Longer servo arms, such as those included with DUB671,
can be used for more extreme throws and 3D flight.
31. Secure the servo to the cover using a #1 Phillips
screwdriver and the screws provided with the servo.
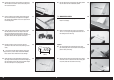
32. Secure an 9-inch (230mm) servo extension to the
tip servo using a commercially available retainer
(SPMA3054).
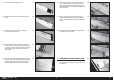
33. When building your model with four wing servos (two
fl ap servos, two aileron servos), make sure to orient the
servos as shown.
Optional Two-Servo Wing
34. An optional set of ailerons can be purchased to build
your model without fl aps. When building the aileron-only
version, swap the aileron and fl ap servo covers in the left
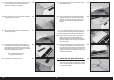
wing panel. Use the inner positions for the aileron servos,
and secure the outer servo covers using the steps
outlined in this section of the manual. This allows the use
of a “Y” harness to operate the ailerons.
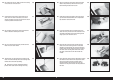
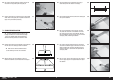
35. Tie or tape the string located inside the wing to the end
of the servo lead.
36. Retrieve the servo lead at the wing root. Guide the lead
through the hole in the bottom of the wing.
37. Secure the aileron cover in the wing using four M3 x 10
self-tapping screws. Use a #2 Phillips screwdriver to
tighten the screws.
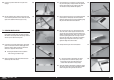
38. Thread an M3 nut on one end of the 100mm pushrod.
Slide a clevis retainer (silicone tubing) on a metal clevis,
then thread the clevis on the rod. Repeat so there are
clevises on both ends of the pushrod. Make the pushrods
for both ailerons and fl aps at this time.
39. Attach the clevis to the hole of the servo arm enlarged
earlier.