
User Manual


16EN
4.
1.
2.
3.
4.
5.
6.
7.
8.
9.
4. Place the wing bolt plate on the wing, then thread the
1/4-20 x 13/4-inch nylon wing bolts into the blind nuts in
the fuselage to secure the wing.
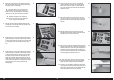
STABILIZER INSTALLATION
Î Check the stabilizer mounting surface on the
fuselage to make sure it is flush with the fuselage
sides. If the fuselage sides protrude beyond the
stabilizer mounting surface, then sand them flush.
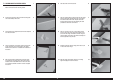
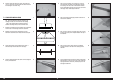
1. Remove the elevators from the stabilizer. Fit the stabilizer
into the notch in the fuselage. Center the stabilizer.
2. Measure from the tip of the stabilizer to the wing.
Position the stabilizer so both measurements are equal.
3. Check the alignment of the stabilizer to the wing. It
should be equal on both sides of the fuselage.
4. Check all alignments. Mark the outline of the fuselage on
the top of the stabilizer.
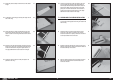
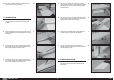
5. Use a ruler and carefully cut the covering 1/8 inch (3
mm) inside the line drawn on the stabilizer to remove
the covering from the center of the stabilizer. Remove
the top and bottom covering. Use care not to cut into the
underlying wood, weakening the stabilizer.
6. Use a paper towel and isopropyl alcohol to remove the
lines from the stabilizer.
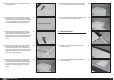
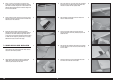
7. Mix 1/2 ounce (15ml) of 30-minute epoxy. Use an epoxy
brush to apply epoxy to the exposed wood on the top of
the stabilizer.
8. Use an epoxy brush to apply epoxy to the stabilizer
mounting surface in the notch in the fuselage for the
stabilizer.
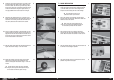
9. Fit the stabilizer back into position. Check the alignment
following steps 1 through 3, then use a paper towel and
isopropyl alcohol to remove any excess epoxy from the
fuselage and stabilizer.