
User manual
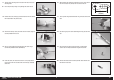

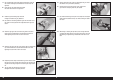
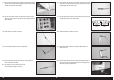

11. Use a straight edge to check the alignment between the front and
rear mounts. Once aligned, the hardware for the mounts can be
tightened.
Leave the M3 x 35 socket head screws loose
that attach the mounts to the support bar.
Read through the following steps and work
through them before using any adhesives.
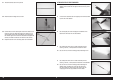
12. Use contact or slow setting adhesive to glue the ammunition rail in
the cockpit. The exact position will be adjusted once the guns are
secure.
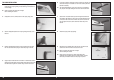
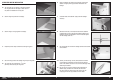
14. Attach the right gun to the rear mount using an M3 x 25 socket head
cap screw and M3 locknut. Use hemostats to hold the nut while
tightening the screw with a 2.5mm hex wrench.
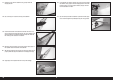
15. Repeat the previous steps to install the left gun to the mounts. Once
both guns are in place, tighten the screws for the gun mounts at the
support bar. Glue the gun sights to the machine guns using medium
CA.
The gun sights are optional and can be easily
damaged if the hatch is repeatedly removed.
13. Attach the right gun to the front mount using an M3 x 25 socket
head cap screw and M3 locknut. Use hemostats to hold the nut
while tightening the screw with a 2.5mm hex wrench.
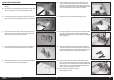
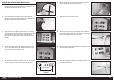
16. Slide the ammunition rails so they are tight against the guns. Allow
the adhesive to fully cure before proceeding.
A black marker can be used to touch up any areas on the
guns where the underlying wood may be exposed.
17. Use contact adhesive to glue the pilot in the cockpit. Set the cockpit
aside to allow the adhesive to fully cure while continuing the build of
the model.
18. When fi tting or removing the top hatch, be sure to angle the hatch
up against the trailing edge of the top wing center section. This way
the delicate gun sights do not get knocked off as the hatch is slid
back.
16EN