
User manual
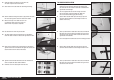
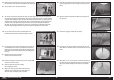
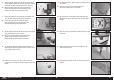

6. Slide the fi rewall so epoxy can be placed in the motor box. Mix 1/3
oz (15mL) of 30-minute epoxy. Use an epoxy brush to apply epoxy in
all areas where the fi rewall contacts the motor box.
7. Slide the fi rewall back into position. Use a square to check the
positioning of the fi rewall. Low-tack tape can be used to hold the
fi rewall in position until the epoxy fully cures. Use a paper towel and
isopropyl alcohol, to remove any excess epoxy.
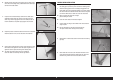
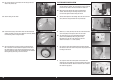
9. Cut the template from the instruction sheet provided with the motor.
Tape the template to the fi rewall and use a drill and 9/32-inch
(7mm) drill bit to drill the holes for the motor mounting bolts.
10. Use a drill and rotary tool to make a slot in the fuselage fi rewall to
pass the battery and receiver leads into the fuselage. Make sure the
motor box will not cover the hole when installed.
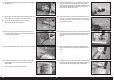
8. Once the epoxy fully cures, remove the tape from the motor box.
Install the triangle stock on the inside of the motor box. Make sure to
cut the triangle stock so it does not cover the blind nuts and fi ts tight
into the corners of the motor box.
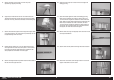
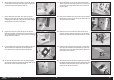
11. Slide four M5 washers on four M5 x 20 socket head cap screws
Slide the screws through the holes in the rear of the motor box, then
into the holes in the fuselage fi rewall. The screws use a 4mm hex
wrench to tighten.
12. Place a drop of thread lock on the end of each screw, then thread an
M5 fl anged nut on each screw. Use the 4mm hex wrench and 8mm
nut driver to tighten the hardware.
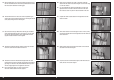
14. Attach the motor to the motor box using four M5 x 15 socket head
cap screws, four M5 washers and four M5 blind nuts. Place a drop
of thread lock on each screw before their installation. Tighten each
screw using a 4mm hex wrench.
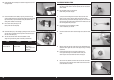
15. Mount the speed control to the motor box following any instructions
provided with the speed controller. Connect the leads from the motor
and speed control and secure them using tie wraps so they don’t
interfere with the operation of the motor.
13. Attach the X-mount to the motor. Place a drop of thread lock on
each of the screws provided with the motor, then use a #2 Phillips
screwdriver to tighten the screws attaching the mount to the motor.
27 EN
Fokker D.VII 30–60cc ARF