COPYRIGHT ©2016 Hangzhou Hikvision Digital Technology Co., Ltd. or its subsidiaries. ALL RIGHTS RESERVED. About this Manual The Manual includes instructions for using and managing the product. Pictures, charts, images and all other information hereinafter are for description and explanation only. The information contained in the Manual is subject to change, without notice, due to firmware updates or other reasons. Please find the latest version in the ™ website (http://www.ezvizlife.com).
PRIVACY LEAKAGE OR OTHER DAMAGES RESULTING FROM CYBER ATTACK, HACKER ATTACK, VIRUS INSPECTION, OR OTHER INTERNET SECURITY RISKS; HOWEVER, HIKVISION WILL PROVIDE TIMELY TECHNICAL SUPPORT IF REQUIRED. SURVEILLANCE LAWS VARY BY JURISDICTION. PLEASE CHECK ALL RELEVANT LAWS IN YOUR JURISDICTION BEFORE USING THIS PRODUCT IN ORDER TO ENSURE THAT YOUR USE CONFORMS TO THE APPLICABLE LAW.
This equipment should be installed and operated with a minimum distance 20cm between the radiator and your body. EU Conformity Statement This product and - if applicable - the supplied accessories too are marked with "CE" and comply therefore with the applicable harmonized European standards listed under the Radio Equipment Directive 2014/53/EU, the EMC Directive 2014/30/EU, the RoHS Directive 2011/65/EU.
Operations Step 1 Power-on Option 1 Power on the camera by connecting to the power socket by a power cable. Option 2 You can also power on the camera by PoE switch (not included). Only supported by some certain models. Refer to page 6 for details.
Step 2 Camera Setup 1 Create an user account - Connect your mobile phone to Wi-Fi. - Download and install the EZVIZ app by searching “EZVIZ” in App Store and Google PlayTM. - Launch the app and register for an EZVIZ user account following the start-up wizard. 2 Add a camera to EZVIZ - Log in the EZVIZ app. - From the Home screen, tap “+” on the upper-right corner to go to the scan QR code interface. - Scan the QR Code on the bottom of the camera and then configure the Wi-Fi.
Step 3 Installing the Camera • Make sure the wall is strong enough to withstand three times the weight of the camera and the mounting. • If the wall is cement, you need to insert expansion screws before you install the camera. • If the wall is wooden, you can use self-tapping screw to secure the camera. The camera can be installed on the wall or ceiling. Installing on the wall will be taken as the example in the following content.
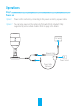
3 Connecting Cables Connect the power cable and network cable. Add the camera to your EZVIZ account. If the camera is added before, it will connect to the same account automatically after connecting the power and network cables. If the camera is connected to a Wi-Fi network before, it will connect to the same Wi-Fi automatically after connecting the power cable. 4 Adjusting the Surveillance Angle - Loosen the adjusting screw and adjusting knob. - Adjust the surveillance angle to your desired place.
Appendix Box Content Internet Camera x1 Mounting Template x1 Power Adapter x1(Optional) Screw Kit x1 Quick Start Guide x1 Functions 720P HD Live Video (CS-CVXXX-31XX Series) 1080P HD Live Video (CS-CVXXX-32XX Series) Wi-Fi Connection (Refer to page 6 to see whether the function is supported by your camera.) PoE Power Supply (The PoE switch is required and not provided.) (Refer to page 6 to see whether the function is supported by your camera.) microSD card. Maximum space 128GB.
Available Models The parameters and functions of different models may vary, check the label on your camera and refer to the figure below for details. Memory Card Supported (micro SD) IR Light Supported Lens Focal Length Camera Series Resolution 1:1.0MP 2:2.
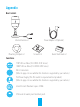
Basics microSD Card Slot RESET Adjusting Screw Adjusting Knob Network Interface Power Supply Name Description microSD Card Slot For microSD Card (not included with this product). You can purchase separately. Recommended compatibility: Class 10, maximum space 128GB. After inserting the microSD card, you can record the event inside the camera. You need to initialize it on the EZVIZ app.
Troubleshooting Q: “The device is offline.” or “The device is not registered.” prompts when adding the camera by EZVIZ app. A: 1. Make sure the network, that the camera is connceted to, is normal and the DHCP of router is enabled. 2. Hold down the RESET button for 10 seconds to reset the parameters if you manually changed the network parameters. Q: How to use the microSD card for local storage? A: 1. Make sure there is a microSD card inserted and the camera is added to your EZVIZ account.
Bedienung Schritt 1 Einschalten Option 1 Schalten Sie die Kamera ein, indem Sie sie mit einem Stromkabel an die Steckdose anschließen. Option 2 Sie können die Kamera auch mit einem PoE-Switch (nicht enthalten) hochfahren. Diese Funktion wird nur von bestimmten Modellen unterstützt. Ausführliche Hinweise hierzu finden Sie auf Seite 6.
Schritt 2 Kamera einrichten Benutzerkonto erstellen 1 Ein --Smartphone mit dem Wi-Fi-Netz verbinden. --Laden Sie die EZVIZ App herunter, indem Sie im App Store und in Google PlayTM nach “EZVIZ” suchen, und installieren Sie sie. --Starten Sie die App und registrieren Sie sich für ein EZVIZ-Benutzerkonto gemäß den Anweisungen im Start-Assistenten. Eine Kamera zu EZVIZ hinzufügen 2 --Melden Sie sich an der EZVIZ App an.
Schritt 3 Installation der Kamera • Stellen Sie sicher, dass die Wand, an der die Kamera angebracht werden soll, das dreifache Gewicht von Kamera und Halterung halten kann. • Für die Montage an Betonwänden werden Dehnungsschrauben benötigt. • Bei der Montage an Holzwänden können Sie die Kamera mit einer selbstschneidenden Schraube befestigen. Die Kamera kann an der Wand oder an der Decke montiert werden. Im Folgenden wird die Installation exemplarisch anhand einer Wandinstallation erläutert.
3 Anschließen der Kabel Schließen Sie das Stromkabel und das Netzwerkkabel an. Fügen Sie die Kamera zu Ihrem EZVIZ-Konto hinzu. Falls die Kamera zuvor bereits hinzugefügt wurde, verbindet sie sich nach dem Anschließen der Strom- und Netzwerkkabel automatisch mit demselben Konto. Falls die Kamera zuvor bereits mit einem Wi-Fi-Netzwerk verbunden war, verbindet sie sich nach dem Anschließen des Stromkabels automatisch mit diesem Wi-Fi.
Funciones Paso 1 Encendido Opción 1 Encienda la cámara. Para ello conecte un cable de alimentación a la toma de corriente. Opción 2 También puede suministrar alimentación a la cámara mediante un conmutador PoE (no incluido). Solo es compatible con algunos modelos. Consulte la página 6 para obtener más información.
Paso 2 Configuración de la cámara 1 2 Cree una cuenta de usuario --Conecte el teléfono móvil a la red Wi-Fi. -- Descargue e instala la app EZVIZ buscando “EZVIZ” en el App Store y Google PlayTM. --Abra la app y registre una cuenta de usuario de EZVIZ siguiendo las instrucciones del asistente de instalación. Agregue una cámara a EZVIZ --Inicie sesión en la app EZVIZ. --Desde la pantalla de inicio, toque el símbolo “+” situado en la esquina superior derecha para ir a la interfaz de escaneo de código QR.
Paso 3 Instalación de la cámara • Asegúrese de que la pared sea lo suficientemente resistente como para soportar más del triple del peso de la cámara y del soporte. • Si la pared es de hormigón, debe insertar tornillos de expansión antes de instalar la cámara. • Si la pared es de madera, puede utilizar tornillos de rosca cortante para fijar la cámara. La cámara puede instalarse en la pared o el techo. En el siguiente contenido, la instalación en la pared se tomará como ejemplo.
3 Conexión de los cables Conecte los cables de alimentación y red. Añada la cámara a su cuenta de EZVIZ. Si la cámara se ha añadido anteriormente, esta se conectará automática- mente a la misma cuenta tras conectar los cables de alimentación y red. Si la cámara se ha conectado a una red Wi-Fi anteriormente, esta se conectará automáticamente a la misma red Wi-Fi tras conecta el cable de alimentación. 4 Ajuste del ángulo de vigilancia --Afloje el tornillo y el regulador de ajuste.
Fonctionnement Étape 1 Alimentation Option 1 Branchez la caméra à la prise de courant au moyen d’un cordon d’alimentation. Option 2 Vous pouvez également alimenter la caméra par un port PoE (non fourni). Uniquement pris en charge par certains modèles. Pour obtenir des détails, reportez-vous à la page 6.
Étape 2 Mise en place de la caméra 1 Créez un compte utilisateur --Raccordez votre téléphone portable au réseau Wi-Fi. --Téléchargez et installez l’application EZVIZ en recherchant « EZVIZ » dans l’App Store ou Google PlayTM. --Lancez l’application et créez un compte utilisateur EZVIZ en suivant l’assistant de démarrage. 2 Ajouter une caméra à EZVIZ --Connectez-vous dans l’application EZVIZ.
Étape 3 Installation de la caméra • Assurez-vous que le mur est suffisamment solide pour supporter au moins trois fois le poids de la caméra et de son support. • Si le mur est en ciment, insérez d’abord des chevilles avant de visser le support de la caméra en place. • Si le mur est en bois, vous pouvez utiliser des vis taraudeuses pour fixer la caméra. La caméra peut être fixée au mur ou au plafond. Dans la section suivante, nous prenons l’exemple d’une installation murale.
3 Branchement des câbles Branchez les câbles d’alimentation et réseau. Ajoutez la caméra à votre compte EZVIZ. Si la caméra a déjà été ajoutée, elle se reconnectera automatiquement au même compte après avoir branché les câbles d’alimentation et réseau. Si la caméra a été connectée précédemment à un réseau Wi-Fi, elle s’y reconnectera automatiquement après avoir branché le câble d’alimentation. 4 Réglage de l’angle de surveillance --Desserrez la vis et le bouton de réglage.
Funzionamento Passo 1 Accensione Opzione 1 Alimentare la videocamera collegando un cavo di alimentazione al connettore di alimentazione. Opzione 2 La videocamera può anche essere alimentata tramite uno switch PoE (non incluso). Supportata solo da alcuni modelli. Per i dettagli, consultare pagina 6.
Passo 2 Configurazione videocamera 1 2 Creare un account utente --Collegare il telefono cellulare alla Wi-Fi. --Scaricare e installare l'app EZVIZ cercando "EZVIZ" in App Store o Google PlayTM. --Avviare l'app e registrare un account utente di EZVIZ seguendo le istruzioni della procedura guidata all'avvio. Aggiungere una videocamera a EZVIZ --Effettuare l'accesso nell'app EZVIZ.
Passo 3 Installare la videocamera • Assicurarsi che la parete sia in grado di sostenere un peso tre volte superiore a quello del gruppo videocamera/supporto. • Se la parete è in cemento, è necessario utilizzare tasselli e viti a espansione. • Se la parete è in legno, è possibile utilizzare viti autofilettanti. La videocamera può essere installata sulla parete o sul soffitto. L'esempio sottostante si basa sull'installazione a parete.
3 Collegare i cavi Collegare il cavo di alimentazione e cavo di rete. Aggiungere la videocamera all'account EZVIZ. Se la videocamera è stata già aggiunta in precedenza, alla connessione dei cavi di alimentazione e di rete si connetterà automaticamente allo stesso account. Se la videocamera è stata già collegata a una rete Wi-Fi in precedenza, alla connessione del cavo di alimentazione si connetterà automaticamente alla stessa rete Wi-Fi.
Operações Passo 1 Ligação Opção 1 Ligue a câmara através de uma ligação à tomada de alimentação com um cabo de alimentação. Opção 2 Pode também ligar a câmara através de um comutador PoE (não incluído). Apenas compatível com determinados modelos. Consulte a página 6 para obter detalhes.
Passo 2 Configuração da câmara 1 2 Criar uma conta de utilizador --Ligue o telemóvel à rede Wi-Fi. --Transfira e instale a app EZVIZ procurando “EZVIZ” na App Store e Google PlayTM. --Inicie a app e registe-se para criar uma conta de utilizador EZVIZ seguindo o assistente de configuração. Adicionar uma câmara ao EZVIZ --Inicie sessão na app EZVIZ. --A partir do ecrã inicial, toque no símbolo “+” no canto superior direito para ir para a interface de leitura do código QR.
Passo 3 Instalação da câmara • Certifique-se de que a parede é suficientemente resistente para suportar um peso três vezes superior ao peso da câmara e do suporte. • Caso a parede seja em cimento, necessita de inserir os parafusos de expansão antes de instalar a câmara. • Caso a parede seja em madeira, pode utilizar um parafuso auto-roscante para fixar a câmara. A câmara pode ser instalada na parede ou no tecto. Tomaremos como exemplo para o conteúdo a seguir a instalação na parede.
3 Ligação dos cabos Ligue o cabo de alimentação e o cabo de rede. Adicione a câmara à sua conta EZVIZ. Se a câmara foi adicionada anteriormente, ligará automaticamente à mesma conta após ligar os cabos de rede e de alimentação. Se a câmara foi anteriormente ligada a uma rede Wi-Fi, ligará automaticamente à mesma rede Wi-Fi após ligar o cabo de alimentação. 4 Ajuste do ângulo de vigilância --Desaperte o parafuso de ajustamento e o botão de ajustamento.
Операции Шаг 1 Подача питания Вариант 1 Подайте питание на камеру через кабель сетевого адаптера, а адаптер подключите к розетке электросети. Вариант 2 Питание на камеру можно также подать от коммутатора с функцией PoE (питание через Ethernet). Коммутатор в комплект поставки не входит. Эта функция поддерживается только некоторыми моделями. Для получения подробной информации см. стр. 6.
Шаг 2 Настройка камеры 1 2 Создание аккаунта пользователя -- Подключите мобильный телефон к сети Wi-Fi. -- Загрузите и установите приложение EZVIZ, выполнив поиск по слову «EZVIZ» в App Store или Google PlayTM. -- Запустите приложение и зарегистрируйте новый аккаунт пользователя EZVIZ, следуя инструкциям мастера запуска. Добавление камеры в EZVIZ -- Авторизуйтесь в приложении EZVIZ. -- В верхнем правом углу главного экрана нажмите «+», чтобы открыть интерфейс сканирования QR-кода.
Шаг 3 Установка камеры • Убедитесь, что стена достаточно прочная, чтобы выдержать тройной вес камеры и монтажных элементов. • Если стена бетонная, перед установкой камеры потребуется вставить дюбели. • Если стена деревянная, для крепления камеры можно использовать самонарезающие винты. Камера может устанавливаться на стене или потолке. В качестве примера далее будет рассматриваться установка на стене.
3 Подключение кабелей Подключите сетевой кабель и кабель питания. Добавьте камеру к вашему аккаунту EZVIZ. Если камера была ранее добавлена к аккаунту, она автоматически подключится к этому же аккаунту после подсоединения сетевого кабеля и кабеля питания. Если камера была ранее подключена к сети Wi-Fi, она автоматически подключится к этой же сети Wi-Fi после подсоединения сетевого кабеля и кабеля питания. 4 Регулировка угла обзора -- Ослабьте регулировочный винт и регулировочную ручку.
Kasutamine 1. toiming Vooluvõrguga ühendamine 1. võimalus Lülita kaamera vooluvõrku, milleks ühenda toitejuhe pistikupessa. 2. võimalus Kaamera toitena võib kasutada ka PoE-lülitit (ei sisaldu komplektis). Ainult teatavatel mudelitel. Vt lähemalt lk 6.
2. toiming Kaamera seadistamine 1 Loo kasutajakonto --Ühenda mobiiltelefon traadita võrguga. -- Laadi alla ja installi EZVIZi rakendus, sisestades veebipoes App Store või Google PlayTM otsingusse „EZVIZ”. --Käivita rakendus ja registreeri EZVIZi kasutajakonto, järgides käivitusviisardit. 2 Lisa kaamera EZVIZi kontole. --Logi sisse EZVIZi rakendusse. --Koputa avalehel üleval paremas nurgas olevale sümbolile „+”, et minna QR-koodi skannimise liidesele.
3. toiming Kaamera installimine • Veendu, et sein on piisavalt tugev, et kanda kaamera ja paigaldusdetailide kolmekordset massi. • Kui sein on tsemendist, tuleb enne kaamera paigaldamist sisestada laienduskruvid. • Puidust seina puhul võib kaamera kinnitamiseks kasutada isekeermestavaid kruvisid. Kaamera võib paigaldada seinale või lakke. Selles tekstis on näitena kasutatud seinale kinnitamist.
3 Ühendusjuhtmed Ühenda toite- ja võrgujuhe. Lisa kaamera EZVIZi kontole. Kui kaamera on juba lisatud, siis ühendatakse see pärast toite- ja võrgujuhtmega ühendamist sama kontoga automaatselt. Kui kaamera on traadita võrguga juba ühendatud, siis ühendatakse see pärast toitejuhtmega ühendamist automaatselt samasse traadita võrku. 4 Seirenurga reguleerimine --Keera reguleerimiskruvi ja -nupp lahti. --Reguleeri seirenurk soovitud asendisse. --Kui oled lõpetanud, pingulda reguleerimiskruvi ja -nuppu.
Darbības 1. solis Ieslēgšana 1. variants Ieslēdziet kameru, pievienojot tās strāvas kabeli kontaktligzdai. 2. variants Jūs arī varat ieslēgt kameru ar Ethernet barošanas (PoE) slēdzi (nav iekļauts komplektācijā). To atbalsta tikai daži modeļi. Vairāk informācijas skatiet 6. lpp.
2. solis Kameras iestatīšana 1 2 Izveidojiet lietotāja kontu. -- Pievienojiet jūsu viedtālruni Wi-Fi tīklam. -- Lejupielādējiet un instalējiet lietotni EZVIZ, meklējot „EZVIZ” pakalpojumā App Store un veikalā Google PlayTM. -- Palaidiet lietotni un reģistrējiet EZVIZ lietotāja kontu, ievērojot startēšanas vedņa norādījumus. Pievienojiet kameru lietotnē EZVIZ. -- Piesakieties lietotnē EZVIZ. -- Pieskarieties simbolam „+” sākuma ekrāna augšējā labajā stūrī, lai dotos uz QR kodu skenēšanas saskarni.
3. solis Kameras uzstādīšana • Pārliecinieties, ka siena ir pietiekami stipra, lai izturētu trīskārtēju kameras un stiprinājuma svaru. • Ja siena ir izgatavota no cementa, pirms kameras uzstādīšanas tajā jāievada montāžas skrūves. • Ja siena ir izgatavota no koka, jūs varat izmantot pašvītņgriezes skrūvi, lai nostiprinātu kameru. Kameru var uzstādīt pie sienas vai griestiem. Turpmākajos norādījumos ir pieņemts, ka kamera ir uzstādīta pie sienas.
3 Kabeļu pievienošana Pievienojiet strāvas kabeli un tīkla kabeli. Pievienojiet kameru savam EZVIZ kontam. Ja kamera ir bijusi pievienota iepriekš, tā automātiski savienosies ar to pašu kontu pēc strāvas un tīkla kabeļu pievienošanas. Ja kamera ir bijusi pievienota Wi-Fi tīklam iepriekš, tā automātiski savienosies ar to pašu Wi-Fi tīklu pēc strāvas kabeļa pievienošanas. 4 Novērošanas leņķa pielāgošana -- Atskrūvējiet regulējošo skrūvi un pogu. -- Pielāgojiet novērošanas leņķi vēlamajā pozīcijā.
Operacijos 1 žingsnis Įjungimas 1 parinktis Įjunkite kamerą, maitinimo kabeliu prijungdami prie maitinimo lizdo. 2 parinktis Kamerą galima maitinti ir naudojant „PoE“ jungiklį (komplekte nėra). Ši galimybė yra tik tam tikruose modeliuose. Žr. p. 6, kur pateikiama išsamios informacijos.
2 žingsnis Kameros sąranka 1 2 Sukurkite naudotojo paskyrą -- Prijunkite savo mobilųjį telefoną prie „Wi-Fi“. -- Atsisiųskite ir įdiekite programėlę EZVIZ, atlikdami paiešką „EZVIZ“ „App Store“ arba „Google PlayTM“. -- Paleiskite programėlę ir užregistruokite EZVIZ naudotojo paskyrą, vadovaudamiesi paleisties vediklio nurodymais. Įtraukite kamerą į EZVIZ -- Prisijunkite prie programėlės EZVIZ. -- Pradžios ekrane palieskite „+“ (viršutiniame dešiniajame kampe), kad atvertumėte QR kodo nuskaitymo sąsają.
3 žingsnis Kameros įrengimas • Įsitikinkite, kad siena pakankamai tvirta ir gali atlaikyti triskart didesnį svorį nei sveria kamera su laikikliu. • Jei siena cementinė, prieš įrengiant kamerą reikės įkišti išsiplečiančius sraigtus. • Jei siena medinė, kamerai fiksuoti galite naudoti savisriegius sraigtus. Kamerą galima montuoti ant lubų arba ant sienos. Tolesniam tekste daroma prielaida, kad kamera sumontuota ant sienos.
3 Kabelių prijungimas Prijunkite maitinimo ir tinklo kabelius. Įtraukite kamerą į savo EZVIZ paskyrą. Jei kamerą įtraukėte pirmiau, ji automatiškai prisijungs prie tos pačios paskyros, kai tik prijungsite maitinimo ir tinklo kabelius. Jei kamerą pirmiau buvote prijungę prie „Wi-Fi“ tinklo, ji automatiškai prisijungs prie to paties „Wi-Fi“ tinklo, kai tik prijungsite maitinimo kabelį. 4 Stebėjimo kampo reguliavimas -- Atlaisvinkite reguliavimo sraigtą ir reguliavimo rankenėlę.
LIMITED WARRANTY Thank you for purchasing EZVIZ products. This limited warranty gives you, the original purchaser of the EZVIZ product, specific legal rights. You may also have other legal rights that vary by state, province or jurisdiction. The disclaimers, exclusions, and limitations of liability under this limited warranty will not apply to the extent prohibited by applicable law.
BESCHRÄNKTE GARANTIE Vielen Dank für den Kauf eines EZVIZ-Produkts. Diese beschränkte Garantie gibt Ihnen, dem Erstkäufer des EZVIZProdukts, bestimmte gesetzliche Rechte. Je nach Staat, Provinz oder Land können Ihnen weitere gesetzliche Rechte zustehen. Die Haftungsausschlüsse und -beschränkungen gemäß dieser beschränkten Garantie gelten ausschließlich im gesetzlich zulässigen Umfang.
GARANTÍA LIMITADA Gracias por adquirir productos EZVIZ. Esta garantía limitada le concede a usted, el comprador original del producto EZVIZ, derechos legales específicos. Es posible que tenga otros derechos legales en función de su estado, provincia o jurisdicción. Los avisos de exención de responsabilidad, las exclusiones y las limitaciones de responsabilidad de esta garantía limitada no se aplicarán hasta el máximo prohibido por la legislación aplicable.
GARANTIE LIMITÉE Merci d'avoir acheté nos produits EZVIZ. En tant qu'acheteur original de produit EZVIZ, cette garantie limitée vous accorde certains droits. Selon le pays, la région ou la juridiction où vous résidez, il est possible que vous bénéficiiez d'autres droits. Les dénis de responsabilités, exclusions et limitations de responsabilité civile stipulés dans cette garantie limitée s'appliquent uniquement dans les limites prévues par la loi.
GARANZIA LIMITATA Grazie per aver acquistato i prodotti EZVIZ. La presente garanzia limitata accorda all'acquirente originale del prodotto EZVIZ, specifici diritti legali. L'acquirente originale potrebbe godere anche altri diritti legali che variano da stato, provincia o giurisdizione. Le declinazioni di responsabilità, le esclusioni e le limitazioni di responsabilità ai sensi della presente garanzia limitata non si applicano ove espressamente vietate dalla legge applicabile.
GARANTIA LIMITADA Obrigado por comprar produtos EZVIZ. Na qualidade de comprador original do produto EZVIZ, esta garantia limitada confere-lhe direitos legais específicos. Poderá ter ainda outros direitos legais que variam consoante o estado, a província ou a jurisdição. As renúncias, exclusões e limitações de responsabilidade expressas nesta garantia limitada não se aplicarão na medida em que tal seja proibido pela legislação aplicável.
ОГРАНИЧЕННАЯ ГАРАНТИЯ Благодарим Вас за покупку продукции EZVIZ. Эта ограниченная гарантия дает Вам как покупателю продукта EZVIZ определенные юридические права. Вы также можете иметь другие юридические права, которые определяются законами государства, провинции или юрисдикцией. Исключения и ограничения ответственности в соответствии с данной ограниченной гарантией не действительны в случае, если они противоречат действующему законодательству.
PIIRATUD TOOTJAGARANTII Täname teid, et olete ostnud EZVIZ seadmeid. Piiratud tootjagarantii annab Teile, EZVIZ seadme esmasele ostjale, teatud õigused. Teile võivad kohanduda ka muud seaduslikud õigused, mis erinevad vastavalt riigile kus seade müüdud on. Garantiist keeldumine, erandid ja piiratud vastutus selle piiratud tootjagarantii raames rakendub vastavalt kehtivale seadusetele.
GARANTIJAS NOTEIKUMI Paldies, ka iegādājāties EZVIZ produktu. Šī garantija piešķir Jums noteiktas tiesības. Jums var būt arī citas tiesības atkārībā no valsts, pilsētas vai jurisdikcijas. Atrunas, izslēgšana un atbildības ierobežojumi saskaņā ar garantijas noteikumiem, ir aizliegti saskaņā ar piemērojamiem tiesību aktiem. Izplatītājiem, tālākpārdevējiem un aģentiem nav tiesību jebkādā veidā grozīt šos garantijas noteikumus.
RIBOTOS GARANTIJOS SĄLYGOS Sveikiname įsigijus EZVIZ produktą. Perkant originalius produktus, ši ribota garantija pirkėjui suteikia tam tikras juridines teises. Jūs galite turėti ir kitų teisių, kurios gali skirtis, atsižvelgiant į šalį, kurioje pirkote įrenginį. Teisės priklauso nuo šalyje galiojančių įstatymų. Atsakomybės ribojimas bei išimtys negali prieštarauti taikomiems teisės aktams. Joks platintojas, perpardavinėtojas, agentas ar darbuotojas neturi teisės keisti garantijos sąlygų.
UD01726B
LIMITED WARRANTY Thank you for purchasing EZVIZ products. This limited warranty gives you, the original purchaser of the EZVIZ product, specific legal rights. You may also have other legal rights that vary by state, province or jurisdiction. The disclaimers, exclusions, and limitations of liability under this limited warranty will not apply to the extent prohibited by applicable law.
OR THAT PRODUCT INFORMATION AND DATA OR USE OF THE PRODUCT WILL PROVIDE SAFETY IN YOUR HOME. YOU USE ALL PRODUCT INFORMATION, DATA, AND THE PRODUCT AT YOUR OWN DISCRETION AND RISK. YOU WILL BE SOLELY RESPONSIBLE FOR (AND EZVIZ DISCLAIMS) ANY AND ALL LOSS, LIABILITY, OR DAMAGES, INCLUDING TO YOUR WIRING, FIXTURES, ELECTRICITY, HOME, PRODUCT, PRODUCT PERIPHERALS, COMPUTER, MOBILE DEVICE, AND ALL OTHER ITEMS AND PETS, RESULTING FROM YOUR USE OF THE PRODUCT INFORMATION, DATA, OR PRODUCT.
About the Documents The documents include instructions for using and managing the product. Pictures, charts, images and all other information hereinafter are for description and explanation only. The information contained in the documents is subject to change, without notice, due to firmware updates or other reasons. Please find the latest version in the website (http://www.ezvizlife.com). Any and all information, including, among others, wordings, pictures, graphs are the properties of EZVIZ Inc.
FCC Information FCC compliance: This device complies with Part 15 of the FCC Rules. Operation is subject to the following two conditions: (1) This device may not cause harmful interference, and (2) This device must accept any interference received, including interference that may cause undesired operation. Note: This product has been tested and found to comply with the limits for a Class B digital device, pursuant to Part 15 of the FCC Rules.
GARANTÍA LIMITADA Gracias por comprar los productos EZVIZ. Esta garantía limitada le brinda al comprador original del producto EZVIZ derechos legales específicos. Además, puede tener otros derechos legales que varían según el estado, la provincia o la jurisdicción. Las renuncias, exclusiones y limitaciones de responsabilidad bajo esta garantía limitada no se aplicarán en la medida que lo prohibida la ley aplicable.
INFORMACIÓN Y LOS DATOS DEL PRODUCTO, O QUE DICHA INFORMACIÓN Y DATOS O EL USO DEL PRODUCTO BRIDEN SEGURIDAD A SU HOGAR. USTED UTILIZA TODA LA INFORMACIÓN Y DATOS DEL PRODUCTO Y EL PRODUCTO A SU PROPIO CRITERIO Y RIESGO.
Acerca de los documentos Los documentos incluyen instrucciones para el uso y el manejo del producto. Las fotografías, cuadros, imágenes y cualquier otra información provista a continuación tienen fines descriptivos y explicativos únicamente. La información incluida en los documentos está sujeta a cambios sin previo aviso, por motivos de actualización de firmware u otros motivos. Encuentre la última versión en el sitio web (http://www.ezvizlife.com).
Cumplimiento con FCC: Este dispositivo cumple con la Parte 15 de la Normativa FCC. La operación está sujeta a las siguientes dos condiciones: (1) Que el dispositivo no cause interferencias nocivas, y (2) Que el dispositivo acepte cualquier interferencia recibida, incluida aquella que puede causar una funcionamiento indeseado. Nota: Este producto fue probado y cumple con los límites para los dispositivos digitales de Clase B, según la parte 15 de la Normativa FCC.
GARANTIE LIMITÉE Merci d’avoir acheté un produit EZVIZ. Cette garantie vous accorde des droits spécifiques en tant qu’acheteur d’origine du produit EZVIZ. Vous pouvez également bénéficier d’autres droits qui varient selon l’état, la province ou la juridiction. Les exonérations, exclusions et limitations de responsabilité établies au titre de la présente garantie limitée s’appliqueront dans les limites du droit en vigueur.
LES RENSEIGNEMENTS ET LES DONNÉES DU PRODUIT SONT FOURNIS « TELS QUELS » ET « EN L’ÉTAT ». EZVIZ NE DÉCLARE, NE GARANTIT NI NE PROMET D’AUCUNE MANIÈRE QUE LES RENSEIGNEMENTS ET LES DONNÉES DU PRODUIT SERONT DISPONIBLES, PRÉCIS OU FIABLES, NI QUE LES RENSEIGNEMENTS ET LES DONNÉES DU PRODUIT OU L’USAGE DU PRODUIT GARANTIRONT LA SÉCURITÉ DE VOTRE DOMICILE. LES RENSEIGNEMENTS, LES DONNÉES ET LE PRODUIT LUI-MÊME SONT UTILISÉS À VOTRE SEULE DISCRÉTION ET À VOS PROPRES RISQUES.
À propos des documents Les documents comprennent des instructions pour utiliser et gérer le produit. Les illustrations, les graphiques, les images et toutes les autres informations figurant ci-après sont fournis à titre de description et d’explication uniquement. Les informations figurant dans les documents sont sujettes à modification sans préavis, en raison de mises à jour du micrologiciel ou pour d’autres raisons. Veuillez consulter le site web pour obtenir la dernière version (http://www.ezvizlife.com).
Informations FCC Conformité FCC : Cet appareil est conforme à la section 15 du règlement de la FCC. Son fonctionnement est soumis aux deux conditions suivantes : (1) Cet appareil ne doit pas causer d’interférences nuisibles, et (2) Cet appareil doit accepter toute interférence reçue, notamment les interférences susceptibles d’occasionner un fonctionnement indésirable.