Smart Conference Camera Quick Start Guide 0
Smart Conference Camera • Quick Start Guide Legal Information © 2022 Hangzhou Hikvision Digital Technology Co., Ltd. All rights reserved. About this Manual The Manual includes instructions for using and managing the Product. Pictures, charts, images and all other information hereinafter are for description and explanation only. The information contained in the Manual is subject to change, without notice, due to firmware updates or other reasons.
Smart Conference Camera • Quick Start Guide Regulatory Information FCC Information Please take attention that changes or modification not expressly approved by the party responsible for compliance could void the user’s authority to operate the equipment. FCC Compliance Note: This product has been tested and found to comply with the limits for a Class B digital device, pursuant to Part 15 of the FCC Rules.
Smart Conference Camera • Quick Start Guide return this product to your local supplier upon the purchase of equivalent new equipment, or dispose of it at designated collection points. For more information see: www.recyclethis.info Directive 2006/66/EC and its amendment 2013/56/EU (Battery Directive): This product contains a battery that cannot be disposed of as unsorted municipal waste in the European Union. See the product documentation for specific battery information.
Smart Conference Camera • Quick Start Guide Applicable Models This manual is applicable to the Smart Conference Camera. Symbol Conventions The symbols that may be found in this document are defined as follows. Symbol Description Provides additional information to emphasize or supplement important points of the main text. Indicates a potentially hazardous situation, which if not avoided, could result in equipment damage, data loss, performance degradation, or unexpected results.
Smart Conference Camera • Quick Start Guide In the use of the product, you must be in strict compliance with the electrical safety regulations of the nation and region. The socket-outlet shall be installed near the equipment and shall be easily accessible. This equipment is not suitable for use in locations where children are likely to be present. The additional force shall be equal to three times the weight of the equipment but not less than 50N.
Smart Conference Camera • Quick Start Guide TABLE OF CONTENTS Chapter 1 Introduction ............................................................................................................... 1 Packing List............................................................................................................................................................ 1 Appearance ..................................................................................................................................
Smart Conference Camera • Quick Start Guide Chapter 1 Introduction Based on audio and video processing technology, the smart conference camera (referred to as "camera") is an easy-to-use, efficient, smooth and safe video conference camera. It has functions of quick meeting joining, multi-party conference, etc.
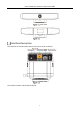
Smart Conference Camera • Quick Start Guide Front View Rear View Interface Description The interface on the side of the camera rear view is shown as follows. Front View The camera interface is described as follows.
Smart Conference Camera • Quick Start Guide Interface Description Name Description MIC USB Type-A port, used for connecting an external microphone. When an external microphone is connected, the build-in microphone will be unavailable. Network Interface The network interface 10 m / 100 m / 1000 m is selfadaptive and used for network interaction with downlink devices. The device can also be debugged through the network port.
Smart Conference Camera • Quick Start Guide Remote Control Description Remote Control The Bluetooth remote control buttons are described as follows.
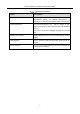
Smart Conference Camera • Quick Start Guide Button Description Icon Button Description Turn on/off privacy cover Turn on/off Bluetooth Shortcut key for volume interface Mute/Unmute microphone Switch HDMI OUT resolution Dome Camera Quick Control Return Menu Switch Mode (Speaker Tacking, AF, etc.) Zoom In Reset preset point Zoom Out Number Press and hold 1 ~ 5 to call the corresponding preset point.
Smart Conference Camera • Quick Start Guide The remote control is used with the camera and cannot be mixed with other devices. The distance between the remote control and the camera is 5 m. The camera cannot be controlled beyond this distance. Please use a 1.5 V battery. Batteries of other specifications may fail to pair due to insufficient battery power. The remote control has been paired at the factory. You need to pair it again when it is disconnected.
Smart Conference Camera • Quick Start Guide Chapter 2 Installation The camera supports desk and wall mounting. Desk Mounting Place the camera on a smooth horizontal table, and adjust the camera base as required. Please keep the desk stable, pay attention to anti-skid, and make sure there is no obstruction in front of the camera. Desk Mounting Wall Mounting The camera can be mounted on a designated wall with the wall mounting bracket. The wall mounting bracket is optional.
Smart Conference Camera • Quick Start Guide Please keep the replaced accessories properly to avoid loss. Remove the camera desk-mounting base. 1) Loosen the 2 decorative cover screws on the camera desk-mounting base and remove the decorative cover. 2) Remove the 8 rotating shaft screws. 3) Remove the desk-mounting base.
Smart Conference Camera • Quick Start Guide Install Wall-Mounting Bracket Assembly Select the appropriate installation wall to open a hole and embed the expansion pipe into the hole (size of the expansion pipe bottom hole in the wall:φ5.5 mm, depth ≥ 25 mm). Open A Hole And Embed the Expansion Pipe Align the mounting holes of the wall mounting bracket base with the openings on the wall, and use self-tapping screws to fix the wall mounting bracket base to the wall.
Smart Conference Camera • Quick Start Guide Install Wall Mounting Bracket Base Place the wall mounting bracket assembly on the wall mounting bracket base, and tighten the hand screws on both sides until they are fixed.
UD28890B 0