Flight 5S ORIGINALITY DESIGN SMART - AND BEAUTIFUL QUICK GUIDE
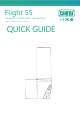
What's in the box Consult the checklist below for all components.
Description MIC PIR Lens Status light SD card slot Reset button Speaker Power AC 100~240V Status light Solid red light on: network is malfunctional Blinking red light: wait for network connection Solid blue light on: camera is working correctly Microphone Capture sounds for your video SD card slot Support local SD Card storage (Max.
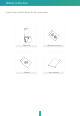
Installation Step 1 First turn off the power breaker at your fuse box for your Flight camera. And confirm to power off everything again. OFF ON Step 2 1. Loosen the screws of ① and connect the power cable to the terminal. And then tighten the 100~240V AC 1 screws of ①. Make sure that one side of white cable ② is installed within the bracket, otherwise there will 2 be water leakage. WARNING Please confirm that you have turned off your power breaker and then connect terminal with cable. 2.
Installation Step 3 Install the camera into the bracket along the direction of the bracket. After the camera is installed in the bracket, fix them with screws. * (Optional) You can adjust the horizontal angle between 0 to 120 degress by App. NOTE: When after installing your flight camera, turn on the power breaker.
Connection Download SmartLife or Tuya Smart is available for both iOS and Android OS. Search the name 'SmartLife','Tuya Smart' in App Store or Google Play, or scan the QRCode to download the App. ·Support ipad IOS Android Download App(IOS&android) Set up router The router supports the 2.4GHz WiFi (doesn't support the 5GHz), and is connected to the WiFi network.Please set the parameters of the router before connecting the WiFi network, and record the SSID and password of your WiFi.
Connection Registration process Step 1 Open the Smart Life App, click "Sign Up", read the "User Agreement Privacy Policy" and click "Agree" . Step 2 Input a legal and valid Mobile number or Email address and click "Get Verification Code". Input the verification code to log in.
QR Code Configuration 1 Open the Smart Life App, click "My" >> "Home Management" >> "Create a home", and you can customize the home name and related settings . 2 Click "Add Device" or "+", and then select "Security & Sensor" >> "Smart Camera" to add camera.
QR Code Configuration 3 Power on and reset camera until the status indicator is flashing quickly or a prompt tone is heard, and then click "Next". Then input your WiFi's passwords and click "Next". Click " " to change network. Note: 1) Camera only supports 2.4GHz WiFi network. 2) The number of bits in the ssid and passwords of the router should not exceed 24 digits.
QR Code Configuration 4 In this interface, you should scan the QR code in your phone with the camera,when the camera comes out "dong dong dong". And you can complete the configuration about 30s.
QR Code Configuration 5 When connecting, you should make sure your router,mobile,and camera are as close as possible.When camera added successffully,click " " you could also DIY the camera's name.
Settings In "Smart Camera" interface,click " ",you can set the camera common functions.
FAQ Q: The device cannot be previewed properly? A: Check whether the network is normal, you can place the camera close to the router, and if not, it is recommended to reset the device and add it again. Q: Why is it still in the list of devices after reseting? A: The reset device only resets the network configuration of the camera, but cannot change the configuration on the App, remove the camera, and must be deleted by the App.
Function Lighting Control You can turn on or off the light, or adjust the brightness by App. Two-way Audio You can see vistors and hear the isounds by App, which are captured by the camera. PIR When someone passes by, an alarm will be triggered and sent to your App of phone. You can turn on the light alarm on App, so that the light will be on automatically when there is a visitor comes out in the evening. Record Using SD card or activating the Cloud-Storage Service to keep recording for every moment.
Functions FCC Statement This equipment has been tested and found to comply with the limits for a Class B digital device, pursuant to part 15 of the FCC Rules. These limits are designed to provide reasonable protection against harmful interference in a residential installation. This equipment generates, uses and can radiate radio frequency energy and, if not installed and used in accordance with the instructions, may cause harmful interference to radio communications.