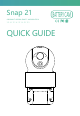
Snap 21 BATTERY CAM ORIGINALITY DESIGN SMART - AND BEAUTIFUL QUICK GUIDE
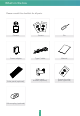
What's in the box Please consult this checklist for all parts.
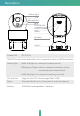
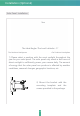
Description Status light PIR Microphone Lens SD card slot ON/OFF button Reset Speaker Type C Power Port DC 5V/1A ON/OFF button Press the button for 3 seconds to turn on/off the camera Status light Solid red light on: network is malfunctional Blinking red light: wait for network connection (slow) connecting the network (fast) Solid blue light on: camera is working correctly SD card slot Support local SD Card storage (Max.
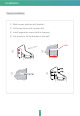
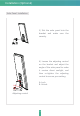
Installation Camera Installation 1)Mark screws position with bracket; 2)Drill screw holes with a power drill; 3)Install expansion screws (with a hammer); 4)Use screws to fix the bracket on the wall.
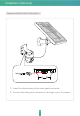
Installation (Optional) Solar Panel Installation Sun The Ideal Angle=The Local Latitude + 5° The Northern Hemisphere The Southern Hemisphere 1) Please select a position with the most sunlight throughout the year for your solar panel. The solar panel only needs a few hours of direct sunlight to sufficiently power your camera daily. The amount of energy that the solar panel can produce is affected by weather conditions, seasonal changes, geographic locations, etc.
Installation (Optional) Solar Panel Installation 3) Slot the solar panel into the bracket and make sure the security. 4) Loosen the adjusting control on the bracket and adjust the angle of the solar panel to make it receive direct sunlight, and then re-tighten the adjusting control to secure your setting.
Installation (Optional) Camera and Solar Panel Connection 1)Insert the silicone plug to the solar panel connector; 2)Connect the solar panel connector to the type c port of camera .
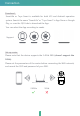
Connection Download SmartLife or Tuya Smart is available for both iOS and Android operation system. Search the name "SmartLife" or "Tuya Smart" in App Store or Google Play, or scan the QR Code to download the App. You can select the App according to needs. ·Support iPad IOS Android Download App(IOS&android) Set up router Please note that the device supports the 2.4GHz WiFi (doesn't support the 5GHz).
Registration Registration process Step 1 Open the App, click "Sign Up" to register. If you already have an account, click “Log In” to log in. Step 2 Input a legal Email address and check the privacy agreement. Then enter the verification code finish registration.
Home Management Step 3 Click "Me" > >"Home Management" >>"Create a home", and you can customize the home name and related settings.
Device Adding Step 4 Click "Add Device" and then select the corresponding device icon to add. Step 5 Power on the device. And then reset the camera and click “Next” on App.
Device Adding Step 6 Select the WiFi network and input the password, and then click "Next". Make sure that your phone has connected to a fluent and steady WiFi already. Note: 1) Camera only supports 2.4GHz WiFi network. 2) The number of bits in the SSID and passwords of the router should not exceed 24 digits.
Device Adding Step 7 Scan the QR code in your phone with the camera and click “Next”, when the camera comes out "dong dong dong". And you can complete the configuration about 30s. Scan the QR code of device Step 8 When connecting, you should make sure your router, mobile and camera are as close as possible. And you can DIY device’s name and assign the room.
Settings Step 9 In live view interface, click " ... ", and then you can set up the device common functions.
FAQ Q: The device cannot be previewed properly? A: Check whether the network is normal, you can place the camera close to the router, and if not, it is recommended to reset the device and add it again. Q: Why is it still in the list of devices after reseting? A: The reset device only resets the network configuration of the camera, but cannot change the configuration on the App, remove the camera, and must be deleted by the App.
Functions Pan/Tilt Rotate your camera by sliding on your smartphone, providing you with a good vision. Motion detection Support smart motion detection. The camera will detect movements, and then send you push notifications and app alerts. Two-way audio When you see a visitor from the live view of camera, you can call and then communicate with the visitor by your App function. PIR When someone passes by, an alarm will be triggered and sent to your phone.
Functions FCC Statement This equipment has been tested and found to comply with the limits for a Class B digital device, pursuant to part 15 of the FCC Rules. These limits are designed to provide reasonable protection against harmful interference in a residential installation. This equipment generates, uses and can radiate radio frequency energy and, if not installed and used in accordance with the instructions, may cause harmful interference to radio communications.