BG-211b Blood Glucose Monitoring System Owner’s Booklet Advanced Diabetes Management System
Contents Introduction ························································ Important Safety information ······································· Important Health-Related information ···························· Limitations ························································· Getting to know your system ·································· Control Solution ··················································· Meter (battery included) ·········································· Test Strips ················
···················································· 34 Troubleshooting ························································ 36 Technical information ················································· 39 Specifications ·························································· 39 Disposing of the meter, test strips, lancets and batteries ····· 41 Warranty ································································· 42 Traceability ······························································· 43 Pe
Introduction * Peel off the insulation film from battery compartment before first use. Thank you for choosing Sejoy BG-211b blood glucose monitoring system. Before you start testing, carefully read this Owner’s Booklet. Intended Use It’s intended to be used for the quantitative measurement of glucose(sugar) in fresh capillary whole blood.
2 Introduction Important Safety information Warning • During normal testing, any blood glucose meter or lancing device may come in contact with blood. All parts of the kit are considered biohazardous and can potentially transmit infectious diseases from blood borne pathogens, even after you have performed cleaning and disinfecting. • The meter and lancing device should never be used by more than one person.
Introduction Important Health-Related information ·Patients undergoing oxygen therapy may receive inaccurate results. ·Some people with diabetes do not experience symptoms of low blood sugar (hypoglycemia). Others, such as children or people who are unconscious or have certain disabilities, may not be able to communicate their symptoms to caregivers.
4 Introduction ·The system is designed for using with whole blood samples. Do not use serum or plasma samples. ·DO NOT test on neonatal samples (new born). ·Inaccurate test results may be obtained at high altitude more than about 3, 048 meters above sea level. ·Hematocrit range: 30% to 55%. Hematocrit below 30% may cause higher results, and hematocrit above 55% may cause lower results. ·Some substances may cause false results with enzymatic tests.
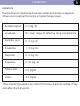
Introduction 5 Limitations The interference listed below have been tested and shown no apparent influence on results at the normal or higher therapy levels. Acetaminophen 2. 0 mg/dL Levodopa No clear range of effective drug concentration Ascorbic acid 2. 0 mg/ dL Creatinine 1. 5 mg/ dL Ibuprofen 4. 2 mg/ dL Dopamine 0. 04 mg/ dL Tetracycline 0.5 mg/dL Urate 8.0 mg/dL Other interfering substances in ISO 15197 Annex A are not verified, it may also affect the test results.
6 Getting to know your system INCLUDED WITH YOUR KIT a. Meter (battery included) b. Test Strips c. Lancing Device a d. Sterile Lancet e. Control Solution b c Manufacturer of Lancing Device and Sterile Lancet EC REP Manufacturer of Lancing Device and Sterile LancetShandong Lianfa Medical Plastic Products Co.. Ltd.No.1 Shuangshan Sanjian Road, 250200, Zhangqiu City, Jinan, Shandong, PEOPLE'SREPUBLIC OF CHINA ShanghaiInternational Holding Corp.
7 Getting to know your system a.
8 Getting to know your system b. Test Strip Top Edge Contact Bars Confirmation Window Contact Bar: Insert it into strip port. Push it all the way until it will go no further. Top Edge: Apply blood sample here Confirmation Window: Sample checking area Important: the meter should only be used with BS-102 test strips. Using other Test strips with this meter can produce inaccurate results. Important Test Strip Information • The system has an operating range of 10℃~40℃(50℉~104℉).
Getting to know your system c. Lancing Device Adjustable Tip Arrow Lancet Cap Lancing Device Cover Lancet Carrier Trigger Button Sliding Barrel Lancet Ejector d.
10 Setting up your meter When use the meter for the first time, please set the parameters of the meter. With the meter off, long press button “S” to enter into setting mode. ① Set the month Press and release the button “M” to advance one month until the correct month appears. After the month is set, press button “S”, the Date figure is flashing automatically. ② Set the date Press and release the button “M” to advance one day until the correct date appears.
Setting up your meter 11 ④ Set the minute Press and release the button “M” to advance one minute until the correct minute appears. After the minute is set, press button “S”, the Time format figure will appear. ⑤ Set the time format The meter can display the time in either an AM/PM (12-hour) or a 24:00 (24-hour) format. Press and release button “M” to select the format. With the preferred time format on the display, press button “S”, the measuring unit figure will appear.
12 Setting up your meter OR ⑦ Set the alarm clock The meter can set an alarm clock to remind you the time for testing. Press button “M” to check the alarm function. If the alarm is on, press button “S”, the time figure is flashing. Please refer to step 3 and 4 for the time setting. After the time is set, press button “S” button to exit the setting mode. If there is no alarm function requirement, press button “S” to exit the setting mode.
Testing your blood glucose Preparing the lancing device Warning • During normal testing, any blood glucose meter or lancing device may come in contact with blood. All parts of the kit are considered biohazardous and can potentially transmit infectious diseases from bloodborne pathogens, even after you have performed cleaning and disinfecting.1,2 • The meter and lancing device should never be used by more than one person.
14 Bluetooth connection Bluetooth requirements The Glucose Meter requires a bluetooth device with: . Bluetooth 4.0 or later . Android 6.0 or later . IOS 10.0 or later And works with: . iphone , iPod, iPad . Android Phones and Tablets Using for the first time 1. Download the "JoyHeath" App from Website or APP Store (Such as Apple Store). 2.Open the App on your phone or tablet. If requested, you should enable Bluetooth on your device.
15 Bluetooth connection Transfer your readings 1. As soon as your measurement is finished, open the app on your smart phone to transfer the reedings. Note: On the matched smart phone, Bluetooth must be enabled. Thermometer Blood pressure monitor GIU Login Glucose meter system Figure 1 After the measurement,the systemautomaticall analyzes Figure 2 Figure 3 Figure 4 2. You can view your blood glucose level readings in the app. 6.
16 Testing your blood glucose Preparing the lancing device ① Twist off the lancing device cover. ② Insert a new lancet into the lancet carrier firmly. ③ Hold the lancet needle cover and gently twist it until it separates from the lancet. ④ Replace the lancing device cap. Avoid touching the lancet pin. ⑤ Adjust the depth setting The adjustable tip offers 5 levels of skin penetration. Twist the lancing device cap until the desired setting appears.
Testing your blood glucose 17 Preparing the lancing device ⑥ Hold the lancing device cover in one hand. Using the other hand, slowly pull the sliding Barrel away from the lancing device cover. You will hear a click, indicating that the lancet carrier is locked into position. Release sliding barrel to return it to its original position.
18 Testing your blood glucose Blood Sampling ① Wash your hands and the puncture site with an alcohol swab or soapy water. Rinse and dry thoroughly. ② Position the end of the adjustable comfort tip against the side-tip of the finger. Press the trigger button, and then lift the lancing device away from the finger after the puncture is complete. Place the lancing device aside and wait a few seconds for a blood drop to form. Approximate size ③ Gently squeeze your finger until you get a round drop of blood.
Testing your blood glucose Blood Sampling IMPORTANT: • Use only Test Strips BS-102. • Make sure your meter and test strips are about the same temperature before you test. • Testing must be done within the operating temperature range 10℃~40℃(50℉~104℉). For the most accurate results, try to test as close to room temperature 20℃ ~ 25℃ (68 ℉ ~ 77 ℉)as you can. • Tightly close the cap on the vial immediately after use to avoid contamination and damage. • Store unused test strips only in their original vial.
20 Testing your blood glucose Testing ① With meter off or in setting mode and memory mode, insert a test strip to enter into testing mode. Note: If you do not start the test within three minutes, the meter will turn off. To restart your meter, take out the unused test strip and reinsert it into the meter. Important: The meter should only be used with BS-102 test strips. Using other test strips with this meter can produce inaccurate results.
Testing your blood glucose 21 Testing ④ Apply the sample Gently touch the channel to the edge of the blood drop. Note: • Discard the first drop of blood. Do Not smear or scrape the drop of blood with the test strip. • Do Not apply more blood to the test strip after you have moved the drop of blood away. • Do Not move the test strip in the meter during a test.
22 Testing your blood glucose ⑧ Delete the memory If you don’t want to keep the test result, press the “S” button and “M” button to delete it at the same time. After memory cleared, the meter will display “dEL” for aprrox.3 seconds, and the nautomatically turn off. ⑨ Turn your meter off Push the eject button gently to automatically eject the test strip from the meter, or remove the test strip by hand, the meter will automatically shut down. Please handle the used test strip carefully.
Testing your blood glucose Interpreting unexpected test results The meter can accurately measure blood glucose concentrations between 2.2 to 33.3 mmol/L (40 to 600 mg/dL). Expected Blood Glucose Level: Time Normal Blood Glucose Range Before breakfast 3.9-5.8 mmol/L(70-105mg/dL) Before lunch or supper 3.9-6.1 mmol/L(70-110mg/dL) 1 hour after meal ≤8.9 mmol/L (less than160 mg/dL) 2 hour after meal ≤ 6.7 mmol/L(less than 120 mg/dL) Between 2 am and 4 am ≥ 3.
24 Testing your blood glucose Interpreting unexpected test results mmol/L ② High glucose results If your test is above 33.3 mmol/L( 600 mg/dL ), HI will appear on the display screen. This indicates severe hyperglycemia (high blood glucose). • HI Reading with Symptoms If you feel symptoms such as fatigue, thirst, excess urination, or blurry vision, then follow your doctor’s recommendation to treat hyperglycemia.
Comparing Your Meter result to a Laboratory result 25 Comparing your meter's results with laboratory results periodically. The results of the Sejoy BG-211b meter are plasma equivalent. This method will help you and your healthcare professional compare your meter results with laboratory test results. The Sejoy BG-211b meter's test result and laboratory test results both are expressed in plasma-equivalent units.
26 Memory and averages Storing Blood glucose and Control Test results The meter automatically stores up to 360 blood glucose test results with the time and date of the test and any test markers. Results can be reviewed at any time. Test results are stored from the newest to the oldest, so set the time and date correctly in the meter. Having the correct time and date setting helps ensure appropriate interpretation of stored blood glucose results by you and your healthcare professional.
Memory and averages mmol/L 27 ③ Viewing7-, 14-, 28-day average Press and release “S” button to scroll forward to averages. The first memory display screen you see is your 7-day average. This average includes all the readings from the last period days. n = indicates the number of results included in your average ④ Deleting all memory Press and hold “S” button approximately 3 seconds. After memory cleared, the meter will display “dEL” for with 3 beep sounds for aprrox.
28 Control solution testing When to perform a control test Control Solution contains a known amount of glucose and is used to check that the meter and the test strips are working properly. Do a control solution test: • Whenever you open a new vial of test strips. • Whenever you want to check if you are testing correctly • If you suspect the meter and test strips are not working properly. • If you have had repeated unexpected blood glucose results. • If you drop or damage the meter.
Control solution testing 29 Performing a control test ① Insert a test strip to turn the meter on MEM OK AVG mg/dL mmol/L M D ② System check screen The backlight will be lit every time the meter is turned on. The screen will briefly display all content to confirm that the display is working properly. AM PM ③ The blood drop symbol flashes on the display screen. Your meter is now ready to apply blood sample. ④ Shake the control solution vial before each test.
30 Control solution testing Performing a control test ⑤ Touch and hold the hanging drop of control solution where the narrow channel meets the TOP EDGE of the test strip. Make sure the confirmation window fills completely. Control solution should not be applied to the flat face of the test strip. NARROW CHANNEL Apply Drop Here TOP EDGE mmol/L CONFIRMATION WINDOW ⑥ Read the result on the meter When the confirmation window is full, the meter will count down from 5 to 1.
Control solution testing Understanding out-of-range control test results Compare the result displayed on the meter to the control solution range printed on the test strip vial. Each vial of test strips may have a different control solution range. If the results you get are not within this range, the meter and test strips may not be working 6.1–9.1 mmol/L properly. Repeat the control solution test. (Example) CTRL 6.1–9.
32 Control solution testing ⑦ Delete the memory If you don’t want to keep the test result, press the“S” and “M” button to delete it at the same time.After memory cleared, the meter will display “dEL”about 3 seconds, and then automatically turns off. ⑧ Turn your meter off Push the eject button gently to automatically eject the test strip from the meter, or remove the test strip by hand, the meter will automatically shut down. Please handle the used test strip carefully.
Maintenance Replacing the battery Your meter comes with one preinstalled, 3 volt, type 2032, lithium battery. The battery provides enough power for the meter to perform about 1000 tests. If your battery runs low, the battery symbol “ ” appears on every display screen until you change the battery. Important: When this symbol appears, you should replace the battery immediately. ① With the meter off, open the battery cover.
34 Maintenance Caring for your system Avoid getting dirt, dust, blood, control solution, water, or any other liquid in the meter’s test strip port. Important: Never immerse the meter in water or any other liquid. This may cause inaccurate reading or meter malfunction. Storing your system Store your meter, test strips, control solution and other items in your carrying case after each use. Store each item in a cool, dry place. Test strips and control solution should be stored between 1℃~ 30℃ ( 33.8℉~86℉).
Maintenance 35 we recommend to disinfect periodically.When you assist others to make blood glucose testing, If you take the meter,please disinfect it or wear gloves to protect yourself. Cleaning your meter and lancing device To clean your meter and lancing device, wipe the outside with a soft cloth dampened with water and mild detergent. Do not use alcohol or another solvent. Do not get any liquids, dirt, dust, blood, or control solution inside the meter through the strip port.
36 Troubleshooting Message Possible Cause The system check may be failed The test strip may be used or damaged. What to do Remove the battery and reinsert it after 30 seconds. If it still doesn’t work, please contact the vendor. Retest with a new strip. The sample was applied before the . eter was ready. m Repeat with a new strip. Applying blood after the symbol flashes on the screen. The test strip may be moved during testing or sampling data is unstable. Retest with a new strip.
37 Troubleshooting Battery power is low. Replace the battery soon The meter is out of operating temperature range. Place the system in appropriate operating environment for 30 minutes before retesting.
38 Troubleshooting Meter does not enter the test mode after inserting a test strip. Probable Cause The battery is dead. What to Do Replace the battery (and reset the date and time,if necessary.) The battery is installed incorrectly or there is no battery in the meter. Check that the battery is installed correctly with the positive(+)sign facing upward, toward you. Test strip inserted upside down, or incompletely inserted into the meter.
Technical information Specifications Product description BG-211b Blood Glucose Monitoring System Assay method Glucose oxidase biosensor Measurement range 2.2-33.3 mmol/L (40~600 mg/dL) Sample Fresh capillary whole blood Sample size Approximate 1 microlitre Response time 5 seconds Coding No coding Battery One 3.
40 Technical information Specifications Weight Approximate 51g, battery not included 10℃~40℃(50℉~104℉) Operating environment 10 ~ 70% RH (non-condensing) -20℃~ 55℃ ( -4℉~131℉) Meter storage temperature 10 ~ 95% RH (non-condensing) Strip storage environment 1℃~ 30℃ (33.8℉~86℉) Altitude Up to 10,000 feet (3,048 meters) above sea level Hematocrit 30%~55 % Automatic power off Approx.
Disposing of the meter, test strips, lancets and batteries 41 Warning • Any product coming in contact with blood is considered contaminated (potentially infectious). • During normal testing, any blood glucose meter may come in contact with blood. • Lancing devices may also be considered sharps. Disposal of sharps is regulated by law in many jurisdictions. Comply with any laws or ordinances relating to the disposal of sharps and/or contaminated products.
42 Warranty Limited 2-Year Warranty The meter is guaranteed for 2-year from the date of purchase. If the meter does not function properly due to defective components or poor workmanship, we will repair or replace it freely. This warranty does not cover damage due to improper handling in any way. Battery does not included in the warranty.
Traceability The calibrator of the Sejoy Blood Glucose Monitoring System BG-211b is control solution. The traceability of the control solution is referenced to the EKF BIOSEN C line-Clinic glucose analyzer. The EKF is the reference method used to assess the accuracy with which glucose results are obtained using the system. The value of the calibrator for glucose is traceable to the National Institute of Standards and Technology (NIST) Standard Reference Material (SRM) 917b (D-Glucose).
44 Performance Characteristics The performance of the system has been evaluated both in laboratory and in clinical tests. Range: The display range of the meter is 2.2mmol/L to 33.3 mmol/L (40mg/dL to 600 mg/dL). "HI" and "Lo" messages indicate results outside of this range. • Accuracy: The accuracy of the system was assessed by comparing blood glucose results obtained using EKF Glucose Analyzer, a laboratory instrument. Table1. System accuracy results for glucose concentration <5.
Performance Characteristics Precision: Intermediate Precision Repeatability Control Solutionav 2.41 mmol/L CV=5.2% Control Solutionav 7.51 mmol/L CV=3.3% Control Solutionav 20.73 mmol/L CV=2.6% Blood av 2.40 mmol/L CV=2.39% Blood av 5.01 mmol/L CV=2.39% Blood av 7.51 mmol/L CV=2.41% Blood av 12.21 mmol/L CV=4.99% Blood av 20.74 mmol/L CV=5.
46 Symbol Index Consult instructions for use In vitro diagnostic medical device SN Serial number Caution Batch code Manufacturer ∑ Contain sufficient for < n > tests Storage temperature limitation STERILE R Sterilized using irradiation Do not reuse Use by
Symbol Index xxxx 47 The Product confoems to the requirements of the EC Directive IVDD(98/97/EC) on in vitro diagnostic medical devices“xxxx” is the identification number of notify body Biological risks Keep dry Please dispose of the waste according to the local regulations Direct Current
48 FCC INFORMATION Caution: Changes or modifications to this unit not expressly approved by the party responsible for compliance could void the user authority to operate the equipment. This device complies with Part 15 of the FCC Rules. Operation is subject to the following two conditions: (1) this device may not cause harmful interference, and (2) this device must accept any interference received, including interference that may cause undesired operation.
Appendix 49 1. “FDA Public Health Notification: Use of Fingerstick Devices on More than One Person Poses Risk for Transmitting Bloodborne Pathogens: Initial Communication” (2010) http://wayback.archive-it.org/7993/20170111013014/http://www.fda.gov/ MedicalDevices/Safety/AlertsandNotices/ucm224025.htm 2. CDC Clinical Reminder:"Use of Fingerstick Devices on More than One Person Poses Risk for Transmitting Bloodborne Pathogens,(2010) https://www.cdc.gov/injectionsafety/Fingerstick-DevicesBGM.
Document No: DBG-1504-011 Version: Z Date of Issue: 20XX.XX Hangzhou Sejoy Electronics & Instruments Co., Ltd. Area C, Building 2, No.