
Safety Instructions


CONTROLS SETUP:
Caution! When working on your aircraft with the battery installed, ALWAYS remove the
propeller in order to avoid the chance of injury if the motors accidentally turn on.
1. Turn on the transmitter, move the throttle to high and then back to low.
a. Remove the bottom hatch and plug in a charged battery. You will hear a series of beeps
coming from the motor.
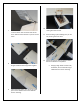
2. Check the control direction and reverse the servos from your transmitter if needed.
a. Move the rudder stick left. The rudder should deflect left.
b. Pull the elevator stick down towards you. The elevator surface should deflect upwards
c. Move the aileron right. The left aileron should deflect downwards, and the right aileron
should deflect upwards.
3. Check the centering of the control surfaces. Adjust the clevises in or out to level all the surfaces.
4. Once you are satisfied with the setup, unplug the battery.
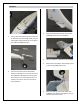
PROPELLER INSTALLATION:
1. Assemble the prop collet, thrust washer, spinner
backplate, propeller and nut (keep loose).
2. Push the propeller assembly onto the motor shaft.
Leave a 0.5mm gap between the motor and the
collet. Tighten prop nut using a 10mm wrench.
3. Attach the spinner cone with (1)M2x6 screw.