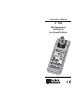
Instruction Manual C 102 Multiparameter Turbidity & Ion Specific Meter This Instrument is in Compliance with the CE Directives www.hannainst.
Dear Customer, Thank you for choosing a Hanna Product. Please read this instruction manual carefully before using the instrument. This manual will provide you with the necessary information for the correct use of the instrument, as well as a precise idea of its versatility. If you need more technical information, do not hesitate to e-mail us at tech@hannainst.com. This instrument is in compliance with tives. direc- TABLE OF CONTENTS General Description ....................................
GENERAL DESCRIPTION The Hanna C 102 is a portable microprocessor driven, multiparameter, turbidity and ion specific meter. It measures Free & Total Chlorine, Cyanuric Acid, pH, Iodine, Bromine, Low Range Iron and Turbidity. In the colorimetric mode, the user can select either factory preprogrammed calibration settings or calibrate the meter using customized calibration values based on the concentration or relative absorbance of the sample. Calibration data is also stored in a non-volatile EEPROM.
In Progress”. The upper level also indicates the concentration or turbidity of the sample, as well as different diagnostic modes, such as “-BA-” for low battery. 2) Secondary LCD: The three-digit LCD shows the current mode of measurement that is “F CL”, “t CL”, “CY”, “PH”, “Id”, “Br”, “L FE”, “tr”, and diagnostic or calibration modes, such as “d 11”, “2 Fn”, “5 c1”.
shown. If pressed in time/date setup mode, the meter will quit current mode without making any changes to current time/ date. 12) key Scrolls upwards through the parameters to be measured. In calibration/diagnostic mode, increments the blinking digit by one. If pressed together with ALT while the meter is in logging mode, the upper LCD will show the data (date/time/value) in the memory. 13) ALT key: Alternative functions. 14) Scrolls downwards through the parameters to be measured.
OPERATIONAL GUIDE SET CURRENT TIME/DATE To set or change the current time, turn on the meter. After initialization routine, the LCD will show: CURRENT TIME/DATE RECALL To recall current TIME/DATE press and hold the ALTand READ keys together. The current time and an intermittent “TIME” will be displayed. + Release the keys. Press and hold the ALT and GLP keys together. Display will show the current date in MM.DD format (e.g. August 28 is shown as 08.28).
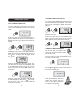
Press READ. The meter will intermittently display “SIP” on the upper level of the LCD. The meter will show “SIP” for a few seconds and then a zero indication: After a few seconds the display will show the turbidity value, e.g. 5.34 NTU: For pH, add 0.2 mL of HI 93710-01: For Chlorine, Iodine and Bromine, add the content of their respective packet: 1x COLORIMETRIC MEASUREMENTS Turn the meter on.
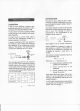
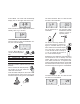
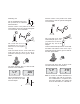
Measuring Iron Add the content of one packet of HI 93746 TPTZ reagent, close the cylinder and agitate for 30 seconds. Fill one graduated mixing cylinder up to the 25 mL mark with deionized water. Add the content of one packet of HI 93746 TPTZ reagent, close the cylinder and agitate for 30 seconds. This is the blank. 12 9 12 9 30" 3 6 30" 3 6 Fill a cuvet with 10 mL of the blank up to 1.5 cm (¾") below the rim and replace the cap. 1.
gether with the “Ab” indicator, e.g.: 533 Ab = 533 milliabs. units Note: Absorbance readings may have a negative sign if the transmittance of the “ZERO” sample is less then that of the reacted sample. Note: For better accuracy wash glassware with HCl 6N. Measurements in user-customized mode Note: The meter must be calibrated for this purpose. Follow the two-point customized calibration on page 26 before proceeding. Turn the meter on and by momentarily pressing both ALT and CAL.
CALIBRATION TURBIDITY CALIBRATION The meter should be properly calibrated with a standard prepared as described in USEPA method 180.1. Span calibration To calibrate the span of the meter, fill the cuvet with the primary turbidity formazine standard of 50 NTU. Inspect and clean thoroughly the surface of the vial. Shake the standard vigorously for a few seconds and wait a few minutes for the bubbles to disappear. Turn the meter on and press both ALT and CAL momentarily.
If the CAL key is not pressed, the upper display will show “----”, indicating that calibration mode was not entered. In which case, hold down the ALT and CAL keys together for 3 seconds to restart the procedure. After entering the calibration mode, the display will show the first point of the previous calibration. The most significant digit will also be blinking. Using the , , keys, set the turbidity of first calibration standard (from 0.00 to 50.0 NTU).
Using , , keys set the lower part to “d 31”. Insert the previously prepared deionized water standard into the cuvet holder and make sure that the notch on the cap is positioned securely into the groove. Press the key. The display will blink “-Lc-” for several seconds, indicating that adjustment of the LED for the colorimetric measurements is in progress. After this, a sequence of numbers between -511 to 512 will appear on the upper LCD indicating the different levels of LED light intensity.
After entering the calibration mode, the display will show the first point of the previous calibration with the most significant digit blinking. Using the , and keys, choose the concentration of the first calibration standard. Insert the known standard into the cuvet holder and make sure that the notch is positioned securely into the groove. Press the key. The display will indicate sample in progress.
DIAGNOSTIC MODE C 102 facilitates operations by providing a diagnostic mode. In this mode, user can set or verify different parameters necessary to ensure optimum performance of the meter. To enter the diagnostic mode, turn the meter on and momentarily press ALT and CAL together. The display will show four dashes together with “d 00”: + Using the , and keys, select the required diagnostic mode and press the key.
of the display to remind the user that every time a measurement is taken, the value is stored in the next available lot number. REVIEWING THE LOGGED BUFFER To review the memorized values, press together ALT and . + To clear the buffer, press the ALT and CAL keys. Select mode 40. Press the key. The display will show the “Cln” message, indicating that memory is being cleaned. + The meter will scroll all the data in the buffer showing the lot number, value, date and time. e.g.
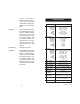
The meter will store new settings in its nonvolatile memory and the display will flash “CAL” and “Stor” alternatly for several seconds. DIAGNOSTIC CODES LOBAT Weak batteries. Change all batteries as soon as possible. -BA- Exhausted batteries. Change all batteries immediately. -LO- Low level of light is received during the zeroing procedure. Check for scratches on the cuvet and ensure that sample is not excessively turbid. Repeat the readings.
ACCESSORIES HI 93722-01 HI 93722-03 HI 731327 HI 93102-0 HI 93102-20 HI 93701-01 HI 93701-03 HI 93703-50 HI 93710-01 HI 93710-03 HI 93711-01 HI 93711-03 HI 93716-01 HI 93716-03 HI 93718-01 HI 93718-03 Starter kit includes: Rugged carrying case; HI 93102-0 AMCO-AEPA-1 0 NTU* calibration solution, 30 mL; HI 93102-20 AMCO-AEPA-1 20 NTU* calibration solution, 30 mL; HI 93703-50 Cleaning solution, 230 mL; HI 731318 Tissues for wiping the cuvet (4 pcs); Two measurement cuvets AMCO-AEPA-1 0 NTU* calibration so
WARRANTY CE DECLARATION OF CONFORMITY Hanna Instruments meters are guaranteed for two years against defects in workmanship and materials when used for their intended purpose and maintained according to instructions. This warranty is limited to repair or replacement free of charge. Damages due to accidents, misuse, tampering or lack of prescribed maintenance are not covered. If service is required, contact the dealer from whom the instrument was purchased.
MANC102R3 07/01 w w w . h a n n a i n s t .