
User Guide

ISTRREACR1 10/01
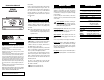
FRONT PANEL
1) Heater block: 1) Heater block:
1) Heater block: 1) Heater block:
1) Heater block: can warm up to 25 samples.
2) Power LED indicator2) Power LED indicator
2) Power LED indicator2) Power LED indicator
2) Power LED indicator: Lights when the power button on
the back of the instrument is switched ON.
3) Heating LED indicator3) Heating LED indicator
3) Heating LED indicator3) Heating LED indicator
3) Heating LED indicator: Lights only when the heater is
working (warming up). When the indicator cycles ON and
OFF, the heater is maintaining stable the set temperature.
4) Temperature mode switch4) Temperature mode switch
4) Temperature mode switch4) Temperature mode switch
4) Temperature mode switch: Selects 105 or 150 ºC (221
or 302 ºF) operation mode.
5) Timer5) Timer
5) Timer5) Timer
5) Timer: The knob allows to control the heating procedure.
It is possible to choose:
§
Timed procedure modeTimed procedure mode
Timed procedure modeTimed procedure mode
Timed procedure mode: when the timer is set
between 0 and 120 minutes, the heater will main-
tain constant the selected temperature for the
remaining time. The reactor will shut off at the end
of the elapsed time and will inform the user with an
acoustic alarm.
§
∞
infinity mode infinity mode
infinity mode infinity mode
infinity mode: the heating indicator will light
when the heater is operating. The heater block will
remain at the selected temperature as long as the
instrument power is ON.
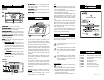
REAR PANEL
Set the power switch (back of the instrument) to ON
position. The power indicator will light. Set the tempera-
ture switch to 105 or 150 ºC (according to the procedure
described in the manual of the specific parameter).
Position the timer to the ∞ position by turning the knob
anticlock-wise to allow the heater to operate; the heating
indicator will light. Allow the heater block to warm up for
approximately 30-40 minutes, depending on the set tem-
perature. During this period the heating indicator will
remain ON.
When the heating indicator cycles ON and OFF, it means
that the heater has reached the set temperature and is
maintaining it constant.
At this moment it is possible to start a timed procedure
and select the time interval requested by the specific
parameter digestion procedure by turning the knob clock-
wise. During this procedure the heating indicator will cycle
ON and OFF.
Attention: to assure a correct digestion it is important to
start the timed procedure as soon as the heater is stabi-
lized at the selected temperature (that is when the
heating indicator starts to cycle ON and OFF).
OPERATINGOPERATING
OPERATINGOPERATING
OPERATING
FUNCTIONAL DESCRIPTIONFUNCTIONAL DESCRIPTION
FUNCTIONAL DESCRIPTIONFUNCTIONAL DESCRIPTION
FUNCTIONAL DESCRIPTION
6) Power switch6) Power switch
6) Power switch6) Power switch
6) Power switch: Turns the instrument ON and OFF.
When the power button is set in the ON position the
power indicator will light.
7) Fuse holder7) Fuse holder
7) Fuse holder7) Fuse holder
7) Fuse holder: The fuse is placed near the case for easy
maintenance operations.
8) Power supply8) Power supply
8) Power supply8) Power supply
8) Power supply: 115 or 230 VAC, depending on model.
Notes:
• Use of the optional safety shield is strongly recom-
mended to protect the operator from splattering reagents
in case of a vial should break.
• Do not place the Reactor near heating or cooling source.
Temperature stability could be affected.
• The set temperature is that typically expected into the
tubes. The temperature of the metallic block is a few
degrees higher than the set value, in order to allow the
heat transmission from the block to the liquid inside the
tubes.
• During operation, the block temperature will be slightly
different for block empty or full of vials. If cold tubes are
placed in the block, the temperature will decrease of
several degrees and a few minutes will be required to
recover as the tubes warm.
• An external stainless steel probe thermometer can be
used for a check of the block temperature, simply by
placing it into the appropriate receptacle.
MAINTENANCEMAINTENANCE
MAINTENANCEMAINTENANCE
MAINTENANCE
The instrument should be kept clean and any reagent spill
should be wiped up immediately.
Do not touch the heater block unless you are
certain it has cooled.
If some reagent accidentally spills into the heater
block, disconnect power and allow the instrument
to cool; then remove all tubes and clean the
block.
Should overheating occurs, the reactor automati-
cally shuts down. Both LED indicators turn off.
Contact your dealer or your nearest Hanna Service
Center for maintenance.
Fuse replacement
Replace fuse only with fuse of specified type and
current rating.
• Turn the instrument off before removing the fuse holder.
• Unscrew the fuse holder by rotating it counterclockwise.
• Replace the fuse with one 4A fuse for 115-volt model
or one 2A fuse for 230-volt model.
• Replace the holder before turning the instrument on.
ACCESSORIESACCESSORIES
ACCESSORIESACCESSORIES
ACCESSORIES
HI 151-00 Hanna thermometer (-50.0 to 220 ºC)
HI 151-01 Hanna thermometer (-58.0 to 428 ºF)
HI 740138 2A, 5x20mm fuse
HI 740139 2A, 5x20mm fuse (6 pcs)
HI 740214 4A, 5x20mm fuse
HI 740215 4A, 5x20mm fuse (6 pcs)
HI 740216 Test tube cooling rack (25 holes)
HI 740217 Laboratory bench safety shield
CE DECLARATIONCE DECLARATION
CE DECLARATIONCE DECLARATION
CE DECLARATION
OF CONFORMITYOF CONFORMITY
OF CONFORMITYOF CONFORMITY
OF CONFORMITY