
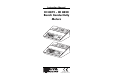
User's Manual


6
CONDUCTIVITY MEASUREMENTSCONDUCTIVITY MEASUREMENTS
CONDUCTIVITY MEASUREMENTSCONDUCTIVITY MEASUREMENTS
CONDUCTIVITY MEASUREMENTS
Make sure that the instrument has been calibrated before taking
conductivity measurements (see page 8 for calibration procedure).
Connect the probe to the back of the meter and
switch the instrument on by pressing the ON/OFF
key. If possible, to minimize any EMC interfer-
ences, use plastic beakers for the solutions.
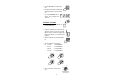
FOR HI8819:
••
••
• Immerse the probe in the solution submerging
the holes of the sleeve (0.5 cm below). Tap
the probe lightly on the bottom of the recipi-
ent to remove any air bubbles which may
have being trapped inside the sleeve.
••
••
• Take the temperature of the solution with a
CHECKTEMP or a glass thermometer.
••
••
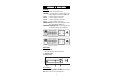
• Press the COND/TEMP key to select tempera-
ture mode.
••
••
• Adjust the TEMPERATURE knob until the LCD
displays the temperature of the solution.
••
••
• Press the COND/TEMP key to select the con-
ductivity measurement range.
••
••
• If the display shows only a "1", there is an
over-range condition. Select the next higher
range.
••
••
• The conductivity reading displayed has been manually compen-
sated for temperature variations.
••
••
• After the measurement is completed, the in-
strument should be switched off by pressing
the ON/OFF key and the probe should be
cleaned (see page 15 for cleaning procedure).
°C
TEMPERATURE
mS