
Owner manual


6
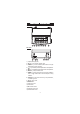
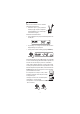
POWER CONNECTIONPOWER CONNECTION
POWER CONNECTIONPOWER CONNECTION
POWER CONNECTION
Plug the 12 VDC adapter into the power supply socket.
Notes: • These instruments use non volatile memory to retain the pH,
mV, temperature calibrations and all other settings, even
when unplugged.
• Make sure a fuse protects the mains line.
ELECTRODE AND PROBE CONNECTIONSELECTRODE AND PROBE CONNECTIONS
ELECTRODE AND PROBE CONNECTIONSELECTRODE AND PROBE CONNECTIONS
ELECTRODE AND PROBE CONNECTIONS
For HANNA P Type pH or ORP electrodes (with internal reference) connect
the electrode’s BNC to the socket on the back of the instrument and the
pin to the reference socket.
Note: Electrode condition and response information is displayed on the
bar graph gauges during the day the calibration is performed,
only if HANNA P type (PIN) electrodes are used.
If the electrode is not recognized as a HANNA P type electrode, the
bar graph gauges will blink (25 seconds OFF, 4 seconds ON, full
bar graph).
For temperature measurement and automatic temperature compensation
connect the temperature probe to the appropriate socket.
INSTRUMENT STINSTRUMENT ST
INSTRUMENT STINSTRUMENT ST
INSTRUMENT ST
ARTART
ARTART
ART
-UP-UP
-UP-UP
-UP
• Turn the instrument on by pressing the ON/OFF switch located on
the rear panel.
• All LCD tags are displayed and a beep is sounded while the instrument
performs a self test.
• The instrument will display “LoAd” message and “ ” blinking until
initialization is complete.
• The “Unscrew electrode refilling cap” message reminds the user
to loosen or remove the electrode refilling cap to improve the electrode’s
response time.
• The instrument automatically defaults to pH measurement mode
unless a HANNA P type ORP electrode is detected.
OPERATIONAL GUIDEOPERATIONAL GUIDE
OPERATIONAL GUIDEOPERATIONAL GUIDE
OPERATIONAL GUIDE