Instruction Manual HI9017 - HI9218 HI9219 - HI9318 Microprocessor Bench-top pH Meters with RS232C PR OG RA MS to ex it fr se om ts an am yp pli ua pri ro PG ng to lly nt gra 6 nu pri en ca PG M to m m nt te lib 7 be rc pri sa ra PG M to r, ali tio nt m 8 M p bra time s n s PG et le am da to 9 tio da an pH ta ple se PG M to nb ta dd /m le CL d un M uff ct V ate pri EA til ala ata dif erv to nt sp un fe R en rm ion alu re ec til to te nt e en co ifie rR cle wo nc dp d ti S2 ar en rk oin m en 32 ing tra e t t
Dear Customer, Thank you for choosing a Hanna Instruments Product. Please read this instruction manual carefully before using the instrument. This manual will provide you with all the necessary information for the correct use of the instrument, as well as a precise idea of its versatility in a wide range of applications. directives These instruments are in compliance with CSA, UL and (EN 50081-1 and EN50082-1). TABLE OF CONTENTS GENERAL DESCRIPTION ..........................................................
PRELIMINARY EXAMINATION Remove the instrument from the packing material and examine it to make sure that no damage has occurred during shipping. If there is any damage, notify your Dealer. Note: Save all packing material until you are sure that the instrument functions correctly. All defective items must be returned in the original packing with the supplied accessories.
(with 1m/3.3' cable), 12VDC adapter (HI710005 or HI710006), pH 4.01 & pH 7.01 buffer solutions (20 mL each), HI7071 electrolyte solution (30 mL), HI76405 electrode holder and a dust cover. • HI9218 and HI9219 are programmable pH/°C meter with builtin printer. They print pH values together with temperature, time and date. These meter provide you with pH and temperature readings simultaneously and separately on the LCDs and feature a unique stability indicator.
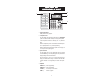
FRONT PANEL AND SPECIFICATIONS OF H HII 9017 1 2 PROGRAMS 1 to manually enter calibration buffer value ENTER ENTER PGM 1st buffer 2nd buffer B A °C to enter pH alarm ENTER 2 PGM A upper limit B to enter mV alarm ENTER 3 PGM upper limit A HI 9017 MICROPROCESSOR pH METER ENTER lower limit B to enter temperature alarm ENTER ENTER upper limit A lower limit B 4 PGM 5 to enter pH end point alarm ENTER ENTER PGM end point value A alert value B 6 to enter RS 232 ESC code ENTER ESC code PGM A t
ON key OFF key RANGE key CAL key CON key +/- key TEMP key 0 to 9 keys to switch the instrument on. to switch the instrument off. to switch range from pH to mV or vice versa. used in calibration with standard pH buffers (pH 4.01, 7.01, 10.
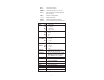
FRONT PANEL AND SPECIFICATIONS OF HI9218 & HI9219 2 Foodcare 3 pH °C To change paper roll or ink ribbon Slide cover to the left to open. 4 PRINT PAPER Push ribbon cassette as marked - to release Insert new paper roll. Pass leading end under guide plate and press PAPER to feed paper through the printer. Pass leading end through ribbon cassette, with ribbon at the front and press cassette into position STABILITY INDICATOR READY 1 NO YES PRINT Press to check reading stability.
DATE/TIME key CAL key CFM key UP/DOWN key PAPER key PRINT key READY key to display date and time. to enter calibration mode. to confirm memorized buffers 7.01 and 4.01/10.01. to set manual temperature compensation and date/time. manual paper feed control. prints pH value together with temperature, date and time. stability indicator to ensure correct pH reading or to enable calibration. SPECIFICATIONS HI9218 HI9219 Ranges pH 0.00 to 14.00 °C -10.0 to 125.0 Resolution pH 0.01 °C 0.1 Accuracy pH ±0.01 ±0.
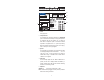
FRONT PANEL AND SPECIFICATIONS OF H HII 9318 1 3 PROGRAMS 0 PGM to exit from any program 4 1 PGM to set sampling number, time and date 2 PGM to manually enter calibration buffervalue pH °C 3 PGM to print calibration data 5 6 4 PGM to print sample data until specified time 5 PGM to print sample data until end point PAPER 6 PGM to set pH/mV alarm PRINT CLEAR SAMPLE DATE 7 PGM to select different working language 8 PGM to print ion concentration 9 PGM to enter RS232C ESC code CLEAR to clear entry
RANGE key CAL key CON key + / - key TEMP key selects pH or mV readings to be displayed on the right LCD to enter into the calibration mode for confirmation of buffer value during calibration select + or - value for manual temperature compensation allows to select temperature manually when the temperature probe is not connected PGM key selects any of the 9 available programs 0 to 9 keys numeric and Decimal keys for numeric data input SPECIFICATIONS Ranges pH ISE ORP °C Resolution pH ISE ORP °C Accuracy pH (
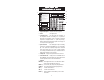
REAR PANEL CONNECTIONS COMBINATION pH ELECTRODE DTR GND REFERENCE ELECTRODE TXD RXD 5 ooooo1 9 oooo 6 TEMPERATURE PROBE RESET DSR RS-232 ooooo oooo 1 2 3 4 5 6 7 1) BNC male connector for single or combination electrode. Will accept any pH or ORP electrode with a standard BNC connector.
Power connection Plug the 12VDC adapter (HI710005 or HI710006) into the DC socket (#7). Plug the adapter into the mains. Note: The instrument uses the following configuration. - + It is recommendable to use the Hanna HI7710005 or HI710006 voltage adapters (supplied witht the meters) that use the proper polarity configuration. The meters can also be used with other adapters. In this case, remember to check the correct polarity of your adapter before connecting it to the meter.
OPERATIONAL GUIDE TAKING PH MEASUREMENTS Make sure that the instrument has been calibrated for pH before taking pH measurements (see page 18). Connect the pH electrode (combination-type) or the electrode half cells to the appropriate connectors on the rear panel (see page 11). If automatic temperature compensation is required, connect the HI7669/2W temperature probe to the proper socket on the rear panel (see page 11). ON Press the ON key to turn the meter on.
For the rinsing process, it is recommended to use a liberal amount of the next solution to be measured. Using refillable electrodes Unscrew the small refill cap to open the refill hole during measurements. After measurements replace the refill hole cap. This will increase the pressure and give a faster response. FOR HI 9218, HI 9219, HI 9318 ONLY PRINT Press the PRINT key to get a printout at any time. All the printouts will be complete with date, time, sample No.
With negative temperature values (e.g. -7.3°C) use the +/- key • press 7 • press decimal point • press 3 • press +/• press TEMP 7 . 3 +/- TEMP ºC Notes: 1) For negative value inputs, always key in the value followed by the +/- key. °C 2) If the +/- key is pressed twice it will toggle back to the positive value. The value will be displayed on the left LCD and "°C" symbol will be flashing.
TAKING TEMPERATURE MEASUREMENTS Taking a temperature measurement is very easy. Turn the instrument ON. Make sure the temperature probe is connected and allow the reading to stabilize (1 or 2 minutes). The temperature value will be displayed on the left LCD. °C pH TAKING ORP MEASUREMENTS (FOR HI 9017 AND HI 9318 ONLY) 4 cm (1½") HI9017 and HI9318 have the capability to take ORP measurements, using an ORP electrode. Hanna Instruments offers a variety of ORP electrodes for this purpose (see page 59).
FOR HI 9318 ONLY Press PRINT key to get a printout at any time. All the printouts will be complete with date, time, sample No., temperature and mV value. DATE TIME SAMPLE °C mV 1/02 12:40 5 20.5 -350.0 AFTER MEASUREMENTS OFF Press the OFF key to switch the instrument OFF. See page 50 for storage, cleaning and maintenance procedures for electrodes.
PH CALIBRATION IMPORTANT The instrument's pH range should be re-calibrated: • When the meter is new. • Whenever the pH electrode is replaced. • At least once a month. • After testing aggressive chemicals. • After cleaning procedure and changing the reference electrolyte. • For greatest accuracy. INITIAL PREPARATION HI 04 70 Pour small quantities (about 4cm / 1½" as level) of pH7.01 (HI7007 or HI8007) and pH4.01 (HI7004 or HI8004) or pH 10.01 (HI7010 or HI8010) solution into clean beakers.
4 cm (1½") • Immerse the pH electrode and the ATC probe into pH7.01 buffer solution. Shake briefly and wait 1-2 minutes for thermal equilibrium. Note: the electrode should be submerged approximately 4 cm (1½") into the solution. The temperature probe should be positioned as close to the pH electrode as possible. CAL • Press the CAL key. The temperature compensated value of the buffer solution will appear on the left LCD and the pH symbol will be blinking. HI 7007 pH pH E.g.
4 cm (1½") • Rinse the electrode and the temperature probe before immersing them into pH 4.01 or pH10.01 calibration buffer, shake briefly and wait for thermal equilibrium. At this moment, "Err5" will disappear. The display will show the temperature compensated value of the second buffer solution and the pH symbol will be blinking. HI 7004 pH pH If a wrong buffer or a faulty electrode has been used, "Err5" remains on the pH left display. • Press the CON key to confirm the pH value.
PH CALIBRATION FOR HI9218 & HI9219 4 cm (1½") Procedure ON • Turn the instrument ON after connecting the pH electrode and the temperature probe. • Immerse the temperature probe together with the electrode into pH 7.01 buffer solution or manually set the temperature to the temperature of the buffer (if you are not using the temperature probe HI7669/2W see page 25). Note: the electrode should be submerged approximately 4 cm (1½") into the solution.
• After about 30 seconds, the small display will show "YES": press the CFM key to confirm the calibration. CFM The LCD will show "Err5" to indicate that the electrode is now ready for slope calibration and another step of instruction procedures will be printed. °CºC pH Now dip the electrode in 2nd solution, wait for 'YES' to appear and then press CFM 4 cm (1½") • Rinse and immerse the pH electrode and temperature probe in pH 4.01 or pH10.01 solution.
PH CALIBRATION FOR HI9318 ON 4 cm (1½") Procedure • Switch the instrument on after connecting the electrode and temperature probe. • Immerse the pH electrode and the ATC probe into pH 7.01 buffer solution. Shake briefly and wait 1-2 minutes for thermal equilibrium. Note: the electrode should be submerged approximately 4 cm (1½") into the solution. The temperature probe should be positioned as close to the pH electrode as possible. HI 7007 CAL • Press the CAL key.
The LCD will show "Err5" to indicate that the electrode is now ready for slope calibration. pH °CºC • Immerse the pH electrode and the probe into pH4.01 or 10.01 solution. 4 cm (1½") The LCD will show the corresponding buffer value at the working temperature. HI 7004 pH °CºC • Wait approximately 30 seconds, and then press the CON key to confirm the calibration. The printer will confirm the calibration process is complete Calibration completed The calibration is now complete.
CALIBRATION WITH MANUAL TEMPERATURE COMPENSATION If for some reason the temperature probe is defective, or it is required to calibrate with manual temperature compensation, follow the procedure below: • Unplug the temperature probe from the meter. • Note the temperature of the buffer with a ChecktempC or a glass thermometer. For HI9017 only To manually set a temperature value (e.g. 20.0°C) proceed as follows: • press 2 key • press 0 key • press TEMP key.
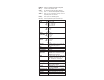
P H VALUES AT VARIOUS TEMPERATURE The calibration buffer solutions are effected by temperature changes to a lesser degree than normal solutions. When manually entering the calibration values (see program #1 for HI9017 and program #2 for HI9318) please refer to the following chart. pH Buffers °C 0 5 10 15 20 25 30 35 40 45 50 55 60 65 70 75 80 85 90 95 °F 32 41 50 59 68 77 86 95 104 113 122 131 140 149 158 167 176 185 194 203 4.01 4.01 4.00 4.00 4.00 4.00 4.01 4.02 4.03 4.04 4.05 4.06 4.07 4.09 4.11 4.
HOW TO SET DATE AND TIME (H (HII 9218 & H HII 9219) Press the PRINT key to get a printout of date and time. If you want to change them, proceed as follows. To set the date, press and hold Press UP or DOWN the DATE key. key to set year, or press DATE key again to continue DATE The meter will give all instructions to set this function.
PROGRAMS OF HI9017 ENTER A ENTER B ins rum n s CLEAR ON OFF 7 8 9 4 5 6 1 2 3 CAL CON 0 . PGM +/- TEMP RANGE There are all together 6 programs in the instrument. To select a particular program, press the program number on the numeric keyboard followed by the PGM key. E.g. To select program 1 • press 1 • press PGM 1 PGM pH ENTER A At this stage, the left display shows "Px - y" (where x refers to program number that you had pressed and y refers to ENTER A or ENTER B).
The 6 programs stored in the instrument are: Program 1: To manually enter calibration buffer values Program 2: To set upper and lower pH alarm limits Program 3: To set upper and lower mV alarm limits Program 4: To set upper and lower temperature alarm limits Program 5: To set end point and alert value pH alarms Program 6: To set RS232C Esc code (Default value is 16 decimal) To stop or exit any program: • press 0 • press PGM 0 PGM Note: the instrument must be in pH mode for program 1, 2 and 5.
e.g. 6.95 at 5°C: • press 6 • press decimal point • press 9 • press 5 • press ENTER A 6 . 9 ENTER A 5 pH pH Value 6.95 appears on the left display with pH symbol blinking. If there is a difference of 1 pH between the two displays, there will be a long beep. CON Otherwise, • press the CON key. The left display value is transferred to the right display and the left display shows "P1-2". pH 9 .
The left display value is transferred to the right display and the left display shows the temperature value. °CºC pH The instrument is now completely calibrated and switches back to the normal operating mode. Notes:: • If you wish to calibrate the instrument with the offset only, exit the program by pressing 0 and PGM keys after the first CON key is pressed. • The instrument accepts any 2 buffers provided the difference between the buffer values is at least 2 pH units. Any buffer can be used first. E.g.
At this stage, the left display shows "P2-1", and the right display shows the measured pH value. 2 PGM pH • press 9 • press decimal point • press 3 • press 2 • press ENTER A The left display then shows "P2-2". 9 . 3 ENTER A 2 pH • press 6 • press decimal point • press 0 • press 3 • press ENTER B. 6 . 0 ENTER B 3 °CºC pH PROGRAM # 3 (HI 9017) Setting of upper and lower mV alarm limits. When either limit is reached, the alarm mV will be activated and the value will flash simultaneously.
E.g. activation of alarm for values higher than 500 mV and lower than -20.3 mV. • set the instrument to the mV mode RANGE • press 3 • press PGM. 3 mV PGM At this stage, the left display shows "P3-1", and the right display mV value. • press 5 • press 0 • press 0 • press ENTER A 5 0 ENTER A 0 mV The left display then shows "P3-2". • press 2 • press 0 • press decimal point • press 3 • press +/• press ENTER B. 2 0 .
To stop: • press 0 • press PGM. 0 PGM E.g. activation of alarm for values higher than 49.3°C and lower than -6.3°C. • press 4 • press PGM. 4 PGM pH At this stage, the left display shows "P4-1". • press 4 • press 9 • press decimal point • press 3 • press ENTER A 4 9 . ENTER A 3 pH The left display then shows "P4-2". • press 6 • press decimal point • press 3 • press +/• press ENTER B 6 .
PROGRAM # 5 (HI 9017) Setting of endpoint and alert pH alarm values. When the alert value is reached i.e. between the final value and the alert value, there will be a single alert beep. When the endpoint value is reached, the alarm will be activated continuously and pH the value will simultaneously flash. CLEAR To clear the alert or alarm, press the CLEAR key. To stop: • press 0 • press PGM. 0 PGM E.g. activation of alarm for an endpoint value of pH 9.32 and alert value of pH 9.03.
The left display then shows "P5-2". • press 9 • press decimal point • press 0 • press 3 • press ENTER B. 9 . 0 ENTER B 3 °C ºC pH PROGRAM #6 (HI9017) Setting of RS232C ESC code. E.g. ESC code is 20 (decimal). • press 6 • press PGM. 6 PGM pH At this stage, the left display shows "P6-1". • press 2 • press 0 • press ENTER A. 2 0 ENTER A °C ºC pH Note: the ESC code should be between 0 - 127 decimal, the default is 16.
PROGRAMMING LOGGER FUNCTIONS OF HI9318 The following section explains how each of the HI 9318's logging programs work. Each program has up to 3 functions defined by the A, B and C key. For program #4, #5 and #6 only, you can log pH or mV values depending on the RANGE key selection. PROGRAM #1 (HI9318) This program allows the user to set sample number, time and date. Values entered into program 1 are kept in memory even when programs 2 to 9 are used.
3) The time value (B) can be set for a 24 hour clock. 2 P.M., for example equals 14.00. Push "14.00" followed by "B". 1 4 . 0 0 B PROGRAM 1 A set sample no. B set time C set date Sample number 200 Time 14.00 4) When setting the date (C), enter the month first. Separate month and day with a decimal point. E.g. February 4th is entered as "2.04" followed by "C". 2 . 0 4 C PROGRAM 1 A set sample no. B set time C set date Sample number 200 Time 14.00 Date 2.
PROGRAM #2 (HI9318) This program lets you calibrate with buffer values other than 4, 7 and 10 pH which are pre-programmed into memory. To enter program 2, press the 2 key and then the PGM key. 2 PGM PROGRAM 2 A is the first buffer value and A enter 1st bufB is the second buffer value. fer B enter 2nd buffer 4 cm (1½") The buffers can be anywhere between 0 and 14 pH. Example: To calibrate with NBS buffers 6.86 pH and 9.18 pH at a temperature of 10°C.
Check the appropriate value for the buffer at the measured buffer temperature (see page 26). After about 30 seconds enter the 2nd buffer value at the working temperature and then press "B". E.g. 9.33 (at 10°C). 9 . 3 3 B PROGRAM 2 A enter 1st buffer B enter 2nd buffer 1st buffer 6.92 2nd buffer 9.33 Press the 0 key followed by the PGM key. The calibration is now complete. PROGRAM #3 (HI9318) This program prints the date, time, the offset and slope characteristics of the pH electrode.
PROGRAM # 4 (HI9318) This program logs and prints pH/mV and temperature values at a preset interval between 1 minute and 24 hours. 4 To enter the program press the 4 key and the PGM key. PGM The printout defines functions A, B and C: PROGRAM 4 A is a start time, A enter start B is the time interval, time C is the finish time. B enter time intHours and minutes must be erval separated by a decimal point. C enter end time The minimum time interval is 1 minute. E.g.
The printout defines functions A, B and C: A is a start time, PROGRAM 5 B is the time interval, C is the interrupt value of A enter start time pH/mV. Hours and minutes must be B enter time interval separated by a decimal C enter end point. The minimum time inpH/mV value terval is 1 minute. E.g. Starting time 10:30, a printout interval of 1h and 30 minutes, pH interruption value 3.50. 1) 1 0 . 3 0 2) 1 . 3 0 B 3) 3 .
E.g. lower limit 6.5, upper limit 7.5. 6 . 5 A 7 . 5 B To stop the beeper from sounding when the limit is exceeded, press the C key. To definitely exit the program press the 0 plus the PGM key. PROGRAM #7 (HI9318) This program allows the user to select a different working language. Press the 7 key and then the PGM key. The printer will print out a list of languages available. The default working language is English. To choose a language, key in the corresponding number then press the A key. E.g.
PROGRAM #8 (HI9318) This program prints out the ion concentration in M for the pH value measured. To activate the program, press the 8 key and then the PGM key. 8 PGM PROGRAM 8 3.88 pH-- 0.132 mM H+ Note: Make sure the meter is in pH mode, otherwise a long beep will be heard. PROGRAM #9 (HI9318) For more details see "Interface with computer" section on page 46. Press the 9 key and then the PGM 9 PGM key. Enter the ASCII Code of the desired prefix character and then press the A key. E.g.
TROUBLESHOOTING GUIDE Symptoms are: The problem is: The instrument does A defective ATC probe not work with the ATC probe. The meter fails to A defective pH eleccalibrate or gives er- trode roneous results.
INTERFACE WITH COMPUTER Data transmission from the instrument to the PC is now much easier with the new HI92000 Windows® compatible application software offered by Hanna Instruments. User friendly, HI92000 offers a variety of features and has an on line help feature to support you throughout all situations. HI92000 allows you to use the powerful means of the most diffused spread sheet programs (e.g. Excel©, Lotus 1-2-3©). Simply run your favorite spread sheet and open the file downloaded by HI92000.
This line makes the computer send a Data Link Escape character (the command expressed as a number or a 3-character sequence) and a CR character. Note: Windows Terminal® and all the other terminal programs that support the ANSI escape sequence, represent the DLE character by the string ‘^P’ and the CR character by the string ‘^M’. E.g. the line ‘^PPHR^M’ sets the range to pH. TYPE OF COMMANDS Commands not requiring an answer from the pH meter.
BKY CKY PGM TEM PRT CLR PHR MVR PAP is equivalent to the B key is equivalent to pressing the C key is equivalent to pressing the PGM key is equivalent to pressing the TEMP key is equivalent to pressing the PRINT key is equivalent to pressing the CLEAR key brings the instrument into pH measurement range brings the instrument into the mV measurement range causes the paper to advance by one tenth of a line. In order to advance the paper by one entire line, send a RETURN character.
HI9318 by pressing the 9 key and then the PGM key. Enter the ASCII Code of the desired prefix character and then press the ENTER A key for HI9017 or the A key for HI9318. It is advisable to use a control character as a prefix (not RETURN, which already performs other functions) or a non-control character which is not being used for other purposes, for example the "@" sign (ASCII Code64).
ELECTRODE CONDITIONING AND MAINTENANCE Reference Filling Hole Reference Filling Hole Sensitive Wire Reference Wire Reference Wire Sensitive Wire Reference Junction Reference Junction Glass Bulb Glass Bulb Plastic Body pH Electrode Reference Wire Reference Junction Platinum or Gold tip Glass Body pH Electrode Reference Wire Reference Junction Platinum or Gold tip Plastic Body ORP Electrode Glass Body ORP Electrode PREPARATION Remove the protective cap.
For refillable electrodes: If the filling solution (electrolyte) is more than 1 cm (½") below the fill hole, add HI7082 or HI8082 3,5M KCl Electrolyte Solution for double junction or HI7071 or HI8071 3,5M KCl+AgCl Electrolyte Solution for single junction electrodes. For a faster response, unscrew the fill hole screw during measurements. For AmpHel electrodes: If the electrode does not respond to pH changes, the battery is run down and the electrode should be replaced.
CLEANING PROCEDURE General Soak in Hanna HI7061 or HI8061 General Cleaning Solution for approximately 1 hour. Removal of films, dirt or deposits on the membrane/junction: - Protein Soak in Hanna HI7073 or HI8073 Protein Cleaning Solution for 15 minutes. - Inorganic Soak in Hanna HI7074 or HI8074 Inorganic Cleaning Solution for 15 minutes. - Oil/grease Rinse with Hanna HI7077 or HI8077 Oil and Fat Cleaning Solution.
TEMPERATURE-RESISTANCE CORRELATION FOR HANNA pH SENSITIVE GLASS The resistance of glass electrodes partially depends on the temperature. The lower the temperature, the higher the resistance. It takes longer time for the reading to stabilize if the resistance is higher. In addition, the response time will suffer to a greater degree at temperatures below 10°C.
ACCESSORIES pH CALIBRATION SOLUTIONS HI 70004P HI 70007P HI 70010P HI 7004L HI 7006L HI 7007L HI 7009L HI 7010L pH 4.01 Buffer Sachets, 20mL, 25 pcs pH 7.01 Buffer Sachets, 20mL, 25 pcs pH 10.01 Buffer Sachets, 20mL, 25 pcs pH 4.01 Buffer Solution, 460 mL pH 6.86 Buffer Solution, 460 mL pH 7.01 Buffer Solution, 460 mL pH 9.18 Buffer Solution, 460 mL pH 10.01 Buffer Sol., 460 mL pH CALIBRATION SOLUTIONS IN FDA APPROVED BOTTLES HI 8004L HI 8006L HI 8007L HI 8009L HI 8010L pH 4.
REFILL ELECTROLYTE SOLUTIONS IN FDA APPROVED BOTTLES 3.5M KCl + AgCl Electrolyte, 4x50mL, for single junction electrodes 1M KNO3 Electrolyte, 4x50 mL 3.5M KCl Electrolyte, 4x50 mL, for double junction electrodes HI 8071 HI 8072 HI 8082 ORP PRETREATMENT SOLUTIONS Reducing Pretreatment Solution, 460 mL Oxidizing Pretreatment Solution, 460 mL HI 7091L HI 7092L pH ELECTRODES All electrodes part numbers ending in B are supplied with a BNC connector and 1 m (3.3') cable. B = BNC CONNECTION PLUG + 1 m (3.
HI 1131B / HI1111S Glass-body, single junction, refillable, combination pH electrode. Use: general purpose. 9.5mm DIA 0.37" 12 mm 0.5" HI 1131 120 mm 4.7" "S" VERSION HI 1330B / HI1310S Glass-body, semimicro, single junction, refillable, combination pH electrode. Use: laboratory, vials. 5mm DIA 0.2" 5mm 0.2" HI 1330 120 mm 4.7" "S" VERSION HI 1331B / HI1311S Glass-body, semimicro, single junction, refillable, combination pH electrode. Use: flasks. 8 mm 0.3" 7.5mm DIA 0.29" HI 1331 210 mm 8.
HI 1332B / HI1312S Plastic-body (Ultem®), double junction, refillable, combination pH electrode. Use: general purpose. 12 mm 0.5" HI 1332 120 mm 4.7" "S" VERSION FC 100B Plastic-body (Kynar®), double junction, refillable, combination pH electrode. Use: general purpose for food industry. 12 mm 0.5" FC 100 120 mm 4.7" FC 200B / FC200S Plastic-body (Kynar®), open junction, conic, Viscolene, non-refillable, combination pH electrode. Use: meat & cheese. 6 mm 0.25" FC 200 75 mm 2.
FC 911B Plastic-body (Kynar®), double junction, refillable with built-in amplifier, combination pH electrode. Use: very high humidity. 12 mm 0.5" FC 911 110 mm 4.3" HI 1413B / HI1410S Glass-body, single junction, flat tip, Viscolene, non-refillable, combination pH electrode. Use: surface measurement. 12 mm 0.5" HI 1413 110 mm 4.3" HALF-CELL ELECTRODES: HI2110B Glass-body, single half-cell pH electrode. Use: general purpose. 9.5mm DIA 0.37" 12 mm 0.5" HI 2110 120 mm 4.
HI5412 Glass-body, single Calomel reference half-cell electrode, refillable with 4mm plug with 1m (3.3') cable. Use: general purpose with constant temperature range. 12 mm 0.5" HI 5412 120 mm 4.7" ORP ELECTRODES: HI3131B / HI3111S Glass-body, refillable, combination platinum ORP electrode. Use: titration. 12 mm 0.5" HI 3131 150 mm 5.9" "S" VERSION HI3230B / HI3210S Plastic-body (Ultem®), gel-filled, combination platinum ORP electrode. Use: general purpose. 12 mm 0.5" HI 3230 120 mm 4.
EXTENSION CABLES FOR SCREW-TYPE ELECTRODES ONLY (SCREW TO BNC CONNECTOR): HI7855/1 HI7855/3 HI7855/5 HI7855/10 HI7855/15 Extension cable 1m (3.3') long Extension cable 3m (9.9') long Extension cable 5m (16.5') long Extension cable 10m (33') long Extension cable 15m (49.5') long HI 7855 SERIES CABLE CONNECTORS CONNECTOR AND 3.0 mm (0.
ELECTRODE APPLICATION REFERENCE GUIDE Application 1. Aquarium 2. Bath-water 3. Beer 4. Bread 5. Cheese 6. Dairy products 7. Dirty water 8. Emulsions 9. Environment 10. Flasks 11. Food industry general use 12. Fruit 13. Fruit juices, organic 14. Galvanizing waste solution 15. Heavy-duty applications 16. High purity water 17. Horticulture 18. In-line applications 19. Laboratory general use 20. 21. 22. 23. 24. 25. 26. 27. 28. 29. 30. 31. 32. 33. 34. 35. 36. 37. 38. 39. 40. 41. 42.
WARRANTY All Hanna Instruments meters are warranted for two years against defects in workmanship and materials when used for their intended purpose and maintained according to instructions. The electrodes and the probes are warranted for a period of six months. This warranty is limited to repair or replacement free of charge. Damages due to accident, misuse, tampering or lack of prescribed maintenance are not covered. If service is required, contact the dealer from whom you purchased the instrument.
CE DECLARATION OF CONFORMITY DECLARATION OF CONFORMITY We Hanna Instruments Srl V.le delle industrie 12 35010 Ronchi di Villafranca (PD) ITALY herewith certify that the bench pH meters HI 9017 HI 9218 HI 9219 HI 9318 have been tested and found to be in compliance with the following regulations: IEC 801-2 IEC 801-3 IEC 801-4 EN 55022 Electrostatic Discharge RF Radiated Fast Transient Radiated, Class B Date of Issue: 02-02-1996 D.Volpato - Engineering Manager On behalf of Hanna Instruments S.r.l.
HANNA LITERATURE WATER ANALYSIS HANDBOOK ENVIROCARE GENERAL CATALOG PRINTED IN ITALY LAB RECORDING h t t p : / / w w w . h a n n a i n s t . c o m MANPHBN2R3 07/98 These and many others catalogs, handbooks and leaflets are available from Hanna. To receive your free copy, contact your dealer or the nearest Hanna Customer Service Center.