HZ194/HZ201 HZ221/HZ231 HZ251/HZ281 HSG 1085/ HSG 1084 HSG 1088/ HSG 1083 HSG 1082/ HSG 1081
Manual del usuario Antes de utilizar el monitor, lea cuidadosamente este manual. Este manual debe guardarse por si tuviera que consultarlo en el futuro. Declaración de la FCC sobre Interferencias de Frecuencias de Radio de Clase B Este equipo ha sido probado y ha cumplido con los requisitos para un dispositivo digital de Clase B según el Párrafo 15 del Reglamento FCC. Estos límites han sido diseñados para ofrecer una protección razonable contra interferencias dañinas en instalaciones residenciales.
Manual del usuario Modelo: HZ251 & HZ281 Congratulations! The product you have just purchased carries the TCO’06 Media Displays label. This means that your display is designed and manufactured according to some of the strictest performance and environmental criteria in the world. The manufacturer of this display has selected it to be certified to TCO’06 Media Displays as a sign of usability, high performance and reduced impact on the natural environment.
Manual del usuario INFORMACIÓN SOBRE EL RECICLAJE A nosotros, la Hanns.G nos importa mucho nuestra política de protección del medioambiente y creemos firmemente que nos ayuda tener una Tierra más sana usando tratamientos adecuados y el reciclaje de dispositivos tecnológicos industriales al final de su vida útil. Estos dispositivos contienen materiales reciclables que pueden ser reciclados y reintegrados en forma de nuevas maravillas.
Manual del usuario TABLA DE CONTENIDO AVISO RELACIONADO CON LA SEGURIDAD ........................................... 6 PRECAUCIONES ........................................................................................... 6 NOTAS ESPECIALES ACERCA DE MONITORES LCD........................ 7 ANTES DE UTILIZAR EL MONITOR ............................................................ 8 CARACTERÍSTICAS ....................................................................................
Manual del usuario AVISO RELACIONADO CON LA SEGURIDAD 1. Los cambios o modificaciones no aprobados expresamente por la parte responsable del cumplimiento anularán la autorización del usuario para trabajar con el equipo. 2. Debe utiliza un cable de alimentación de CA y cables de interfaz apantallados para no sobrepasar los límites de emisión. 3. El fabricante no se responsabilizará de ninguna interferencia de radio o televisión causada por modificaciones no autorizadas practicadas a este equipo.
Manual del usuario NOTAS ESPECIALES ACERCA DE MONITORES LCD Los siguientes síntomas son normales con monitores LCD y no indican un problema. • Debido a la naturaleza de la luz fluorescente, la pantalla puede parpadear durante el uso inicial. Desconecte la alimentación y vuelva a conectarla para asegurarse de que el parpadeo desaparece. • Puede detectar un brillo ligeramente irregular en la pantalla dependiendo del patrón de escritorio que utilice.
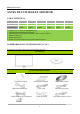
Manual del usuario ANTES DE UTILIZAR EL MONITOR CARACTERÍSTICAS Modelo: Tamaño: Resoluciones recomendadas: • • • • • • HZ194 18.
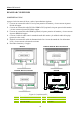
Manual del usuario INSTRUCCIONES DE INSTALACIÓN INSTALACIÓN DESINSTALACIÓN Figura 1. Instalar y desinstalar la base INSTALACIÓN: 1. Coloque el monitor orientado hacia abajo sobre una superficie llana y equilibrada. 2. Alinee el monitor con la apertura de la base. 3. Gire el tornillo hacia la derecha para fijar la base al monitor. (En los modelos HZ194, HZ201, HZ221, HZ231 y HZ251, el tornillo está unido a la base)(En el caso del modelo HZ281, busque los 2 tornillos necesarios en la bolsa de accesorios).
Manual del usuario REALIZAR CONEXIONES CONEXIÓN A UN PC: Apague el televisor antes de llevar a cabo el procedimiento siguiente. 1. Conecte un extremo del cable VGA a la parte posterior del monitor y el otro extremo al puerto D-Sub del equipo. 2. Conecte un extremo del cable DVI-D o HDMI a DVI (opcional) a la parte posterior del monitor y el otro extremo al puerto DVI-D del equipo. 3. Conecte un extremo del cable HDMI (opcional) a la parte posterior del monitor y el otro extremo al puerto HDMI del equipo.
Manual del usuario AJUSTE DEL ÁNGULO DE VISIÓN 1. Para conseguir la mejor visualización, es recomendable mirar a toda la superficie del monitor y, a continuación, ajustar el ángulo del monitor en función de sus preferencias. 2. Sujete la base de forma que no deje caer el monitor cuando cambie su ángulo. 3. El ángulo del monitor se puede ajustar entre -5° y 15°( HZ194, HZ201, HZ231, HZ221) , 0° y 20°( HZ251, HZ281). HZ194, HZ201, HZ231, HZ221 HZ251, HZ281 Figura 3.
Manual del usuario INSTRUCCIONES DE FUNCIONAMIENTO INSTRUCCIONES GENERALES Presione el botón de encendido para encender o apagar el monitor. El resto de botones de control se encuentran en el panel frontal del monitor (consulte la Figura 4). Si cambia esta configuración, la imagen podrá ajustarse en función de sus preferencias personales. • El cable de alimentación debe estar conectado. • Conecte el cable de señal desde el monitor a la tarjeta VGA. • Presione el botón de encendido para encender el monitor.
Manual del usuario FUNCIONES DE LOS BOTONES DEL PANEL DE CONTROL • Botón de encendido: Presione este botón para ENCENDER/APAGAR el monitor. • Indicador de encendido: Verde — Modo Encendido. Naranja — Modo de ahorro de energía. • MENÚ/ VOLVER: 1. Enciende/Apaga el monitor o vuelve al menú anterior. 2. Salir del menú OSD en el estado OSD de volumen. • Ajuste ▲▼: 1. Ajusta el brillo y el volumen si el OSD está desactivado. 2.
Manual del usuario Resolución 640x400@70Hz ↔ 720x400@70Hz 640x400@85Hz ↔ 720x400@85Hz 640x480@60Hz ↔ 720x480@60Hz 1024x768@70Hz ↔ 1280x768@70Hz 1280x768@60Hz ↔1360x768@60Hz 1360x768@60Hz ↔ 1366x768@60Hz 1440x900@60Hz ↔ 1600x900@60Hz 1400x1050@60Hz ↔ 1680x1050@60Hz 1400x1050@RB 60Hz ↔ 1680x1050@RB 60Hz 1400x1050@75Hz ↔ 1680x1050@75Hz 1280x960@60Hz ↔ 1600x900@60Hz ** Las resoluciones de pantalla disponibles dependerán del modelo adquirido.
Manual del usuario CÓMO AJUSTAR LA CONFIGURACIÓN BRILLO/ CONTRASTE BRILLO Puede ajustar el brillo de la pantalla de acuerdo con sus preferencias. Seleccione la opción 「BRILLO」 para ajustar el valor de brillo. CONTRASTE Ajuste el valor de contraste de la pantalla de acuerdo con sus preferencias. Seleccione la opción 「CONTRASTE」para ajustar el valor de contraste. X-CONTRAST Configuración óptima para imágenes o vídeos de alto contraste.
Manual del usuario RELACIÓN DE ASPECTO Si la relación de aspecto de la pantalla está distorsionada, puede realizar ajustes utilizando esta función.「FULL」(COMPLETO) indica que la pantalla se mostrará completa, lo cual no garantiza que se muestre la imagen con su escala original.「FIT」 (APROPIAR) indica el escalado en proporción de las imágenes originales, lo cual podría implicar la aparición de bandas negras a ambos lados de la imagen.
Manual del usuario POSICIÓN H Seleccione la opción 「POSICIÓN H [H-position]」 para ajustar la posición horizontal del menú OSD. Introduzca la opción y ajuste el nivel. POSICIÓN V Seleccione la opción 「POSICIÓN V [V-position]」para ajustar la posición vertical del menú OSD. Introduzca la opción y ajuste el nivel. TRANSPARENCIA Seleccione la opción 「TRANSPARENCIA」 para ajustar la transparencia del menú OSD. INTERV. DE ESPERA DE OSD Seleccione la opción 「INTERV.
Manual del usuario CONECTAR Y LISTO [PLUG AND PLAY] FUNCIÓN DDC2B Conectar y listo Este monitor cuenta con las funciones DDC2B VESA según la NORMA DDC VESA. Dicha norma permite al monitor informar al sistema principal de su identidad y, dependiendo del nivel de DDC utilizado, comunicar información adicional sobre sus funciones de visualización. DDC2B es un canal de datos bidireccional basado en el protocolo I²C. El sistema principal puede solicitar información EDID a través del canal DDC2B.
Manual del usuario SOPORTE TÉCNICO (P+F) preguntas y respuestas par defectos generales PROBLEMA Y PREGUNTA El indicador LED de encendido no se ilumina POSIBLE SOLUCIÓN *Compruebe si el conmutador de encendido está en la posición de encendido. *El cable de alimentación debe estar conectado. *Compruebe si su PC es compatible con la función Plug & Play (Conectar y listo).
Manual del usuario Es necesario ajustar la resolución de la pantalla No se transmite sonido a los altavoces integrados del monitor *Utilice Windows 2000/ME/XP. Haga clic derecho en cualquier punto de la pantalla y seleccione Propiedades > Cnfiguración > Resolución de pantalla. Utilice la barra deslizante para ajustar la resolución y pulse el botón Aplicar. * Asegúrese de que el cable de salida de audio del PC está conectado al puerto ENTRADA DE LÍNEA de la pantalla.
Manual del usuario MENSAJES DE ERROR Y POSIBLES SOLUCIONES CABLE NO CONECTADO: 1. Compruebe que el cable de señal está correctamente conectado. Si el monitor está suelto, apriete los tornillos del conector. 2. Compruebe si los contactos de conexión del cable de señal están dañados. ENTRADA NO ADMITIDA: Su PC se ha establecido en un modo de visualización incompatible. Establezca su PC en el modo de visualización dado en la tabla siguiente.
Manual del usuario 28 1440×900 @60Hz 64.981 60.05 ▲ ▲ ▲ ▲ ▲ 29 1440×900 @75Hz 66.981 75.07 ▲ ▲ ▲ ▲ ▲ 30 1400×1050 @60Hz 64.744 59.948 31 1600×900 @60Hz 55.54 59.978 32 1680×1050 @60Hz 65.29 59.954 33 1920×1080 @60Hz 66.587 59.934 34 1920×1200 @60Hz 74.038 59.
Manual del usuario APÉNDICE ESPECIFICACIONES-HZ194 Panel LCD Vídeo Sistema Pantalla LCD TFT en color Tamaño 18.5" Densidad de píxeles 0.3 mm (H) x 0.3 mm (V) Frecuencia H 24 KHz – 61 KHz Frecuencia V 56 – 75 Hz Colores de visualización 16.7M de colores Resolución máxima 1366 X 768 @ 60 Hz Plug & Play (Conectar y listo) VESA DDC2BTM , DPMS Consumo de energía Modo activado 28 W (Típico) Modo de ahorro de energía ≤1 W Modo desactivado ≤0.5 W Salida de audio Potencia nominal de 1.
Manual del usuario ESPECIFICACIONES-HZ201 Panel LCD Vídeo Sistema Pantalla LCD TFT en color Tamaño 20" Densidad de píxeles 0.276 mm (H) x 0.276 mm (V) Frecuencia H 24 KHz – 70 KHz Frecuencia V 56 – 75 Hz Colores de visualización 16.7M de colores Resolución máxima 1600 X 900 @ 60 Hz Plug & Play (Conectar y listo) VESA DDC2BTM , DPMS Consumo de energía Modo activado 35 W (Típico) Modo de ahorro de energía ≤1 W Modo desactivado ≤0.5 W Salida de audio Potencia nominal de 1.
Manual del usuario ESPECIFICACIONES-HZ221 Panel LCD Vídeo Sistema Pantalla LCD TFT en color Tamaño 22" Densidad de píxeles 0.282 mm (H) x 0.282 mm (V) Frecuencia H 24 KHz – 83 KHz Frecuencia V 56 – 75 Hz Colores de visualización 16.7M de colores Resolución máxima 1680 X 1050 @ 60 Hz Plug & Play (Conectar y listo) VESA DDC2BTM , DPMS Consumo de energía Modo activado 35 W (Típico) Modo de ahorro de energía ≤1 W Modo desactivado ≤0.5 W Salida de audio Potencia nominal de 1.
Manual del usuario ESPECIFICACIONES-HZ231 Panel LCD Vídeo Sistema Pantalla LCD TFT en color Tamaño 23" Densidad de píxeles 0.265 mm (H) x 0.265 mm (V) Frecuencia H 24 KHz – 83 KHz Frecuencia V 56 – 75 Hz Colores de visualización 16.7M de colores Resolución máxima 1920 X 1080 @ 60 Hz Plug & Play (Conectar y listo) VESA DDC2BTM , DPMS Consumo de energía Modo activado 35 W (Típico) Modo de ahorro de energía ≤1 W Modo desactivado ≤0.5 W Salida de audio Potencia nominal de 1.
Manual del usuario ESPECIFICACIONES-HZ251 Panel LCD Vídeo Sistema Pantalla LCD TFT en color Tamaño 25" Densidad de píxeles 0.283 mm (H) x 0.283 mm (V) Frecuencia H 24KHz – 83 KHz Frecuencia V 56 – 75 Hz Colores de visualización 16.7M de colores Resolución máxima 1920 X 1080 @ 60 Hz Plug & Play (Conectar y listo) VESA DDC2BTM , DPMS Consumo de energía Modo activado 48 W (Típico) Modo de ahorro de energía ≤1 W Modo desactivado ≤0.5 W Salida de audio Potencia nominal de 2.
Manual del usuario ESPECIFICACIONES-HZ281 Panel LCD Vídeo Sistema Pantalla LCD TFT en color Tamaño 28" Densidad de píxeles 0.309 mm (H) x 0.309 mm (V) Frecuencia H 24 KHz – 80 KHz Frecuencia V 56 – 75 Hz Colores de visualización 16.7M de colores Resolución máxima 1920 X 1200 @ 60 Hz Plug & Play (Conectar y listo) VESA DDC2BTM , DPMS Consumo de energía Modo activado 95 W (Típico) Modo de ahorro de energía ≤1 W Modo desactivado ≤0.5 W Salida de audio Potencia nominal de 2.