Control Buttons
Contents of the Package *LCD Monitor (Reference only, the real feature is depended on selected model) Screen Base *Accessory Power Cord D-SUB Cable Audio Cable Warranty and manual service User’s Manual 2 Warranty and Service Manual HDMI Cable (Optional)
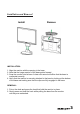
Installation and Removal Install Remove INSTALLATION: 1. Align the monitor with the opening in the base. 2. Note that the longer section of the base points forward. 3. Snap the monitor into its base. A clear click sound will affirm that the base is connected correctly. 4. Verify that the monitor is securely attached to the base by looking at the bottom of the base and making sure that the clips are fully engaged in the base. REMOVAL: 1. Put on the desk and press the hook that hold the monitor in place. 2.
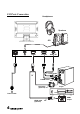
I/O Ports Connection Headphones Speakers OR AC IN HDMI Audio IN D-SUB Audio Cable or D-SUB Cable DVI Cable (optional) Player Power outlet HDMI cable (optional) 4 HDMI HDMI output
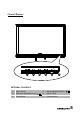
Control Buttons 1 2 4 3 5 6 EXTERNAL CONTROLS: 1. Menu / Return 3. Brightness adjustment button / 5. Power Button 2. [+] Volume adjustment button / 4. INPUT / Enter 6.
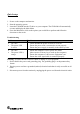
Quick setup 1. Power on the computer and monitor. 2. Start the operating system. 3. Insert the CD-ROM into the CD drive on your computer. The CD-ROM will automatically execute and display the Main Menu. 4. From the Main Menu, click on the options you would like to perform and follow the directions on the screen. Troubleshooting Problems • No video • The power LED is not lit. • • No video The power LED is orange. Check items • Check whether the power of screen is on or not.
7
8
9
10
11
12
13
14
15
16
17