HannsBook SN10E2 Series USER’S MANUAL
Trademark: All trademarks are the property of their respective owners. Version: User’s Manual V1.0 for Netbook. CA UT IO N Symbol description: ! Caution : refers to important information that can help you to use Netbook better, and tells you how to avoid problems. WEEE: The use of this symbol indicates that this product may not be treated as household waste.
Safety Precautions CA UT IO N The following safety precautions will increase the life of the netbook. Please follow allprecautions and instructions. Except as described in the manual, refer all servicing to qualified personal. ! ■ Do not place on uneven or unstable work surfaces. Seek servicing if the casing has been damaged. ■ Do not expose to dirty or dusty environment. And Do not operate during a gas leak.
Table of Contents Chapter 1 Introduction to Your Netbook ............ Accessories.....................................................................................................2 External Appearance.......................................................................................3 Setting Up Your Computer...............................................................................8 Touchpad Usage...........................................................................................12 .......
Netbook Introduction to Your Netbook ■ Accessories ■ External Appearance ■ Setting Up Your Computer ■ Touchpad Usage ■ Special Function Keys 1
Check your product package for the following items: ● Netbook ● Battery Pack ● Adapter ● AC Power Cable ● Driver DVD ● Recovery DVD ● Quick Installation Guide ● Warranty Card ● Carry Bag ● Wiping Cloth CA UT IO N 1 1-1 Accessories ! Before your purchase, if any of the above items is damaged or missing, please contact your retailer.
1-2 External Appearance Refer to the diagram below to identify the components on every side of the netbook. 1 1. Top View 1 2 9 3 4 5 6 7 CA UT IO N 8 ! Your Netbook keyboard may vary depending on the country/region of purchase.
1 No. Item Description 1 Web Camera Records videos or take photos 2 LCD LED backlight panel 3 Power Button Button for turning the computer's power on/off. ● Glowing blue when the Netbook power is turned on. ● Blinking blue when the Netbook is entering suspend mode.
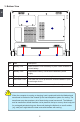
2. Rear View 1 1 2 No. Item Description 1 Battery Pack Replaceable battery pack that serves as Netbook's power supply. SIM Card Slot (optional) To insert the SIM card into the slot as the icon shown and make sure that the gold pins of SIM card are downward. (Warning: Please do not insert or pull out the SIM card when power-on, otherwise the data may lose or the card would be damaged.
1 3. Bottom View 5 4 2 CA UT IO N 1 ! 3 No. Item Description 1 Battery Lock Slide inwards to lock the battery in place. Slide outwards to unlock battery. 2 Battery Pack Replaceable battery. Serves as the Netbook's power supply 3 Battery Latch Push outwards to release battery for removal 4 Hard Disk Cover The Hard Disk Cover protects the internal hardware. Open to exchange device 5 Memory Cover The cover is to protect the memory from damage.
4. Left View 2 3 4 5 No. Item Description 1 External Display Port Connects to an external display 2 Power Port Connects to the external power supply 3 Vent Netbook's cooling vent 4 USB Port Connects to USB 2.0 device 5 Memory Card Slot Supports MMC/SD/MS memory cards 5. Right View 1 2 3 4 5 6 No. Item Description 1 Headphone Connects to external headphone 2 Microphone Connects to external microphone 3 USB Port Connects to USB 2.0 device 4 USB Port Connects to USB 2.
1 1-3 Setting Up Your Computer 1. Installing/Removing the Battery Pack Please install the battery before using the Netbook and connect the external power supply transformer. The Netbook can be powered by the battery or the external transformer. If you are in an office environment, we recommend using the external transformer as much as possible. If you are away from the office and no power socket is available, use the battery instead.
1 2 3 Removing the Battery Pack Step 1: Shut down the Netbook. Disconnect all cables and devices. Step 2: Turn the Netbook over and unlock the battery by pushing the Battery Lock outwards. Step 3: Push the Battery Latch outwards and hold it in place with your finger. Now use the other hand to pull the battery out. 2 1 3 CA UT IO N ! Do not remove the battery while the Netbook is still running. This may damage the data on the hard disk.
The AC transformer provides external power source to your Netbook and charges the battery pack at the same time. The AC transformer also has an auto-switching design that can connect to any 100V AC ~240V AC power outlets. Step 1: Plug the power cord into the power socket of the AC transformer. Step 2: Plug the connector of the AC transformer to the DC port of Netbook. Step 3: Plug the other end of the power cord to a live power outlet. 1 2 CA UT IO N 1 2.
Step 2: Turn on the machine by pressing the Power Button. 1 Power Button 4. Emergency Shutdown When the Netbook cannot be shut down through normal means, please press and hold the Power Button until the Netbook powers off.
1-4 Touchpad Usage 1 1. Introduction to the Touchpad The touchpad is like a computer mouse. It senses the pressure from the user's finger and generates a voltage that is used to control the cursor's movements and issue commands. The touchpad senses finger movements. Simply move one finger across the touchpad to control the movement of the cursor on screen. Below the touchpad is three buttons. The left button is like the left mouse button and is used for selecting options or launching programs on screen.
5. Multi-finger Gesture Input Applications Two-finger zooming in/out Adobe Reader, Windows Photo Viewer Two-finger rotating Adobe Reader, Windows Photo Viewer Two-finger scrolling up/down or left/right Adobe Reader, MS Word, MS Excel ● Two-finger zooming in/out: Moving two fingertips apart or together on the touchpad to zoom in or zoom out. This is convenient when viewing photos or reading documents.
1-5 Special Function Keys 1 The following defines some special function keys on the netbook.
Netbook Install Windows XP in Netbook ■ Install a new Windows XP system ■ Install drivers in a new Windows XP 2
2 Make sure you have these ready: 1. An USB DVD drive. 2. A Netbook driver CD. 3. Windows XP Install CD. Before we continue : ■ Shut down your computer. ■ Connect the USB DVD drive to an USB port of Netbook and connect the power cord to AC power. 2-1 Install a new Windows XP system 1. Press to enter BIOS setup during POST, select and the go to "Boot" menu, set "�1st Boot Device" to USB DVD drive, press save changes and exit BIOS.
Windows XP Professional Setup Welcome to Setup. This portion of the Setup program prepares Microsoft(R) Windows(R) XP to run on your computer. ● To set up Windows XP now, press ENTER. ● To repair a Windows XP installation using Recovery Console, press R. ● To quit Setup without installing Windows XP, press F3. ENTER=Continue R=Repair F3=Quit 3. Press to continue the installation and p������ ress to agree the Licensing Agreement. Windows will display the partition of your system.
2-2 Install drivers in new Windows XP 2 1. After installing Windows XP, you have to install necessary drivers before using the Netbook. Insert the Netbook driver CD to the USB DVD drive, waiting for a few seconds, the main menu will be displayed on your Netbook screen. 2. Clicking ������������������������������������������������������������������������������������������ these options to install all the drivers for your system.
Netbook Install Windows 7 in Netbook ■ Install a new Windows 7 system ■ Install drivers in a new Windows 7 3
Make sure you have these ready: 3 1. An USB DVD drive. 2. A Netbook driver CD. 3. Windows 7 Install CD. Before we continue : ■ Shut down your computer. ■ Connect the USB DVD drive to an USB port of Netbook and connect the power cord to AC power. 3-1 Install a new Windows 7 system 1. Power on your Netbook, then press to enter BIOS setup during POST. Select and go to the “Boot” menu, set the “1st Boot Device” to USB DVD drive, press to save change and exit BIOS.
6. It then asks you to select the installation type. Click “Custom (advanced)” to install a new copy of Windows. 3 7. The setup will display the hard disk partitions (160GB, in this example) of your system. If there were other systems (such as Linux) installed previously, you need select them and click “Drive options (advanced)” -> “Delete” to delete them. When all partitions are clean, setup will display the biggest size of your hard drive. 8.
3 To ensure that all Windows features work correctly, Windows might create additional partitions for system files. So you will see a 100MB partition reserved by system after you create a partition. Select the 70GB partition and click “Next” to continue. 9. From this step we start to install Windows 7 into your hard disk. During the process, your computer will restart several times.
3 10. When the installation is complete, setup will prepare your computer for the first use. Then you can follow steps to select system settings, create an account, set a password...etc, until the whole process is complete and enter Windows 7 system.
3-2 Install Drivers in Windows 7 1. When the Windows 7 is completely installed, you have to install the necessary drivers before using the Netbook. Take out the Windows 7 Install CD from the USB DVD 3 drive, and put the driver CD inside. Waiting for a few seconds, the main menu will be displayed on the screen. 2. Use these options to install all the drivers for your system. You must click "Intel Chipset Driver" to install it first.
Netbook Recovery of Windows XP/ Windows 7 System 4
4 1. Power on the computer, when the message "Press F3 to Rescue and Recovery" appears on the top of the screen, press "F3" to enter the recovery interface. 2. System prepares for the recovery after pressing "F3" key.
3. Recovery begins after clicking "Start" in the following image. 4 4. When the following image appears, click "OK" to continue.
4 5. Recovery is accomplished when the following image appears, click "OK" to finish it. 6. Now, click "Restart" to reboot the system.
Netbook Introduction to Linux System ■ ■ Overview Recovery of Linux system 5
5-1 Overview FoxMC stands for Fox Media Center, it incorporates the functions of internet surfing, entertainment, office work, document management and various system settings on one desktop. With its dynamic user interface, simple desktop style, wealth of application software, clear system management and complete hardware support, FoxMC can easily meet the requirements of being the operation system of your office computer, home entertainment center, gaming console, educational instrument and mobile devices.
Help Click "?" to open the online help page. Please refer to the content of the page about detailed description of the system. Shutdown Open the menu to choose the action to the system. When you click home screen, the shutdown menu will appear as below: Hibernate icon Suspend icon Shutdown icon Reboot icon Open favorites icon Eject/load drive icon Panel The panel auto hides in the default status. When the mouse moves to the bottom of the home screen, the panel will appear as below.
5-2 Recovery of Linux system I From DVD to recover system CA UT IO N 5 1 Boot from DVD Power on the computer, insert the system Installation DVD into the DVD drive, press "ESC" to select booting system from the DVD drive. 2 Select the way of Installation When the figure as below shows, select "Install and make recovery partition", the system will be installed and a recovery partition will be made.
4 Installing system Click "Next" to format hard disk and install system. The figure is shown as below: 5 5 After installing, click "Reboot" to restart the system.
5 II From hard disk to recover system 1 When you log in, according to the screen suggestion, press any key to enter Grub interface, the figure is shown as below: 2 Select "FoxMC recovery" item and then press "Enter", the warning box is shown below: 3 Select "Next", system warns the root partition(hd0, 0) will be formatted.
4 Click "Next" to format partition(hd0,0) and recover system from hard disk. The figure is shown as below: 5 5 When the process is completed, please reboot the system.
Netbook Appendix ■ ■ Appendix Product Specification Netbook FAQ
Product Specification CPU ● Intel® Atom™ N450* 1.66 GHz FSB 553 ● Intel��������������������������� �������������������������������� ®�������������������������� Atom��������������������� ™�������������������� N470* 1.83 GHz FSB ��� 667 *: The CPU type depends on model you purchase, please refer to the physical product.
Appendix Microphone ● Internal ����������������������������������� Microphone, 2200ohm, 114dB AC Adapter ● 19V, �������� 40W EC ● ITE �������� 8502 I/O Ports ●3 ���������������� x USB 2.
Netbook FAQ 39 Appendix 1. A: Does the HDD shock-proof designed? B: Yes, it does. 2. A: Can I expand the RAM stick? B: It depends on your products specification, if you get one with 1GB, you can expand it up to 2GB. 3. A: Could the VGA share memory be adjusted in BIOS? B: No, it couldn’t. 4. A: Could Windows Vista be installed properly? B: Not Vista ready. 5. A: How long the battery could be used after complete charge? B: About 2-3 hours normally, according to netbook loading. 6.
Appendix 13. A: What to do when I forget the BIOS or Linux password? B: Please contact with local service center to resolve the problem. 14. A: How to get Windows XP/ Windows 7 driver? B: From DVD with your Netbook. 15. A: How to view system configuration in Windows XP������������ / Windows 7� ? B: Please click “Computer” in desktop or use “CPU-Z” and other system tool softwares. 16. A: The problem is that wireless LAN card does not distribute IP address.