MAF-001001
Table of Contents REGULATORY INFORMATION ................................................................... 2 RECYCLING INFORMATION ....................................................................... 4 SAFETY NOTICE ........................................................................................... 5 PRECAUTIONS ......................................................................................... 5 SPECIAL NOTES ON LCD MONITORS ................................................... 6 PREFACE .
REGULATORY INFORMATION Before operating the monitor, please read this manual thoroughly. This manual should be retained for future reference. FCC Class B Radio Frequency Interference Statement This equipment has been tested and found to comply with the limits for a Class B digital device, pursuant to Part 15 of the FCC Rules. These limits are designed to provide reasonable protection against harmful interference in a residential installation.
TCO'03 ( TCO'03 applied model only ) Congratulations! The display you have just purchased carries the TCO’03 Displays label. This means that your display is designed, manufactured and tested according to some of the strictest quality and environmental requirements in the world. This makes for a high performance product, designed with the user in focus that also minimizes the impact on our natural environment.
RECYCLING INFORMATION HANNspree Inc. cares about environmental protection strategies and in using manufacturing methods and treatments that lend themselves to conservation and recycling devices at the end-of-life. Our products, whenever possible, contain recyclable materials which can be recycled into new devices. When necessary for operation, other materials may be classified as hazardous or poisonous substances. We strongly encourage you to research the provided information about recycling this device.
SAFETY NOTICE 1. Changes or modifications not expressly approved by the party responsible for compliance could void the user's authority to operate the equipment. 2. Shielded interface cables and AC power cord, if any, must be used in order to comply with the emission limits. 3. The manufacturer is not responsible for any radio or TV interference caused by unauthorized modification to this equipment. It is the responsibilities of the user to correct such interference.
SPECIAL NOTES ON LCD MONITORS The following symptoms are normal with LCD monitor and do not indicate a problem. Due to the nature of the fluorescent light, the screen may flicker during initial use. Turn off the Power Switch and then turn it on again to make sure the flicker disappears. You may find slightly uneven brightness on the screen depending on the desktop pattern you use. The LCD screen has effective pixels of 99.99% or more. It may include blemishes of 0.
PREFACE Thank you for purchasing a Hannspree Liquid Crystal Display Monitor (LCD Monitor). Please carefully read this manual in its entirety before setting up, using or operating your Monitor. To ensure the safe and correct installation and operations of the Monitor, it is important that the safety and operation instructions in this manual are followed. This instruction manual is designed to assist you in setting up and using the Monitor.
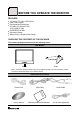
BEFORE YOU OPERATE THE MONITOR FEATURES 19” screen TFT Color LCD Monitor Crisp, Clear Display Recommended Resolutions: 19" Wide (16:10)1440 X 900 19"(5:4)1280 X 1024 EPA ENERGY STAR® Ergonomic Design Space Saving, Compact Case Design CHECKING THE CONTENTS OF THE PACKAGE The product package should include the following items: LCD Monitor Screen Base Note : The screen and base design may vary on different models. For more information, please refer to the Quick Start Guide of your Monitor model.
POWER POWER SOURCE: 1. Make sure that the power cord is the correct type required in your area. 2. This LCD monitor has an Internal universal power supply that allows operation in either 100/120V AC or 220/240V AC voltage area (No user adjustment is required.) 3. Plug one end of the AC-power cord into the LCD monitor's AC input socket and the other into a surge protection power strip or device.
CONTROLS AND CONNECTORS CABLE CONNECTIONS: Turn off your computer before performing the procedure below. 1. Connect one end of the 15-pin D-Sub cable to the back of the monitor and connect the other end to the computer’s D-Sub port. -or2. Connect one end of a 24-pin DVI-D to the back of the monitor. Connect the other end to the computer's DVI-D port. note: This monitor is capable of operating in 'Dual input' mode.
ADJUSTING THE VIEWING ANGLE For optimal viewing it is recommended to look at the full face of the monitor, then adjust the monitor’s angle to your own preference. Hold the stand so you do not topple the monitor when you change the monitor’s angle. You are able to adjust the monitor’s angle at 20 alternative from -5 to 15 or 0 to 20 . For more information, please refer to the Quick Start Guide of your Monitor model. Figure.3.
OPERATING INSTRUCTIONS GENERAL INSTRUCTIONS Press the power button to turn the monitor on or off. The other control buttons are located at front panel of the monitor (See Figure 4). By changing these settings, the picture can be adjusted to your personal preferences. The power cord should be connected. Connect the Signal cable from the monitor to the computer. Press the power button to turn on the monitor. The LED will turn green. 5 4 3 6 2 1 Figure.4. External Control Button EXTERNAL CONTROLS: 1. 3.
FRONT PANEL CONTROL Power Button: Press this button to switch the monitor on and off. Power Indicator (LED): Green — Power On mode. Orange — Power saving mode MENU / ENTER: 1. Activate the OSD menu or adjust the function settings and confirmation. 2. Exit OSD menu when in volume OSD status. VOL - / VOL + : 1. Activates the volume control when the OSD is OFF. 2. Navigate through adjustment icons when OSD is ON or adjust a function when function is activated.
HOW TO ADJUST A SETTING OSD Diagram OSD Description Brightness adjustment: Select the ψ Brightness ω option on the ψ Main Menu ω . Press enter and adjust the level. Contrast adjustment: Select the ψContrastωoption on theψMain Menuω. Press enter and adjust the level. How to adjust screen position and quality: Select ψImage Settingωon the ψMain Menuω, and then Press enter. Horizontal position adjustment: Select the ψH-positionωoption to shift the screen image to the left or right.
OSD Diagram OSD Description Clock adjustment: Select the ψClock Adjustmentωoption to reduce the vertical flicker of characters on the screen. Press enter and adjust the level. Phase adjustment: Select the ψPhase Adjustmentωoption to reduce the horizontal flicker of characters on the screen. Press enter and adjust the level. How to adjust color: Select the ψColor Settingωoption on the ψMain Menuω, and then Press enter. Move the cursor to one of the preset options and select it.
OSD Diagram OSD Description How to set the OSD: Select ψOSD Settingωon the ψMain Menuω, and then Press enter. OSD horizontal adjustment: Select the ψOSD H-Positionωoption to adjust the horizontal position of the OSD. Press enter and adjust the level. OSD vertical position adjustment: Select the ψOSD V-Positionωoption to adjust the vertical position of the OSD. Press enter and adjust the level. OSD timer setting: Select the ψOSD Time-outωoption to set the OSD time out from 10 to 120 seconds.
OSD Diagram OSD Description OSD color setting: Select the ψOSD Colorωsetting option to adjust the color of the OSD. Press enter and adjust the level. Language: Select the ψLanguageω option to change the language of the OSD. Press enter and select a language. (Please note the diagram is for reference only. The OSD Language options may vary by model and region.) Volume adjustment: Select the ψVolumeωoption to change the volume level. Press enter and adjust the level.
OSD Diagram OSD Description Recall the factory settings: Select theψFactory Presetωoption to reset to the monitor’s default setting. This will erase the current settings. Press enter and select On or Off. Input Setting: Select theψInput Settingωoption to change between the analog (D-Sub) or Digital (DVI) source. Press enter and select Analog or Digital. PLUG AND PLAY ( Plug & Play DDC2B Feature ) This monitor is equipped with VESA DDC2B capabilities according to the VESA DDC STANDARD.
TECHNICAL SUPPORT (FAQ) Q & A FOR GENERAL DEFECTS PROBLEM & QUESTION POSSIBLE SOLUTION Power LED is not on *Check the power cord. No Plug & Play or screen image is stretch or seems out of proportion *Check if the PC system is Plug & Play compatible. *Check if the Video Card is Plug & Play compatible. *Check if the D-15 plug pin of Video Cable is bent or broken. Picture is dim, too bright or fuzzy *Adjust the Clock, Phase or Contrast and Brightness Controls.
ERROR MESSAGE & POSSIBLE SOLUTION CABLE NOT CONNECTED : 1. Check whether the signal-cable is properly connected. If the connector is loose, tighten the connector screws. 2. Check the signal-cable’s connection pins for damage. INPUT NOT SUPPORT : Your computer has been set to an unsuitable display mode.
APPENDIX SPECIFICATIONS LCD Panel Input 19"(16:10) Display size Pixel pitch 0.2835(H) x 0.2835(V) Video R,G,B Analog Interface Digital (Dual-Input Model) H/V TTL H-Frequency 31KHz – 80KHz V-Frequency 56 – 75Hz Display Colors 16.2M Colors Dot Clock 135MHz Max. Resolution 1440 x 900 VESA DDC2B Plug & Play EPA ENERGY STAR® 19"(5:4) ON Mode İ36W OFF Mode İ1W 0.294(H) x 0.294(V) 1280 x1024 TM Audio maximum power output 1.
CONNECTOR PIN ASSIGNMENT 15 - Pin Color Display Signal Cable: PIN NO. 1. 2. 3. 4. 5. 6. 7. 8. DESCRIPTION Red Green Blue Ground Ground R-Ground G-Ground B-Ground 1 5 6 10 11 15 PIN NO. 9. 10. 11. 12. 13. 14. 15. DESCRIPTION +5V Cable Detection Ground DDC-Serial Data H-Sync V-Sync DDC-Serial Clock 24 - Pin Color Display Signal Cable: (Dual Input Mode) PIN NO. 1. 2. 3. 4. 5. 6. 7. 8. 9. 10. 11. 12.