All-In-One PC SN22A1 series User’s Manual S_SN22A1_UM_EUR_V01_P
Table of Contents Overview of your documentation....................................................................... 4 Document type............................................................................................ 4 Printed documentation ..................................................................... 4 Non-printed documentation.............................................................. 4 Servicing ........................................................................................
Using the PC ...................................................................................................... 21 Connecting to the Internet ........................................................................ 21 Connecting to a wired network....................................................... 21 Connecting to a wireless network (for select models).................... 22 Using the webcam ....................................................................................
Exit menu ....................................................................................... 46 Troubleshooting ................................................................................................ 47 Frequently asked questions (FAQ) ........................................................... 47 Power problems ............................................................................. 47 Internet access problems...............................................................
Overview of your documentation Document type Your documentation contains printed information and PDF user manuals to help you perform various tasks. Printed documentation • Quick Start Guide provides information about setting up your computer. Non-printed documentation • User Manual provides information about using your computer, cleaning and maintaining the monitor and the accessories, and the common solutions to the problems you may encounter while using your computer.
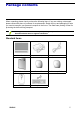
Package contents When unpacking please check you have the following items. If any are missing or damaged, please contact the place of purchase for a replacement. Retain the box and packaging in case you need to transport your personal computer in the future. The fitted foam packing is ideal for protecting the device during transport. The appearance and contents of your package may be different from those illustrated below due to regional variations.
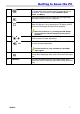
Getting to know the PC Touring the PC This section describes the views and the features of the controls, ports, buttons, components, and connectors of your computer. Front view No. 1 Item Built-in microphone 2 Webcam 3 Touch-enabled widescreen (for select models) 4 SN22A1 Description The built-in microphone receives sounds and voices when used with the built-in webcam. The built-in camera allows you to capture still images, record videos, and have video chats.
Getting to know the PC 5 Picture mode switch. Press the key continually to select the mode which best suits the type of images shown on the screen. These modes include Standard, Sport, Photo, and Movie. Input signal switch. Press to select the input signal that may have connected to your computer. 6 7 LCD display switch. Press to turn on or turn off the display. When the system is on, pressing the LCD display control will turn off the display and the built-in speakers.
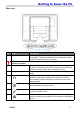
Getting to know the PC Rear view No. 1 Item Vents Description The design of the vents is to prevent the computer from overheating. The internal fans blow hot air away from heatsensitive components in the computer. Keep the vents clean and free of dirt and dust, as blocking it may cause serious thermal problems. 2 Rear panel cover 3 Computer stand 4 5 The hard drive and the memory module slots are located under the rear panel cover.
Getting to know the PC 8 USB ports. Insert the USB plugs into the USB ports to connect your USB devices, such as MP3 players, digital cameras, keyboard and mouse, or external hard disk drives, etc. DC IN port. Connect the power cord to this port to power the computer. 9 10 11 HDMI 12 SN22A1 15-pin D-Sub input jack. Use a 15-pin D-Sub cable to connect other devices with D-Sub output port, such as notebooks, or game consoles, etc. HDMI input port.
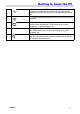
Getting to know the PC Right-side view No. 1 2 Item Media card reader USB ports SN22A1 Description Insert your memory card into this media card reader to access photos, audio and video files, or other data stored in the memory cards.
Getting to know the PC Left-side view No. 1 2 Item CD/DVD drive Eject button Description Press the Eject button and insert a CD/DVD into this drive to play your CD’s collections, DVD movies, or access the data burned onto the discs. To record a CD or DVD, press the Eject button to insert a recordable CD or DVD into this drive and burn the data with CD/ DVD recording applications installed on your system. Press to open the disc tray.
Getting to know the PC 3. Mute key: Press to mute the volume. 4. Volume down key: Press to decrease the volume level. 5. Volume up key: Press to increase the volume level. 6. Numeric keypad: Use the numeric keypad to enter numbers and do calculations. Pressing will activate or inactivate the numeric keypad. 7. Cursor control keys (left, right, up, down): Use these directional keys to move the mouse pointer to the desired location. 8.
Getting to know the PC Overview of the wired mouse (front view) 1. Left button: single-click or double-click to select items. To drag and drop items, click on the items and hold the left button, then drag them to the desired destination before releasing the button. 2. Central wheel: Rotate the wheel to scroll up and down a page. 3. Right button: Single-click to open a menu of the selected item. Indicator lights The table below describes the status that LED indicators present.
Setting up the PC This section describes how to set up your computer and make adjustments to the monitor.
Setting up the PC Your computer is stable through a 45-degree range of motion, from upright 10° to 55° (leaning back). As you pull the display forward, the stand will maintain the adjusted angle. Now you are ready to access some ports on the rear panel of the computer to make cable connections.
Setting up the PC Connecting the power The illustrations may differ from product supplied for your region. 1. Connect the power cable to the supplied power adapter. 2. Connect the power plug to the power jack on the rear panel of the monitor. 3. Connect the power adapter to a nearby power outlet. Do not plug in or turn on the power to the computer until instructed to do so. Connecting the wired keyboard and mouse The complete computer installation includes the setup of the keyboard and mouse.
Setting up the PC 2. Connect the USB cable on the mouse to the other USB port on the rear panel of the computer. • It is recommended that you use the USB ports on the rear panel for devices that usually remain connected, such as keyboards and mouse. • For information about using the keyboard shortcut keys and mouse, see Special keyboard buttons (front view) and Overview of the wired mouse (front view). Customizing the mouse settings You may configure the mouse settings to meet your personal preferences.
Setting up the PC Turning off the PC To turn off the system, close all the active windows, and then click the Start menu at the bottom left corner of your screen, and then click Shut Down on the right side of the open tab. Alternatively, after closing all the active windows, you may press the Power button on the front panel of the computer to turn off the system. Turning off the display To save power, you may press the LCD display switch button to turn off the LCD monitor power when not in use.
Setting up the PC Configuring the display You may press the Auto-adjust button to automatically optimize and adjust the screen settings while displaying video source from the D-sub input jack. Brightness control To adjust the brightness level of the monitor, press the Brightness/Increase button to display the Brightness indicator, and then press the same button to increase the level or press the Volume/Decrease button to decrease the level.
Setting up the PC Volume control To adjust the sound level, press the Volume/Decrease button to display the Volume indicator, and then press the Brightness/Increase button to increase the level or press the Volume/ Decrease button to decrease the level. The Volume function is only available for the HDMI input signal. Picture mode control To display the contents of images in an optimal mode, continuously press the Picture mode button to switch among Standard, Sport, Photo, and Movie.
Using the PC This section describes more tasks your computer can perform, including connecting to the Internet, using the Webcam to communicate with your family and friends, enjoying your digital entertainment from CD and DVD, reading and writing to your memory cards, and taking control of your computer via the touchscreen technology. Connecting to the Internet With the access to the Internet you can browse the Web, send e-mail or exchange instant messages with friends and family.
Using the PC 3. Open the Web browser and access any Web site to test the network connection. Connecting to a wireless network (for select models) Wireless LAN (WLAN) connectivity has limited range, depending upon the equipment being used, the chosen frequency band, radiowave interference, and the physical landscape, including building structure. Circumstances will vary depending upon your particular situation. 1. Make sure you - are located within the wireless network service area.
Using the PC If the selected network requires security authentication, please enter user name and password. 4. If you are able to successfully connect to a wireless network, you will receive a message indicating that the connection has been established. 5. Open the Web browser and access any Web site to test the network connection. To disable WLAN manually, click “Disconnect” from the Wireless Network Connection list. Using the webcam Your computer comes with a built-in 1.
Using the PC Using the optical disc drive Your computer comes with an optical disc drive, which supports music CDs, video CDs and DVD. You can also use it to burn CD-R/CD-RW or DVD+R/DVD-R/DVD+RW/DVD-RW/ DVD-RAM discs. The following tables show which formats are supported by the optical disc drive.
Using the PC 2. Gently pull out the disc tray. 3. With the label side facing forward, place the disc in the center of the disc tray. 4. Gently push the disc tray back into the disc slot. 5. The optical disc drive indicator is on and your computer will start to read the disc you just inserted.
Using the PC Reading a disc 1. Follow the steps in the “Inserting a disc” section. 2. When prompted, choose the desired program to play the inserted disc. If no window appears on the desktop, click “Start”, select “All Programs”, and then select the desired software to play the inserted disc. For more instructions about the selected software, please see its manual or online help. Writing to a disc Ensure that the discs you create do not violate copyright laws. 1.
Using the PC Alternatively, you may click “Start”, select “Computer” to open the Computer window, then right-click the disc drive icon, and select “Eject” from the menu. If the disc tray doesn’t open, please restart your system and repeat the above procedures. 4. Gently push the disc tray back into the disc slot.
Using the PC Your system will automatically detect the inserted memory card and then display the content of the memory card. If no window appears on the desktop, click “Start”, select “Computer” to open the Computer window, then double-click the memory card icon to access the data stored on the memory card. If the Computer window does not show any memory card icon, check if the memory card is inserted in the correct direction.
Using the PC Using the touch screen (for select models) Your computer is equipped with a touch screen which has a high sensitivity level. You can control your PC with the touch of your finger or by using a stylus pen. Your fingertips and stylus pen work as the hand-held mouse pointer. When you control the computer with your fingertips on the screen, the hand-held mouse can work concurrently. When you press LCD display switch button to turn off the LCD monitor, the touch screen is still active.
Using the Peripheral Devices Connecting USB devices Your computer comes with 4 USB ports; two on the side panel and the other on the rear panel. To expand the functionality of your computer, you may connect your USB peripherals, such as digital still camera, digital video camera, printer, floppy disk drive. etc., to the USB ports of your computer. To connect USB peripherals to the USB port, please follow the procedures below. 1. Choose a USB port you wish to use.
Using the Peripheral Devices There is only one direction to make the connection. Incorrect direction will cause damage to the USB device. 4. Your system will automatically detect the connected USB device. You may review the contents of the device in the Windows Explorer. Removing USB devices To avoid data or equipment damage while removing the USB devices from the computer, please always follow the procedures below. 1. Ensure all files or programs accessing the connected USB devices are closed. 2.
Cleaning and care Your computer, keyboard, and mouse need occasional cleaning to prolong their life. Please read this section carefully to ensure proper care of your monitor, keyboard and mouse.
Cleaning and care Storing your computer If you need to store your computer for an extended period of time, unplug your computer from the electric outlet and remove all connected cables before any action is taken. When transporting your computer, we recommend you pack the computer in its original packaging. CDs and DVDs (Recovery DVD and Driver CD) Your computer is shipped with a System Recovery DVD and a Driver CD.
Cleaning and care Keyboard and mouse Cleaning your keyboard and mouse Before starting to clean the keyboard or mouse, unplug the USB cable to disconnect the keyboard from the computer. To properly disconnect the USB cable, see Removing USB devices. 1. For wireless keyboard or mouse only, if your keyboard or mouse has a power button, turn it off. 2. For wireless keyboard or mouse only, remove installed batteries from the battery compartment. 3.
BIOS Setup Utility BIOS Setup Utility is a program for configuring the BIOS (Basic Input/Output System) settings of the computer. BIOS is a layer of software called firmware that translates instructions from other layers of software into instructions that the computer hardware can understand. The BIOS settings are needed by your computer to identify the types of installed devices and establish special features. This chapter tells you how to use the BIOS Setup Utility.
BIOS Setup Utility The BIOS Setup Utility screen can be divided into four areas: Area Descriptions 1 Displays the available menus for your computer.
BIOS Setup Utility Navigating the BIOS setup screen Keyboard information can be found at the bottom of the screen. The following table lists the keys and their corresponding functions: Key(s) Function Launches the General Help screen. Moves between the menus on the title bar. Moves to the previous or next item. Enters the submenu or bring up the Options screen. <+><-> Increases or decrease the values. Leaves the current screen or exit the BIOS setup screen.
BIOS Setup Utility Main menu The Main menu contains the basic configuration settings of the system and shows some system information, such as the BIOS version, CPU type and speed, and the system memory, etc. A brief description of the adjustable menus displays in the Descriptions box below. Menu Descriptions System Time (hour:minute:second) Allows you to set the time of the system. Use , , or + to move between fields, and then press <+> or <-> to change the value.
BIOS Setup Utility Advanced menu The Advanced menu allows you to configure the settings of CPU, I/O (Input/Output) settings, and other system devices. If you are not familiar with the items in the Advanced menu, you are advised to keep the default. A brief description of the adjustable menus displays in the Descriptions box below. Menu Descriptions CPU Configuration Selects to display the information about your CPU.
BIOS Setup Utility APM Configuration Selects to make advanced power management settings. • USB Device Wakeup From S3: Enabling this will allow you to use a USB device to wake up the system. • Restore on AC Power Loss: Sets the system state when an unexpected power outage or shutdown occurs. • Power Off: The system remains off after power is restored. • Power On: The system reboots after the power is restored. • Last State: The system returns to the state at the time the power outage or shutdown occurred.
BIOS Setup Utility Video Function Configuration Selects to control the video memory allocation. • DVMT Mode Select: Sets the allocation method of video memory. • Fixed Mode: A fixed portion of the system memory is reserved as video memory. • DVMT Mode: Video memory is dynamically allocated from system memory depending on demand. • DVMT/FIXED Memory: Specifies the amount of DVMT / FIXED system memory to allocate for video memory.
BIOS Setup Utility Security menu The Security menu allows you to set password in order to safeguard your system against unauthorized use. The first time you enter this menu, the Supervisor Password and User Password fields will display “Not Installed”. You may select Change Supervisor Password and Change User Password to set the passwords. A brief description of the adjustable menus displays in the Descriptions box below.
BIOS Setup Utility Password check • Setup: The password is required when you access the BIOS setup main screen. • Always: The password is required both at boot and when you access the BIOS setup main screen. Do NOT set the BIOS security password without having memorized it or written it down and stored it with your computer warranty documentation.
BIOS Setup Utility Boot menu The Boot menu displays all the bootable devices present on the system. It offers options for setting boot device priority and boot setting configurations. A brief description of the adjustable menus displays in the Descriptions box below. Depending on your computer and installed devices, the menus listed below may vary with those appeared on your menu.
BIOS Setup Utility Hard Disk Drives Specifies the boot device priority sequence from the available hard disks. CD/DVD Drives Specifies the boot device priority sequence from the available CD/DVD drives.
BIOS Setup Utility Exit menu This menu allows you to save or discard the new settings, and load the optimal or failsafe default settings. A brief description of the adjustable menus displays in the Descriptions box below. Menu Descriptions Save Changes and Exit Saves the configurations you have made and exits the BIOS setup screen. The key is the hotkey for this option. Discard Changes and Exit Allows you to exit BIOS setup without saving the settings and restarts the system.
Troubleshooting The section describes situations that you may encounter while using the computer and provides troubleshooting steps. Before you begin troubleshooting, verify the following items: - If you have added or removed a program or a hardware before the problem appeared, make sure that your computer has met all the pre-installation requirements, review if the installation procedures are correct, and check if the program or hardware is properly installed.
Troubleshooting Internet access problems Symptom My computer cannot access a modem or a wireless router or access point. The wireless Internet connection is unstable. Possible solution • Verify that you have performed a correct pre-installation for your Internet connection type. - If you are using a wireless Internet connection, make sure that your computer has installed a wireless LAN card in order to connect with a wireless router or access point.
Troubleshooting Optical discs problems Symptom When a CD or DVD is inserted into the optical disc drive, there is no response. The inserted disc doesn’t slide out when I press the Eject button. I cannot write (burn) a disc (CD or DVD). SN22A1 Possible solution • Check the optical disc drive indicator is on. • Check the inserted disc is not dirty, bent, or damaged. If you need to clean the disc, see Cleaning the discs.
Troubleshooting Display problems Symptom There is nothing visible on the screen. Possible solution • Check the power cable and power adapter are well connected. • Check the Power button indicator. - If the indicator does not light up, your computer is not being supplied power from an external power source via the power adapter. Check the connection between your computer, the power adapter, and the nearby outlet. - If the indicator flashes in blue, your computer has entered Sleep mode.
Troubleshooting Keyboard and mouse problems Symptom Possible solution Keyboard or mouse commands are not recognized by the computer. • If you are using a wired keyboard or mouse, check the cable connection between the unit and your computer. • If you are using a wireless keyboard or mouse, check the following items. - Ensure the USB receiver is properly connected to the computer, and the keyboard or mouse is within its range. - If your keyboard or mouse has a power button, turn it on.
Troubleshooting Sound and microphone problems Symptom I hear noise when connecting a headphone to the computer. I do not hear sound from the built-in speakers. The external microphone does not work. Certain audio files cannot be played, and the Codec error messages appear. SN22A1 Possible solution • Check if the earphone works well. - Connect the earphone to other devices, such as a radio, to see if you can still hear that noise. If the noise persists, the earphone may be out of order.
Troubleshooting Miscellaneous problems Symptom Possible solution Certain video files cannot be played, and the Codec error messages appear. • Check if Windows Media Player is set to automatically download codecs. - Right-click on the menu bar, select Tools from the opened menu, and then click Options. The media card reader cannot read my memory card. - On the Player tab, in the Automatic updates area, select Once a day, and then click Apply and OK to complete the settings.
Specifications: SN22A1 Specifications Model Processor Chipset Operating System Memory Type Memory Capacity Hard Drive Graphics Adapter Display Ports and Connectors Keyboard Media Card Reader Network Wireless Network (for select models) SN22A1 SN22A1 Intel® Pine-View (1.66Ghz, Dual Core) D510 Tiger Point NM10 Microsoft Windows 7 Home Premium SODIMM type, two slots 3GB • One 2.
Specifications Optical Drive (for select models) Web Camera (for select models) Audio 8x super multi-format DVD +/- RW dual layer drive (up to 8.5 GB) • Write Max.: 8x DVD+R, 8x DVD-R, 6x DVD+R DL, 6x DVD-R DL, 8x DVD+RW, 6x DVD-RW, 5x DVD-RAM, 24x CD-R, 24x CD-RW • Read Max.: 8x DVD-ROM, 24x CD-ROM • Slim form factor 1.3 Megapixel Web Cam and digital microphone • • • • Environment Requirements Dimension Net Weight Gross Weight (including adaptor/power cord/keyboard/mouse/bag) Sound System: 5.
Specifications Trademark Notice Hannspree products incorporate High-Definition Multimedia Interface (HDMI™) technology. HDMI, the HDMI logo and High-Definition Multimedia Interface are trademarks or registered trademarks of HDMI Licensing LLC in the United States and other countries.